


(给Python开发者加星标,提升Python技能)
来源:诡途
https://blog.csdn.net/qq_35866846/article/details/105389738
视频资料:https://tv.sohu.com/v/dXMvMzM1OTQyMDI2LzExMzQxMDY1MS5zaHRtbA==.html
视频的内容介绍:一张照片,横着切成若干条,并且没有打乱,随后隔条分成了两份,然后把这两份各自拼接在一起,出现了跟两张原图一模一样的图片,将两张图竖着切成若干条,并且没有打乱,随后隔条分成了四份,出现了四张跟原图一模一样的图片(等比例缩小)
目标:使用Python实现图片切割拼接。
效果:效果如下图所示,证实这个实验是真的,只不过处理后的像素降低。

原理:
Numpy对图像的处理实际上就是对ndarray的处理。图像和ndarray又有什么关系呢?图像是可以用ndarray数组来表示。如图我们可以用plt.imread()读取一张图片的数据,返回的就是这张图片的ndarray数组。通过对ndarray的处理实现图片操作
步骤解析:
【1】图片读取
读取一、PIL库的image
import numpy as np# pip install numpyimport PIL.Image as img# pip install PILdata=np.array(img.open('test.jpg'))读取二、matplotlib库的pyplot
import numpy as np # pip install numpyimport matplotlib.pyplot as plt # pip install matplotlibdata=plt.imread('test.jpg')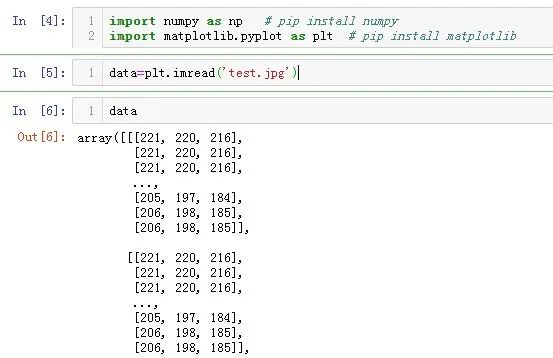
# 查看数组的形状data.shape# (800,800,3), # 第一个800代表图片的像素宽度-纵轴像素,# 第二个800代表图片的像素长度-横轴像素,#3代表RGB通道数,(有些图片格式是3通道,有些图片格式是4通道)【2】图片切割 & 数组拼接
#图像切割——横轴切width=data.shape[1]width0= np.split(data,range(10,width,10),axis=1)width1=width0[::2]width2=width0[1::2]#数组的拼接——1轴|纵轴test1 = np.concatenate(width1,axis=1)test2 = np.concatenate(width2,axis=1)print(test1.shape)plt.imshow(test1)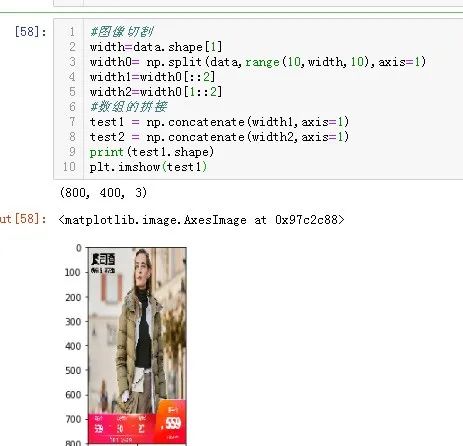
#对切割后的test1再进行纵轴切割length=test1.shape[0]length0= np.split(test1,range(10,length,10),axis=0)#test1 test2的length和原图等长length1=length0[::2]length2=length0[1::2]#数组的拼接——0轴|横轴test3 = np.concatenate(length1,axis=0)test4 = np.concatenate(length2,axis=0)print(test3.shape)plt.imshow(test3)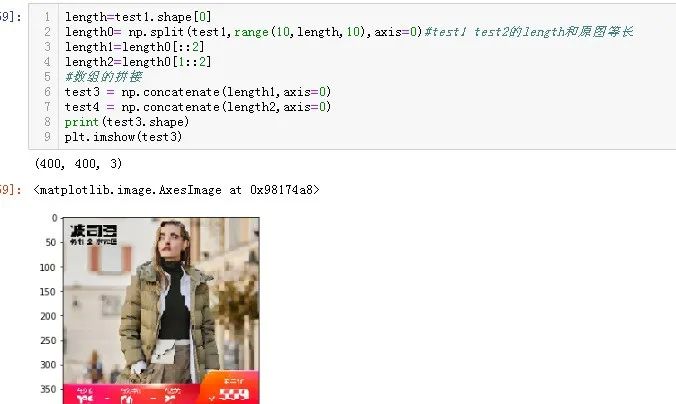
【3】图片保存
保存一、scipy.misc
import scipy.miscscipy.misc.imsave('test3.jpg',test3)保存二、PIL库的image
#imageimg.fromarray(test3).save("test3.jpg")保存三、matplotlib库的pyplot
plt.imsave("test3.jpg",test3)【4】完整代码:
import numpy as np # pip install numpyimport matplotlib.pyplot as plt # pip install matplotlibjpg_path='test.jpg'#n为切割的大小,n越大,像素越小def cut_jpg(jpg_path,n): # 读取图片 data=plt.imread(jpg_path) #图像切割_横轴切 width=data.shape[1] width0= np.split(data,range(n,width+1,n),axis=1)#左闭右开所以+1 width1=width0[::2] width2=width0[1::2] #数组的拼接 test1 = np.concatenate(width1,axis=1) test2 = np.concatenate(width2,axis=1) #图像切割_纵轴切 length=test1.shape[0] #test1 test2的length和原图等长,可以尝试同时切割 length0= np.split(test1,range(n,length+1,n),axis=0)#左闭右开所以+1 length1=length0[::2] length2=length0[1::2] #数组的拼接 test3 = np.concatenate(length1,axis=0) test4 = np.concatenate(length2,axis=0) return test3#返回处理后的数组对象,test1,test2,test3,test4都是一样的,此处返回一组即可test3=cut_jpg(jpg_path,5)#保存图片plt.imsave("test305.jpg",test3)- EOF -
推荐阅读 点击标题可跳转1、Numpy高级操作大全!!!
2、这一招将 Numpy 加速 700 倍!!!
3、70 道 NumPy 测试题
觉得本文对你有帮助?请分享给更多人
关注「Python开发者」加星标,提升Python技能

点赞和在看就是最大的支持❤️


 3079
3079


 被折叠的 条评论
为什么被折叠?
被折叠的 条评论
为什么被折叠?
 到【灌水乐园】发言


