


今天我们就来分享一下如何用MATLAB中的guide框架设计一款简易+科学型的计算器,下次分享基于APP Designer框架的。其实,这款计算器去年这个时候已经做好了,没来得及分享。
简易计算器的一些思想,最早在这里分享过 基于MATLAB程序设计的计算器(上)。
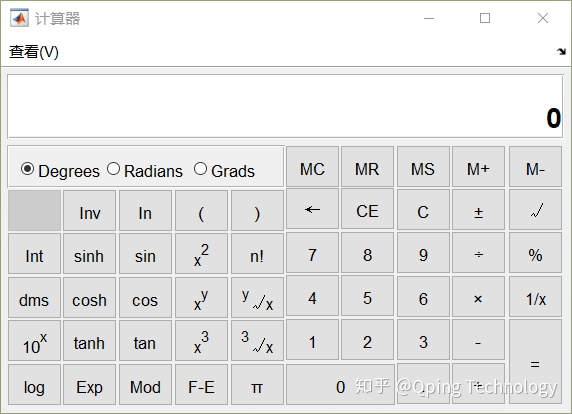
我们用GUI Layout Toolbox布局管理器构建计算器的界面,用MVC设计模式,将界面和逻辑分离,基本的做法就是这样。下图是构建的简易计算器和科学型计算器的界面示意图。
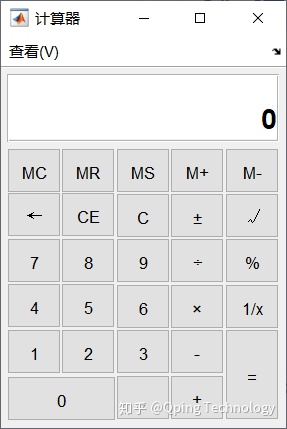
一. 简易型计算器
这是构建科学型计算器的基础,有了它可以将简易计算器的功能集成到科学型计算器,已达到简化的目的。下面我们聊一聊主要的实现过程吧。
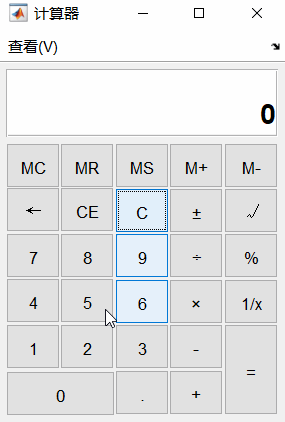
(1)屏幕显示和数字按键
我们每按一个键就会在屏幕上显示当前按下的数字,数字0区别于其他的数字键1~9,定义一个bool类型的变量isInition,初始化为true,对于数字0,如果显示器中的数字是0的话,继续操作还是0,否则末尾追加'0',这时isInition=true,而对于其他按键, 如果是输入的新数值,屏幕显示0,因为输入了新的数值,所以后面的操作是在此基础上进行的,故isInition作为记录新数值的boolean值为false,否则就末尾追加该数字。
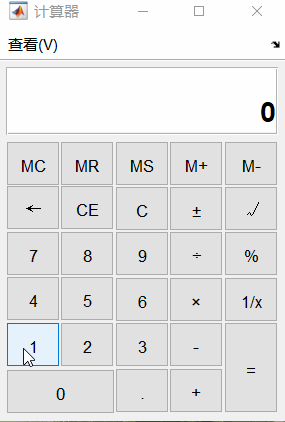
(2)一,二元操作符按键
这个实现容易,屏幕上显示的数值作为第一个运算值,当按键二元操作符(+,-,*,/)后,随后输入的值作为第二个值,再进行数学操作。一元操作符(1/x等)就更简单了,直接对屏幕的数值进行运算,再显示到屏幕上。效果如下:
(3)其它按键
MS: 存储显示屏上的数字到存储器.
MC: 清除存储器内容.
MR: 调用存储器内容.
M+: 把目前显示的值放在存储器中,并与存储器中的数值相加.
M-: 把目前显示的值放在存储器中,并与存储器中的数值相减.
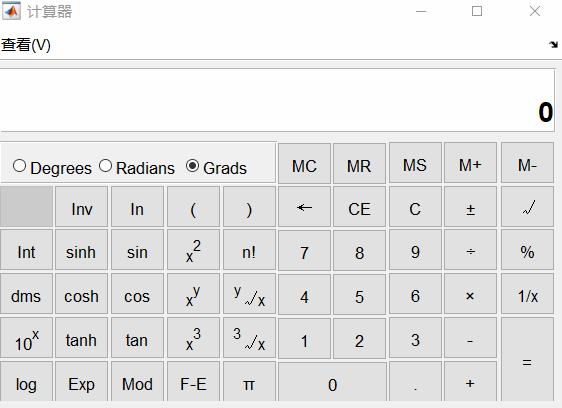
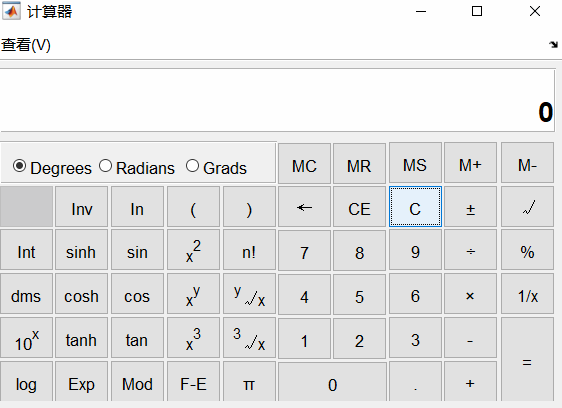
二. 科学型计算器
科学型计算器只是多了一些功能,主要集中在左边部分的一些按钮,右半部分是简易型的。
(1)角度,弧度,百分度,三角和反三角函数
默认情况下是角度制的计算,可以选择弧度和梯度,反三角函数等计算时点击Inv按键,效果如下图所示:

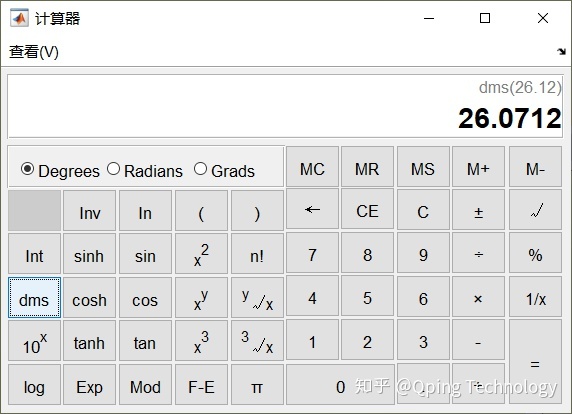
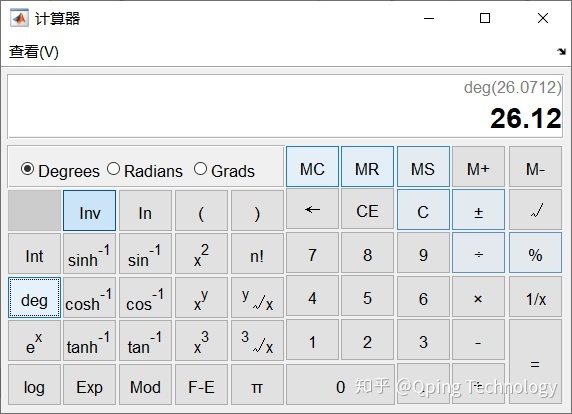
(2)dms/deg
dms表示Degree-Minute-Second,对一个以小数表述的角度用度分秒的形式来表示,比如26.12,用dms表示就是26.0712
deg可以看作是dms的反向计算,即26.0712可以转换成26.12
(3)(, )
括弧可以优先计算,主要的实现思想是按下左括弧后将括弧外边的数值进行存储为第一个数并记录运算符,直到按下右括弧时,将中间值存为第二个值再操作计算, 最后按等号得结果。
(4)其他按键
其他的按键都相对容易,都是一元或者二元操作了。
三. 工具下载
这里提供免安装的exe文件和mlappinstall文件,第二个可以直接双击安装在MATLAB APP—>My APP栏目中,想要下载的朋友可以在后台直接回复 简易计算器 获得下载链接。
这里再分享一下构建简易计算器界面的源码:
- 菜单栏的构建
 classdef MenuBarView < handle
     %MENUBARVIEW is a figure's menu bar view
     %   obj = MenuBarView(thisContainer, vObj, mObj) produces a object of MenuBarView
     %   class, where thisContainer is the main container for it.
     %   vObj is the object of StdCalculatorView class, mObj is the subject
     %   of CalculatorModel class.
     %   Writen by: Poor Prince
     %
     %   See also BasicView, ShowPanelView, StdCalculatorView, SciCalculatorView.
     %   Copyright 2018-2019 The Poor science and technology.
     %
     properties
         stdMenu
         sciMenu
         mObj  % CalculatorModel's object
         cObj  % MenuBarController's object
     end  % end properties

     methods
         function obj = MenuBarView(thisContainer, vObj, mObj)
             lookMenu = uimenu('Parent', thisContainer, 'Label', '查看(V)');
             calculatorMenu = uimenu('Parent', lookMenu, 'Label', '计算器');
             obj.stdMenu = uimenu('Parent', calculatorMenu, 'Label', '标准', 'Checked', 'on');
             obj.sciMenu = uimenu('Parent', calculatorMenu, 'Label', '科学');
             obj.mObj = mObj;
             obj.cObj = obj.makeController(vObj);
             obj.attachToController(obj.cObj);
         end  % end constructor

         function controllerObj = makeController(obj, vObj)
             controllerObj = MenuBarController(vObj, obj.mObj, obj);
         end  % end makeController

         function attachToController(obj, controller)
             set(obj.stdMenu, 'Callback', @controller.stdMenu_callback);
             set(obj.sciMenu, 'Callback', @controller.sciMenu_callback);
         end  % end attachToController

     end  % end methods

end % end classdef- 功能按键区域的构建
 classdef KeyPanelView < handle
     %KEYPANELVIEW is the all key pushbutton for the calculator
     %   obj = KeyPanelView(thisContainer, vObj, mObj) produces a object of KeyPanelView
     %   class, where thisContainer is the main container for it. vObj is the object of StdCalculatorView class, mObj is the subject
     %   of CalculatorModel class.
     %   Writen by: Poor Prince
     %   See also BasicView, ShowPanelView, MenubarView, StdCalculatorView, SciCalculatorView.
     %   Copyright 2018-2019 The Poor science and technology.
     %
     properties
         mcBtn;
         mrBtn;
         msBtn;
         maddBtn;
         msubBtn;
         ceBtn;
         cBtn;
         addorsubBtn;
         leftarrowBtn;
         zerosBtn;
         oneBtn;
         twoBtn;
         threeBtn;
         fourBtn;
         fiveBtn;
         sixBtn;
         sevenBtn;
         eightBtn;
         nineBtn;
         dotBtn;
         addBtn;
         subBtn;
         divBtn;
         mulBtn;
         sqrtBtn;
         modBtn;
         invBtn;
         equalBtn;
         mObj;  % CalculatorModel's object
         cObj;  % KeyPanelController's object
     end  % end properties

     methods

         function obj = KeyPanelView(thisContainer, vObj, mObj)
             obj.buildGUI(thisContainer);
             obj.mObj = mObj;
             obj.cObj = obj.makeController(vObj);
         end  % end constructor

         function controllerObj = makeController(obj, vObj)
             controllerObj = KeyPanelController(vObj, obj.mObj, obj);
         end  % end makeController

         % buildGUI
         function buildGUI(obj, thisContainer)
             % Construct the layout manager
             %
             firstColLay = uiextras.VBox('Parent', thisContainer);
             secondColLay = uiextras.Grid('Parent', thisContainer);
             thirdColLay = uiextras.VBox('Parent', thisContainer);
             set(thisContainer, 'Sizes', [-2, -2, -1]);
             %
             firstColTopLay = uiextras.Grid('Parent', firstColLay);
             firstColBotLay = uiextras.HBox('Parent', firstColLay);
             set(firstColLay, 'Sizes', [-5, -1]);
             %
             %
             % Adds a control to the layout manager
             %
             controlFontsize = 10;
             %
             %------------------------------------------
             %             firstColTopLay
             %------------------------------------------
             % first column
             %
             % MC Key
             obj.mcBtn = uicontrol('Parent', firstColTopLay, 'String', '<html>MC</html>', ...
                 'Fontsize', controlFontsize);
             % ← Key
             obj.leftarrowBtn = uicontrol('Parent', firstColTopLay, 'String', '<html>←</html>', ...
                 'Fontsize', controlFontsize);
             % 7 Key
             obj.sevenBtn = uicontrol('Parent', firstColTopLay, 'String', '<html>7</html>', ...
                 'Fontsize', controlFontsize);
             % 4 Key
             obj.fourBtn = uicontrol('Parent', firstColTopLay, 'String', '<html>4</html>', ...
                 'Fontsize', controlFontsize);
             % 1 Key
             obj.oneBtn = uicontrol('Parent', firstColTopLay, 'String', '<html>1</html>', ...
                 'Fontsize', controlFontsize);
             %
             % second column
             %
             % MR Key
             obj.mrBtn = uicontrol('Parent', firstColTopLay, 'String', '<html>MR</html>', ...
                 'Fontsize', controlFontsize);
             % CE Key
             obj.ceBtn = uicontrol('Parent', firstColTopLay, 'String', '<html>CE</html>', ...
                 'Fontsize', controlFontsize);
             % 8 Key
             obj.eightBtn = uicontrol('Parent', firstColTopLay, 'String', '<html>8</html>', ...
                 'Fontsize', controlFontsize);
             % 5 Key
             obj.fiveBtn = uicontrol('Parent', firstColTopLay, 'String', '<html>5</html>', ...
                 'Fontsize', controlFontsize);
             % 2 Key
             obj.twoBtn = uicontrol('Parent', firstColTopLay, 'String', '<html>2<html>', ...
                 'Fontsize',controlFontsize);
             %
             set(firstColTopLay, 'Rowsizes', [-1, -1, -1, -1, -1]);
             %
             %------------------------------------------
             %             firstColBotLay
             %------------------------------------------
             %
             % 0 Key
             obj.zerosBtn = uicontrol('Parent', firstColBotLay, 'String', '<html>0</html>', ...
                 'Fontsize', controlFontsize);
             %
             %------------------------------------------
             %             secondColLay
             %------------------------------------------
             %
             % first column
             %
             % MS Key
             obj.msBtn = uicontrol('Parent', secondColLay, 'String', '<html>MS<html>', ...
                 'Fontsize', controlFontsize);
             % C Key
             obj.cBtn = uicontrol('Parent', secondColLay, 'String', '<html>C</html>', ...
                 'Fontsize', controlFontsize);
             % 9 Key
             obj.nineBtn = uicontrol('Parent', secondColLay, 'String', '<html>9</html>', ...
                 'Fontsize', controlFontsize);
             % 6 Key
             obj.sixBtn = uicontrol('Parent', secondColLay, 'String', '<html>6</html>', ...
                 'Fontsize', controlFontsize);
             % 3 Key
             obj.threeBtn = uicontrol('Parent', secondColLay, 'String', '<html>3</html>', ...
                 'Fontsize', controlFontsize);
             % . Key
             obj.dotBtn = uicontrol('Parent', secondColLay, 'String', '<html>.</html>', ...
                 'Fontsize', controlFontsize);
             %
             % second column
             %
             % M+ Key
             obj.maddBtn = uicontrol('Parent', secondColLay, 'String', '<html>M+</html>', ...
                 'Fontsize', controlFontsize);
             % ± Key
             obj.addorsubBtn = uicontrol('Parent', secondColLay, 'String', '<html>±</html>', ...
                 'Fontsize', controlFontsize);
             % ÷ Key
             obj.divBtn = uicontrol('Parent', secondColLay, 'String', '<html>÷</html>', ...
                 'Fontsize', controlFontsize);
             % × Key
             obj.mulBtn = uicontrol('Parent', secondColLay, 'String', '<html>×</html>', ...
                 'Fontsize', controlFontsize);
             % - Key
             obj.subBtn = uicontrol('Parent', secondColLay, 'String', '<html>-</html>', ...
                 'Fontsize', controlFontsize);
             % + Key
             obj.addBtn = uicontrol('Parent', secondColLay, 'String', '<html>+</html>', ...
                 'Fontsize', controlFontsize);
             %
             set(secondColLay, 'Rowsizes', [-1, -1, -1, -1, -1, -1]);
             %
             %------------------------------------------
             %             thirdColLay
             %------------------------------------------
             %
             % M- Key
             obj.msubBtn = uicontrol('Parent', thirdColLay, 'String', '<html>M-<html>', ...
                 'Fontsize', controlFontsize);
             % √ Key
             obj.sqrtBtn = uicontrol('Parent', thirdColLay, 'String', '<html>√<html>', ...
                 'Fontsize', controlFontsize);
             % '%' Key
             obj.modBtn = uicontrol('Parent', thirdColLay, 'String', '<html>%</html>', ...
                 'Fontsize', controlFontsize);
             % '1/x' Key
             obj.invBtn = uicontrol('Parent',thirdColLay,'String', '<html>1/x</html>', ...
                 'Fontsize',controlFontsize);
             % = Key
             obj.equalBtn = uicontrol('Parent', thirdColLay, 'String', '<html>=</html>', ...
                 'Fontsize', controlFontsize);
             %
             set(thirdColLay, 'Sizes', [-1, -1, -1, -1, -2]);
             %

         end %end buildGUI

     end  % end methods

end % end classdef- 显示面板的构建
 classdef ShowPanelView < handle
     %SHOWPANELVIEW is the result show for the calculator
     %   obj = ShowPanelView(thisContainer) produces a object of ShowPanelView
     %   class, where thisContainer is the main container for it.
     %   Writen by: Poor Prince
     %   See also BasicView, MenubarView, StdCalculatorView, SciCalculatorView.
     %   Copyright 2018-2019 The Poor science and technology.
     %
     properties
         showText;
         historyText;
     end  % end properties

     methods
         function obj = ShowPanelView(thisContainer)
             showPanel = uipanel(thisContainer);
             mainLayout = uiextras.VBox('Parent', showPanel);
             % historyText
             obj.historyText = uicontrol('Parent', mainLayout, ...
                 'Style', 'text', ...
                 'String', ' ', ...
                 'FontSize', 10, ...
                 'Enable', 'on', ...
                 'HorizontalAlignment', 'right', ...
                 'BackgroundColor', [1, 1, 1], ...
                 'ForegroundColor', [0.5, 0.5, 0.5]);

             % displayer
             obj.showText = uicontrol('Parent', mainLayout, ...
                 'Style', 'text', ...
                 'String', '0', ...
                 'FontSize', 17, ...
                 'FontWeight', 'bold', ...
                 'Enable', 'on', ...
                 'HorizontalAlignment', 'right', ...
                 'BackgroundColor', 'w');

             set(mainLayout, 'Sizes', [-2, -3]);

         end  % end constructor
     end  % end methods

end % end classdef- 基础窗口的构建
 classdef BasicView < handle
     %BASICVIEW  is the base container for calculator
     %   obj = BasicView(figWidth, figHeight) produces a object of BasicView class
     %   Input arguments:
     %   viewsize is the size of GUI
     %   Writen by: Poor Prince
     %   See also CalculatorView StdCalculatorView SciCalculatorView
     %   Copyright 2018-2019 The Poor science and technology.

     properties(Access = public)
         hfig;
         figWidth;
         figHeight;
         showContainer;
         funcContainer;
     end  % end properties

     methods
         % Constructor
         function obj = BasicView(figWidth, figHeight)
             obj.figWidth = figWidth;
             obj.figHeight = figHeight;
             scrSize = get(0, 'ScreenSize');
             cenX = scrSize(3) / 2;
             cenY = scrSize(4) / 2;
             obj.hfig = figure('Menubar', 'none', ...
                 'Numbertitle', 'off', ...
                 'Name','计算器', ...
                 'Resize', 'on', ...
                 'Visible', 'off');
             set(obj.hfig, 'Position', [cenX-115, cenY-140, figWidth, figHeight]);

             thisContainer = uiextras.VBox('Parent', obj.hfig);
             obj.showContainer = uiextras.VBox('Parent', thisContainer);
             obj.funcContainer = uiextras.HBox('Parent', thisContainer);
             set(thisContainer, 'Sizes', [-1, -4], 'Padding', 5, 'Spacing', 5);
             set(obj.hfig, 'Visible', 'on');
         end
     end  % end methods

end % end classdef- 简易计算器的构建
 classdef StdCalculatorView < BasicView
     %StdCalculatorView build GUI of standard form.
     %   obj = StdCalculatorView() produces a object of StdCalculatorView
     %   class, where modelObj is the object of CalculatorModel class
     %   Writen by: Poor Prince
     %
     %   See also SciCalculatorView
     %   Copyright 2018-2019 The Poor science and technology.
     %
     properties
         menubarView
         showpanelView
         keypanelView
         mObj  % the object of the Model class
         stdConObj  % the object of the StdCalculatorController class
     end  % end properties

     methods
         % Constructor
         function obj = StdCalculatorView(mObj)
             figWidth = 230;
             figHeight = 290;
             obj = obj@BasicView(figWidth, figHeight);
             obj.mObj = mObj;
             obj.menubarView = MenuBarView(obj.hfig, obj, obj.mObj);
             obj.showpanelView = ShowPanelView(obj.showContainer);
             obj.keypanelView = KeyPanelView(obj.funcContainer, obj, obj.mObj);
             %obj.attachToController(obj.stdConObj);
         end  % end constructor

     end  % end methods

end % end classdef- 模型类
 classdef CalculatorModel < handle
     %CALCULATORMODEL Model of this calculator
     %   obj = CalculatorModel() produces a object of CalculatorModel class
     %   Writen by: Poor Prince
     %
     %   See also
     %   Copyright 2018-2019 The Poor science and technology.
     %
     %%
end %end classdef- 控制器类
classdef StdCalculatorController < handle
%STDCALCULATORCONTROLLER Controller of this calculator for
% StdCalculatorView
% obj = StdCalculatorController(vObj, mObj) produces a object of StdCalculatorController
% class. where mObj and vObj is the object of CalculatorModel class
% and StdCalculatorView class respectively.
% Writen by: Poor Prince
%
% See also .
% Copyright 2018-2019 The Poor science and technology.
%
properties
vObj; % StdCalculatorView object
mObj; % CalculatorModel object
end
methods
%
function obj = StdCalculatorController(vObj, mObj)
obj.vObj = vObj;
obj.mObj = mObj;
end
end % end methods
end % end classdef
- 主程序
clear;
clc;
close force all;
mObj = CalculatorModel();
StdCalculatorView(mObj);当然,这里主要省略了模型和控制器的代码,提供了一个空盒子,目的仅仅是构建计算器的界面,如果有需要的朋友可以直接在后台回复消息,我们可以交流。
http://weixin.qq.com/r/oy-H39rENYdKrZ6893qx (二维码自动识别)


 被折叠的 条评论
为什么被折叠?
被折叠的 条评论
为什么被折叠?
 到【灌水乐园】发言


