


本文实例讲述了Android控件之TabHost用法。分享给大家供大家参考。具体如下:
以下通过TabHost实现android选项卡。
main.xml布局文件:
android:layout_width="fill_parent"
android:layout_height="fill_parent">
android:layout_width="fill_parent"
android:layout_height="fill_parent"
android:gravity="center_horizontal"
android:orientation="vertical">
android:scaleType="fitXY"
android:layout_gravity="center"
android:layout_width="wrap_content"
android:layout_height="wrap_content"
android:src="@drawable/andy"/>
android:layout_width="wrap_content"
android:layout_height="wrap_content"
android:textSize="24dip"
android:text="Android的创造者: Andy Rubin"/>
android:layout_width="fill_parent"
android:layout_height="fill_parent"
android:gravity="center_horizontal"
android:orientation="vertical">
android:scaleType="fitXY"
android:layout_gravity="center"
android:layout_width="wrap_content"
android:layout_height="wrap_content"
android:src="@drawable/bill"/>
android:layout_width="wrap_content"
android:layout_height="wrap_content"
android:textSize="24dip"
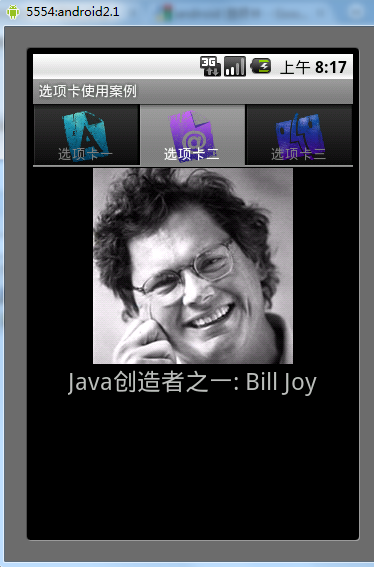
android:text="Java创造者之一: Bill Joy"/>
android:layout_width="fill_parent"
android:layout_height="fill_parent"
android:gravity="center_horizontal"
android:orientation="vertical">
android:scaleType="fitXY"
android:layout_gravity="center"
android:layout_width="wrap_content"
android:layout_height="wrap_content"
android:src="@drawable/torvalds"/>
android:layout_width="wrap_content"
android:layout_height="wrap_content"
android:textSize="24dip"
android:text="Linux之父: Linus Torvalds"/>
TabHostActivity类:
package com.ljq.activity;
import android.app.TabActivity;
import android.os.Bundle;
import android.view.LayoutInflater;
import android.widget.TabHost;
public class TabHostActivity extends TabActivity{
private TabHost tab=null;
@Override
public void onCreate(Bundle savedInstanceState) {
super.onCreate(savedInstanceState);
tab=this.getTabHost();
LayoutInflater.from(this).inflate(R.layout.main, tab.getTabContentView(), true);
tab.addTab(tab.newTabSpec("选项卡一").setIndicator("选项卡一",
getResources().getDrawable(R.drawable.png1)).setContent(R.id.tab01));
tab.addTab(tab.newTabSpec("选项卡二").setIndicator("选项卡二",
getResources().getDrawable(R.drawable.png2)).setContent(R.id.tab02));
tab.addTab(tab.newTabSpec("选项卡三").setIndicator("选项卡三",
getResources().getDrawable(R.drawable.png3)).setContent(R.id.tab03));
}
}
运行结果:
希望本文所述对大家的Android程序设计有所帮助。


 7615
7615


 被折叠的 条评论
为什么被折叠?
被折叠的 条评论
为什么被折叠?
 到【灌水乐园】发言


