


前言
大家都知道在Android中,自定义控件是一个非常重要的知识点,而自定义控件对Android开发者是一个难点,考验开发人员对View原理的理解,对于继承View的自定义控件,一般都需要重写onDraw方法,而且往往需要开发人员能够掌握Paint这个类。
简介
The Paint class holds the style and color information about how to draw geometries, text and bitmaps.
Paint:该类保存了绘制几何图形、文本和位图的样式和颜色信息。也就是说我们可以使用Paint保存的样式和颜色,来绘制图形、文本和bitmap,这就是Paint的强大之处。接下来我们使用Paint来绘图,并且看看该类有哪些样式和颜色。
Paint的使用
使用Paint之前需要初始化
mPaint = new Paint();
设置笔(Paint)的颜色和alpha值:
mPaint.setColor(Color.BLUE);
mPaint.setAlpha(255);
注意:alpha的范围是[0..255],而不是[0..1],是一个int值。
设置画笔的样式:通过mPaint.setStyle()来设置样式。
public enum Style {
/**
* Geometry and text drawn with this style will be filled, ignoring all
* stroke-related settings in the paint.
*/
FILL (0),
/**
* Geometry and text drawn with this style will be stroked, respecting
* the stroke-related fields on the paint.
*/
STROKE (1),
/**
* Geometry and text drawn with this style will be both filled and
* stroked at the same time, respecting the stroke-related fields on
* the paint. This mode can give unexpected results if the geometry
* is oriented counter-clockwise. This restriction does not apply to
* either FILL or STROKE.
*/
FILL_AND_STROKE (2);
Style(int nativeInt) {
this.nativeInt = nativeInt;
}
final int nativeInt;
}
总共有三种画笔的样式
FILL:填充内容;
STROKE:描边;
FILL_AND_STROKE:填充内容并描边。
设置画笔的宽度
mPaint.setStrokeWidth(50);
设置画笔的线帽
通过mPaint.setStrokeCap来设置线帽,总共有三种线帽
/**
* The Cap specifies the treatment for the beginning and ending of
* stroked lines and paths. The default is BUTT.
*/
public enum Cap {
/**
* The stroke ends with the path, and does not project beyond it.
*/
BUTT (0),
/**
* The stroke projects out as a semicircle, with the center at the
* end of the path.
*/
ROUND (1),
/**
* The stroke projects out as a square, with the center at the end
* of the path.
*/
SQUARE (2);
private Cap(int nativeInt) {
this.nativeInt = nativeInt;
}
final int nativeInt;
}
BUTT:没有线帽,默认模式
ROUND:圆形
SQUARE:方形
三种线帽对比:
@Override
protected void onDraw(Canvas canvas) {
super.onDraw(canvas);
mPaint.setColor(Color.BLUE);
mPaint.setAlpha(255);
//设置画笔的样式
mPaint.setStyle(Paint.Style.FILL_AND_STROKE);
//画笔的宽度
mPaint.setStrokeWidth(50);
mPaint.setStrokeCap(Paint.Cap.SQUARE);//方形
mPaint.setStrokeJoin(Paint.Join.BEVEL);//直线
Path path = new Path();
path.moveTo(100, 100);
path.lineTo(300, 100);
canvas.drawPath(path, mPaint);
mPaint.reset();//重置
mPaint.setColor(Color.RED);
mPaint.setStyle(Paint.Style.FILL_AND_STROKE);
mPaint.setStrokeWidth(50);
mPaint.setStrokeCap(Paint.Cap.ROUND);//圆形
mPaint.setStrokeJoin(Paint.Join.BEVEL);//直线
Path path1 = new Path();
path1.moveTo(100, 200);
path1.lineTo(300, 200);
canvas.drawPath(path1, mPaint);
mPaint.reset();//重置
mPaint.setColor(Color.GREEN);
mPaint.setStyle(Paint.Style.FILL_AND_STROKE);
mPaint.setStrokeWidth(50);
mPaint.setStrokeCap(Paint.Cap.BUTT);//没有
mPaint.setStrokeJoin(Paint.Join.BEVEL);//直线
Path path2 = new Path();
path2.moveTo(100, 300);
path2.lineTo(300, 300);
canvas.drawPath(path2, mPaint);
}
上面代码中有个重置画笔,这时候需要重新设置画笔。
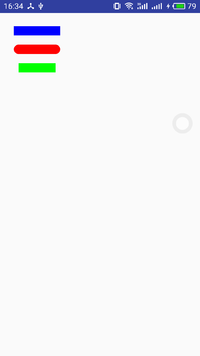
线帽对比
设置Join
使用setStrokeJoin方法来设置Join,Join有三种类型:
BEVEL:直线
ROUND:圆角
MITER:锐角
@Override
protected void onDraw(Canvas canvas) {
super.onDraw(canvas);
mPaint.setColor(Color.BLUE);
mPaint.setAlpha(255);
mPaint.setStyle(Paint.Style.STROKE);//设置画笔的样式
mPaint.setStrokeWidth(50);//画笔的宽度
mPaint.setStrokeCap(Paint.Cap.BUTT);//线帽
mPaint.setStrokeJoin(Paint.Join.BEVEL);
Path path = new Path();
path.moveTo(100, 100);
path.lineTo(300, 100);
path.lineTo(100, 300);
path.close();
canvas.drawPath(path, mPaint);
mPaint.reset();//重置
mPaint.setColor(Color.RED);
mPaint.setStyle(Paint.Style.FILL_AND_STROKE);
mPaint.setStrokeWidth(50);
mPaint.setStrokeCap(Paint.Cap.BUTT);//圆形
mPaint.setStrokeJoin(Paint.Join.ROUND);//圆弧
Path path1 = new Path();
path1.moveTo(100, 400);
path1.lineTo(300, 400);
path1.lineTo(100, 700);
path1.close();
canvas.drawPath(path1, mPaint);
mPaint.reset();//重置
mPaint.setColor(Color.GREEN);
mPaint.setStyle(Paint.Style.FILL_AND_STROKE);
mPaint.setStrokeWidth(50);
mPaint.setStrokeCap(Paint.Cap.BUTT);//没有
mPaint.setStrokeJoin(Paint.Join.MITER);//锐角
Path path2 = new Path();
path2.moveTo(100, 800);
path2.lineTo(300, 800);
path2.lineTo(100, 1100);
path2.close();
canvas.drawPath(path2, mPaint);
}
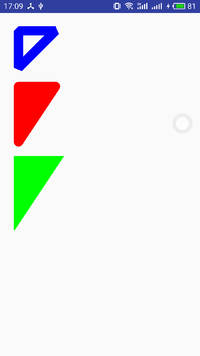
Join对比
以上就是Join三种类型对比。
设置防锯齿
mPaint.setAntiAlias(true);
如果设置防锯齿,会损失一定的性能
抖动处理
使用mPaint.setDither()方法,设置是否使用图像抖动处理。会使绘制的图片等颜色更加的清晰以及饱满,也是损失性能。
使用Path绘制图形
Path绘制图形
点组成线,线组成面,这样Path可以绘制各种各样的图形,可以说是无所不能的了,但是Path也提供了很多方法,来绘制图形。
文本绘制
上文中,介绍了Paint画笔,和绘制了一些图形。但是介绍Paint的时候,我们知道它可以绘制图形,文本和bitmap,所以Paint是非常强大的了,我们看下Paint是如何绘制文本的。
设置字符之间的间距
setLetterSpacing
设置文本删除线
mPaint.setStrikeThruText(true);
是否设置下划线
mPaint.setUnderlineText(true);
设置文本大小
mPaint.setTextSize(textSize);
设置字体类型
mPaint.setTypeface(Typeface.BOLD);
// Style
public static final int NORMAL = 0;//常规
public static final int BOLD = 1;//粗体
public static final int ITALIC = 2; //斜体
public static final int BOLD_ITALIC = 3;//粗斜体
字体类型有以上四种类型可以设置。
加载自定义字体
Typeface.create(familyName, style)
文字倾斜
mPaint.setTextSkewX(-0.25f);
文字倾斜默认为0,官方推荐的-0.25f是斜体
文本对齐方式
mPaint.setTextAlign(Align.LEFT)
有三种:
public enum Align {
/**
* The text is drawn to the right of the x,y origin
*/
LEFT (0),//左对齐
/**
* The text is drawn centered horizontally on the x,y origin
*/
CENTER (1),//居中
/**
* The text is drawn to the left of the x,y origin
*/
RIGHT (2);//右对齐
private Align(int nativeInt) {
this.nativeInt = nativeInt;
}
final int nativeInt;
}
计算制定长度的字符串
int breadText = mPaint.breakText(text, measureForwards, maxWidth, measuredWidth)
注意:字符长度、字符个数、显示的时候是真实的长度
Rect bounds获取文本的矩形区域(宽高)
mPaint.getTextBounds(text, index, count, bounds)
mPaint.getTextBounds(text, start, end, bounds)
//获取文本的宽度,和上面类似,但是是一个比较粗略的结果
float measureText = mPaint.measureText(str);
//获取文本的宽度,和上面类似,但是是比较精准的。
float[] measuredWidth = new float[10];
//measuredWidth得到每一个字符的宽度;textWidths字符数
int textWidths = mPaint.getTextWidths(str, measuredWidth);
mPaint.getTextWidths(text, start, end, widths)
使用drawText绘制文本
public class PaintView extends View {
private Paint mPaint;
private String text = "你是我世界之光,我心另一半";
public PaintView(Context context) {
this(context,null);
}
public PaintView(Context context, @Nullable AttributeSet attrs) {
this(context, attrs,0);
}
public PaintView(Context context, @Nullable AttributeSet attrs, int defStyleAttr) {
super(context, attrs, defStyleAttr);
init(context, attrs, defStyleAttr);
}
private void init(Context context, AttributeSet attrs, int defStyleAttr) {
mPaint = new Paint();
}
@Override
protected void onDraw(Canvas canvas) {
super.onDraw(canvas);
mPaint.setColor(Color.BLUE);
mPaint.setStyle(Paint.Style.STROKE);//设置画笔的样式
mPaint.setStrokeCap(Paint.Cap.BUTT);//线帽
mPaint.setStrokeJoin(Paint.Join.BEVEL);
int top = 100;
int baselineX = 0;
mPaint.setTextSize(50);
mPaint.setTextAlign(Paint.Align.LEFT);
canvas.drawLine(0, top, 2000, top, mPaint);
//文本Metrics
Paint.FontMetrics fontMetrics = mPaint.getFontMetrics();
float baselineY = top - fontMetrics.top;
canvas.drawText(text, baselineX, baselineY, mPaint);
}
}
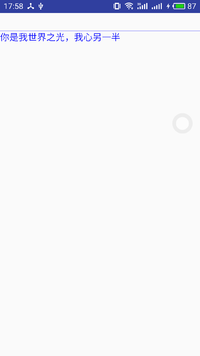
绘制文本
绘制文本时,还有一个很重要的知识点就是基线的确定
DrawText 基线的确定
在自定义控件的时候,有时候会用到DrawText 方法.
先把自定义TextView的贴出来
@Override
protected void onDraw(Canvas canvas) {
super.onDraw(canvas);
int x = getPaddingLeft();
//dy 代表的是:高度的一半到 baseLine的距离
Paint.FontMetricsInt fontMetrics = paint.getFontMetricsInt();
// top 是一个负值 bottom 是一个正值 top,bttom的值代表是 bottom是baseLine到文字底部的距离(正值)
// 必须要清楚的,可以自己打印就好
int dy = (fontMetrics.bottom - fontMetrics.top)/2 - fontMetrics.bottom;
int baseLine = getHeight()/2 + dy;
canvas.drawText(costom_text,x,baseLine,paint);
}
/**
* Draw the text, with origin at (x,y), using the specified paint. The
* origin is interpreted based on the Align setting in the paint.
*
* @param text The text to be drawn
* @param x The x-coordinate of the origin of the text being drawn
* @param y The y-coordinate of the baseline of the text being drawn
* @param paint The paint used for the text (e.g. color, size, style)
*/
public void drawText(@NonNull String text, float x, float y, @NonNull Paint paint) {
native_drawText(mNativeCanvasWrapper, text, 0, text.length(), x, y, paint.mBidiFlags,
paint.getNativeInstance(), paint.mNativeTypeface);
}
x,y 分别表示 基线的开始坐标,并不是 文字左上角的坐标,因为文字的绘制是以基线为基础的
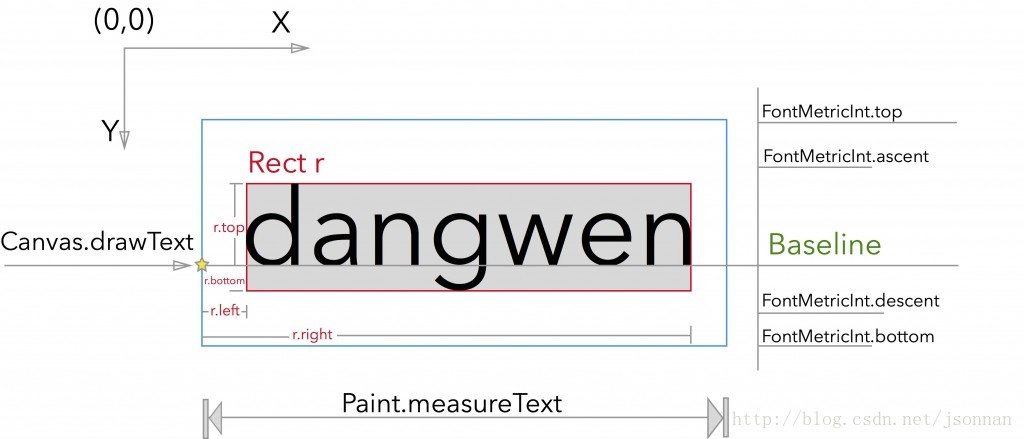
图中的 五角星 所在的线 就是基线 BaseLine,那么如何确定基线的x,y坐标呢?
首写我们先确定一下x坐标 :int x = getPaddingLeft();也就是文字距左边的距离
y坐标:
1、我们先计算一下文字高度的一半到 baseLine的距离。
int dy = (fontMetrics.bottom - fontMetrics.top)/2 - fontMetrics.bottom;
2、之后我们再使用控件高度的一般,加上文字高度的一半到 baseLine的距离,就是基线的y坐标
int baseLine = getHeight()/2 + dy;
总结
以上就是这篇文章的全部内容了,希望本文的内容对大家的学习或者工作具有一定的参考学习价值,如果有疑问大家可以留言交流,谢谢大家对脚本之家的支持。


 859
859


 被折叠的 条评论
为什么被折叠?
被折叠的 条评论
为什么被折叠?
 到【灌水乐园】发言


