


这篇笔记为形态学膨胀(dilate)和腐蚀(erode),一种在数字图像处理中常用的基本算法。
形态学图像处理的理论根基是数学形态学(Mathematical Morphology),可以通过形态学处理获取图像中有意义的区域,比如边界信息。
形态学最基本的操作为腐蚀和膨胀,我个人的理解,就是让图像中的感兴趣目标变大或者变小。自己做了下面这个小例子:
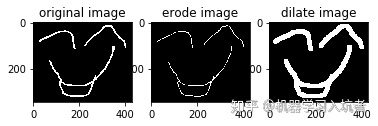
原始的图片是一张笑脸,erode(腐蚀)就是让图像中笑脸轮廓变细,而dilate(膨胀)就是让图像中笑脸轮廓变粗。
接下来将会将原理和代码分别介绍,并分析模板均为1的情况,共分成三个部分:
(1)灰度化和二值化像素反转(背景知识)
(2)膨胀
(3)腐蚀
1、灰度化和二值化和像素反转
灰度化和二值化在我之前的文章
机器学习入坑者:二值化算法之宇智波鼬zhuanlan.zhihu.com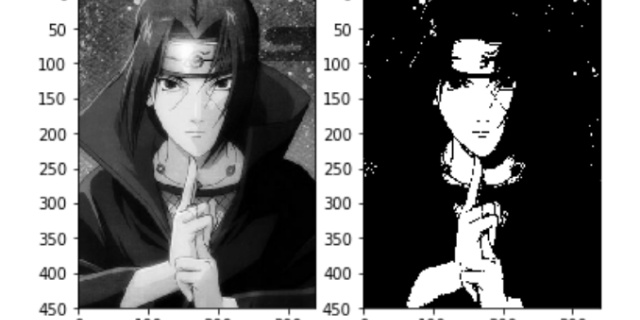
中进行过介绍。灰度化目的是把RGB图片变为Gray的图片,二值化目的是将包含不同像素值的图像根据阈值,转换为只有2种像素值的二值图。像素反转在
机器学习入坑者:暗光也清晰的图像增强算法zhuanlan.zhihu.com
中进行过介绍,可以简单的认为灰度反转的目的是:将亮的像素变暗、将暗的像素变亮。直接给出代码吧:
import imageio
import matplotlib.pyplot as plt
import numpy as np
def rgb2gray(rgb):
"""
rgb 2 gray
Args:
rgb image
Returns:
gray image
"""
gray = rgb[:, :, 0] * 0.299 + rgb[:, :, 1] * 0.587 + rgb[:, :, 2] * 0.114
return gray
# 1:read image
image = np.array(imageio.imread("smile.png")[:, :, 0:3])
# 2:convert rgb to gray image
image = rgb2gray(image)
# 3: dark area become bright, bright area become dark
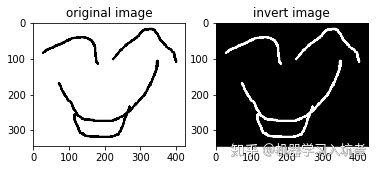
invert_image = 255 - image代码极其简单,第一步读取图片,第二步转为rgb,第三步用255减去图片的像素值。下面给出显示图的代码:
# plot
plot_image = [image, invert_image]
plot_title = ["original image", "invert image"]
plt.figure()
for i in range(1, len(plot_image)+1):
    plt.subplot(1, len(plot_image), i)
    plt.imshow(plot_image[i-1], cmap="gray")
    plt.title(plot_title[i-1])
plt.show()
下图左边是自己用画板手绘的图,由于画板为背景白色前景黑色,所以反转成笑脸白色背景黑色。
二值化函数的代码如下:
def thre_bin(gray_image, threshold=170):
    """
    binary image
    Args:
        gray_image:image with gray scale
        threshold:the split standard
    Returns:
        bin image
    """
    threshold_image = np.zeros(shape=(image.shape[0], image.shape[1]), dtype=np.uint8)
    # loop for every pixel
    for i in range(gray_image.shape[0]):
        for j in range(gray_image.shape[1]):
            if gray_image[i][j] > threshold:
                threshold_image[i][j] = 1
            else:
                threshold_image[i][j] = 0
    return threshold_image
bin_image = thre_bin(invert_image)
plt.imshow(bin_image, cmap="gray")
二值化以后视觉效果是不会变的,仅仅是将像素值严格限制为0和1(也可以是0和255)。
2、腐蚀
假设有一个模板B(就是一个红色的3x3的框,没有任何值,出于简化的考虑)这个模板在一个图像P中进行移动。那么模板和图像的运算规则就决定了输出图像是被腐蚀还是被膨胀了。
考虑下面的图像,1表示白色区域,0表示黑色区域,现在对图像P和模板B的计算制定一条规则:选取红色方框内的最小值作为新图像的中心值。那么红色方框中最小值是0,也就是新图像对应方框中心位置的像素值是0。
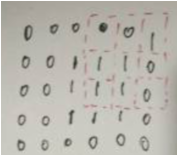
想象一下就会发现红色框在移动中,框里面的最小值大多数都是0,也就是说新图片大多数都是0的像素值(即黑色)。那么什么情况下能得到1呢(白色)?仅仅当模板在下面这张图的位置能得到1,也就是只有在框内数值均为1时才能使得最小值是1。
综上,新的图像只有一处像素值为1(白色),其它位置都是0(黑色),即这张图像被“腐蚀”了。
代码如下:
kernel = np.ones(shape=(5, 5))
def erode_bin_image(bin_image, kernel):
    """
    erode bin image
    Args:
        bin_image: image with 0,1 pixel value
    Returns:
        erode image
    """
    kernel_size = kernel.shape[0]
    bin_image = np.array(bin_image)
    if (kernel_size%2 == 0) or kernel_size<1:
        raise ValueError("kernel size must be odd and bigger than 1")
    if (bin_image.max() != 1) or (bin_image.min() != 0):
        raise ValueError("input image's pixel value must be 0 or 1")
    d_image = np.zeros(shape=bin_image.shape)
    center_move = int((kernel_size-1)/2)
    for i in range(center_move, bin_image.shape[0]-kernel_size+1):
        for j in range(cen ter_move, bin_image.shape[1]-kernel_size+1):
            d_image[i, j] = np.min(bin_image[i-center_move:i+center_move,
                                             j-center_move:j+center_move])
    return d_image
上述代码实现的就是卷积操作,其中第一个if语句用来判断卷积核尺寸是不是奇数并且正整数,第二个if用来判断输入图像是不是灰度图像,如果不满足这两者就会抛出Error。接下来的双层循环是模板在图像以步长为1进行移动,并选取最小值过程。用来调用函数并绘图的代码如下:
e_image = erode_bin_image(bin_image, kernel)
plot_image = [bin_image, e_image]
plot_title = ["original image", "erode image"]
plt.figure()
for i in range(1, len(plot_image)+1):
    plt.subplot(1, len(plot_image), i)
    plt.imshow(plot_image[i-1], cmap="gray")
    plt.title(plot_title[i-1])
plt.show()
腐蚀的结果如前所料,白色区域减少,也就是像素值为1的位置减少。
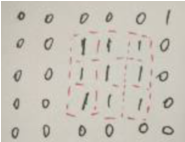
3、膨胀
膨胀和腐蚀是两个相反的过程,上一节讲“选取红色方框内最小值”改为“选取红色方框内最大值”即可。选取框内最小值造成了1大量减少,那么选取框内最大值就会造成1大量增加,这里不再累述。代码如下:
kernel = np.ones(shape=(13, 13))
def dilate_bin_image(bin_image, kernel):
    """
    dilate bin image
    Args:
        bin_image: image with 0,1 pixel value
    Returns:
        dilate image
    """
    kernel_size = kernel.shape[0]
    bin_image = np.array(bin_image)
    if (kernel_size%2 == 0) or kernel_size<1:
        raise ValueError("kernel size must be odd and bigger than 1")
    if (bin_image.max() != 1) or (bin_image.min() != 0):
        raise ValueError("input image's pixel value must be 0 or 1")
    d_image = np.zeros(shape=bin_image.shape)
    center_move = int((kernel_size-1)/2)
    for i in range(center_move, bin_image.shape[0]-kernel_size+1):
        for j in range(center_move, bin_image.shape[1]-kernel_size+1):
            d_image[i, j] = np.max(bin_image[i-center_move:i+center_move,j-center_move:j+center_move])
    return d_image
d_image = dilate_bin_image(bin_image, kernel)
plot_image = [bin_image, d_image]
plot_title = ["original image", "dilate image"]
plt.figure()
for i in range(1, len(plot_image)+1):
    plt.subplot(1, len(plot_image), i)
    plt.imshow(plot_image[i-1], cmap="gray")
    plt.title(plot_title[i-1])
plt.show()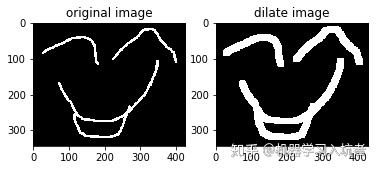
图像确实膨胀了,像素值为1的像素点大量增加,笑脸的轮廓变得清晰了非常多。


 被折叠的 条评论
为什么被折叠?
被折叠的 条评论
为什么被折叠?
 到【灌水乐园】发言


