


 本文是 Arduino 高级编程教程的一部分,主要介绍如何使用 Arduino 控制乐高 EV3 马达。内容包括 EV3 马达的优势、所需的硬件设备如 Arduino MEGA 板、EV3 大马达、Bricktronics 马达驱动等,以及硬件安装和程序编写。通过安装特定库和编写代码,实现马达的运动控制。

译者按:最近一直在忙,好不容易找到时间翻译一下剩余的教程。学生现在正在写 ev3dev 2.0 stretch 版本的【对象】,我也不知道他写成怎么样了,已经知道的是新版本的 ev3dev,允许多个超声波传感器同时运作,不会互相干扰了,但是在控制马达方面还是有点 bug!
Arduino: Lesson 5 - Control Ev3 Motors in Arduino
第五课 - 使用 Arduino 控制 乐高 EV3 马达
5.1 What and Why do we need to control Lego EV3 Motors in Arduino
5.1 怎么样和为什么要使用 Arduino 控制 EV3 马达?
If your robot has weight concern, Lego EV3 Motors have larger torque than DC Motors with the same weight. In this lesson, you'll need to following parts:
如果你要做的机器人有重量限制,在同样的重量下,乐高 EV3 马达比直流马达有更大的扭力。(译者按:意思就是比方说你要参加机器人相扑比赛,同样重量下,EV3 马达比某宝能买到的【直流减速马达】,会【更大力】!)。这这一课里,你需要以下的零件:
- An Arduino MEGA board.
1. Arduino MEGA 板。
2. TWO EV3 Large Motors. (Need 2 motors to demonstrate the robot's turn left and turn right functions)
2. 两只 EV3 大马达(需要两只去演示机器人的左拐和右拐功能)
3. ONE Bricktronics Motor Driver, for more information, you can find it here:
3. 一只 Bricktronics 马达驱动,你可以在以下网站找到他的资料:
https://www.wayneandlayne.com
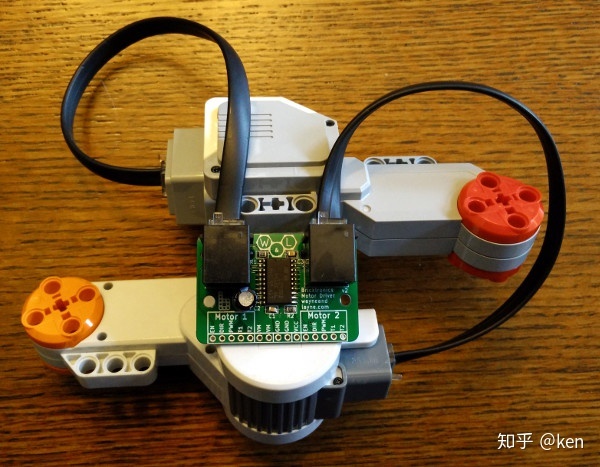
Figure 5.1
The Bricktronics Motor Driver is also sold in
某宝也有售:
http://www.taobao.com
4. ONE battery box, which has TWO "18650" Li-ion Rechargeble Battery attached in Serial. Each "18650" battery provides 3.7V voltage, the Bricktronics Motor Driver only accepts voltage from 7.2V to 9.0V. You may also use 1.5V AA x 6 batteries.
4. 一个电池盒,里面有两只串联的 18650 充电锂电池。每只 18650 电池提供 3.7V 电压(译者按,这里我学生写错了一点点,应该是快没电的时候是 3.7V,满电的时候是 4.2V),Bricktronics 马达驱动只允许 7.2V 到 9.0V 电压。你也可以使用 6只串联 1.5V 5号电池。
5.2 Hardware Setup
5.2 硬件安装
Setup hardware as shown below:
按下图安装硬件: (由于没有 Bricktronic 马达驱动的图片,下图的面包板下面就当作是它的接线位置了)

http://www.zephan.top/arduinolessons/lesson5/lesson5.fzz
5.3 Programs
5.3 程序
Download the Header files for the Bricktronics Motor Driver from the following URL:
在以下网址下载 Bricktronics 马达驱动的 Header 档案:
https://github.com/wayneandlayne/BricktronicsMotor
Click the "Clone or Download" button to download the ZIP file.
按 "Clone or Download" 按键去下载这个 ZIP 档案。
Install this ZIP file using one of the following methods:
用以下其中一个方法安装这个 ZIP 档案:
1. If you are running Arduino IDE, select "Project" -> "Libraries" -> "Install a zip library", or
- 如果你是使用 Arduino 官方 IDE,选择 "Project" -> "Libraries" -> &#
 最低0.47元/天 解锁文章


 被折叠的 条评论
为什么被折叠?
被折叠的 条评论
为什么被折叠?
 到【灌水乐园】发言


