


写在前面:这里对近几日的前端开发方面的学习做一个小结以开始下一个阶段的学习。对于该方面还有很长的路要走,但我不会继续作为一个阶段的主攻方向。后续会对JavaScript语言本身做一些小结。正如“你不知道的JavaScript”书中提到的:作为一种语言,JavaScript一直是大量批评的目标,部分归功于它的传统,但更多的是它的设计哲学。JavaScript语言本身具有很多我所熟悉的语言不同的特性,比如说异步机制,委托机制等,所以还是很有必要对语言本身做一个小结从而形成自己的思考体系。接下来,进入正题。
以往的前端开发模式采用MVP(Model-View-Presenter)模式,MVP是从经典的模式MVC演变而来,它们的基本思想有相通的地方:Controller/Presenter负责逻辑的处理,Model提供数据,View负责显示。在MVP模式中,一般只有前后端通信的过程中才会涉及到Model层,故而我们主要致力于Presenter层的逻辑设计,在Presenter层,我们通过getElementById()等函数获取到View层的DOM节点的一个句柄,进而通过修改内容、样式、绑定事件等操作来实现页面的交互。Vue采用了MVVM(Model-View-ViewModel)的开发模式,不再把关注点放在DOM节点上,而是聚焦在Model层,由于Vue中的双向绑定机制的存在,我们通过修改Model层的数据可以很方便的修改View中的数据。
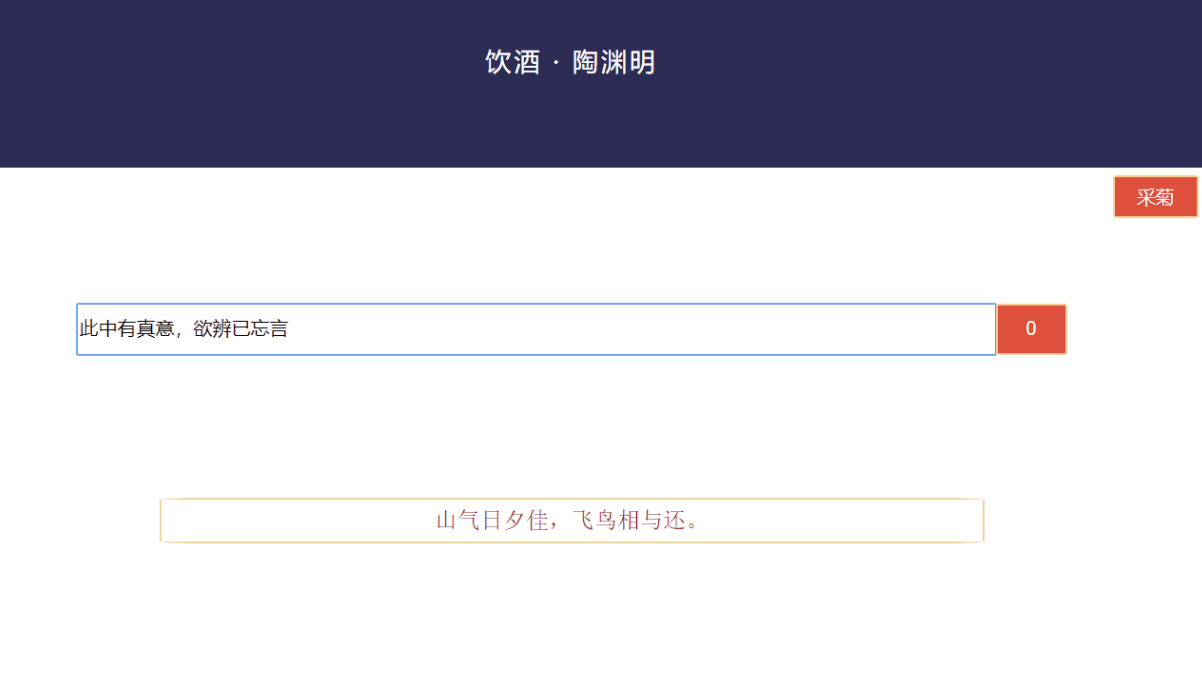
这里通过一个示例页面源码来汇总部分思想,示例中包含了数据双向绑定、事件绑定、响应式布局、组件化、组件通信等内容。
<!DOCTYPE html>
<html lang="en">
<head>
    <meta charset="UTF-8">
    <title>饮酒</title>
    <link rel="stylesheet" href="./css/vueme.css">
</head>
<body>


<div id="app">
	<my-header></my-header>
	<my-menu></my-menu>
	<search-box></search-box>
	<show-table></show-table>
</div>


<!-- 通过template标签和id标识确定模板 -->
<template id="myMenu">
	<div id="myMenu">
		<ul>
			<li v-for="(item,index) in list" class="menuItem" @click="handle($event)">{{item}}</li>
		</ul>
	</div>
</template>

<template id="SearchBoxTemp">
	<div id="searchBox">
		<input class="inputBox" placeholder="请输入内容" v-model="medName" @keyup.enter="submit"/>
		<button class="btn" @click="submit">{{count}}</button>
	</div>
</template>

<template id="showTable">
	<div id="resultWrap">
		<div id="resultTable">{{result}}</div>
	</div>
</template>


<script src="javascript/vue.js"></script>
<script>
/*全局组件:全局组件模式下,对于绑定了Vue的元素内部都能使用该组件,如这里id为app的div内部,无需在该Vue中components声明*/
// Vue.component('my-menu',{
//     props:['menuItem'],
//     template: '<a><button class="ok-menu">{{menuItem}}</button></a>'
// });

/*局部组件*/
/*组件模板方式1: 定义一个对象,键为template, 值为模板内容, 如my-header组件
  组件模板方式2: 在组件对象中设置键为template, 值为模板内容, 如my-menu-item组件,和方式1可看作是同一种方法
  组件模板方式3: 使用template标签,注意如果template中有多个标签时用div标签包裹,如模板SearchBoxTemp
  建议:统一编码风格
*/
/*总线机制,用于组件间通信*/
Vue.prototype.bus = new Vue;
var MyHeader = {template: '<div class="myHeader">饮酒 · 陶渊明</div>'};
var app = new Vue({
    el:"#app",
    components:{
        "my-header": MyHeader,
        "my-menu":{
        	template:"#myMenu",
        	data:function(){
        		return{
        			list:['采菊','东篱','悠然','南山']
        		}
        	},
        	/*模拟跳转*/
        	methods:{
        		handle:function(obj){
        			if(obj.currentTarget.innerHTML==='采菊'){
        				console.log("跳转!");
        				window.location.href="";
        			}
        			console.log(obj.currentTarget.innerHTML);
        		}
        	}
        },
        /*使用data function设置局部组件的数据*/
        "search-box":{
   			template: "#SearchBoxTemp",
   			data:function() {
   				return {
   					medName: "",
   					count: 0,
   				}
   			},
   			methods:{
   				submit: function(e){
   					/*通过e对象可以在Chrome控制台中查看该事件相关属性*/
   					console.log(e);
   					console.log(this.medName);
   					this.count++;
   					this.bus.$emit('get',this.medName);
   					this.medName=""
   				}
   			},
   		},
   		"show-table": {
   			template: "#showTable",
   			data:function() {
   				return {
   					result:"山气日夕佳,飞鸟相与还。"
   				}
   			},
   			mounted:function(){
   				/*注意this指针指向的对象*/
   				self=this
   				this.bus.$on('get',function(msg){
   					console.log("收到:",msg)
   					console.log(this)
   					self.result=msg
   				})
   			}
   		}
    }
});
</script>
</body>
</html>
页面布局css文件如下:
body{
    margin: 0;
    padding: 0;
}
.myHeader{
    text-align: center;
    background: #2c2c54;
    color: #fff;
    height: 150px;
    line-height: 150px;
    letter-spacing: 2px;
    font-size: 18px;
}
#myMenu ul{
    display: flex;
    justify-content: flex-end;
    border: orangered;
    list-style-type:none;
}
.menuItem{
    background: #dd503d;
    border: #f3d19e solid 1px;
    border-radius: 5%;
    margin-left: 3px;
    margin-right: 3px;
    margin-top: 5px;
    color: #fff;
    width: 60px;
    height:30px;
    line-height: 30px;
    font-size: 13px;
    text-align: center
}
.menuItem:hover{
    background: #ff4d51;
    font-size: 14px;
}
#searchBox{
    display: flex;
    justify-content: center;
    margin-top:60px;
}
.inputBox{
    line-height: 30px;
    width:50%;
}
.btn{
    background: #dd503d;
    border: #f3d19e solid 1px;
    border-radius: 5%;
    color: #fff;
    width: 50px;
    line-height:30px;
    font-size: 13px;
}
#resultWrap{
	display: flex;
    justify-content: center;
    margin-top:100px;


}
#resultTable{
	border: #f3d19e solid 1px;
    border-radius: 5%;
	width: 45%;
    text-align: center;
    font-size: 16px;
    font-family: serif;
    color: #A52A2A;
    height: 30px;
    line-height: 30px;
}
最后,考虑使用vue-cli工具来构建一个前端项目。下图是使用vue-cli新建的项目自动生成目录结构。
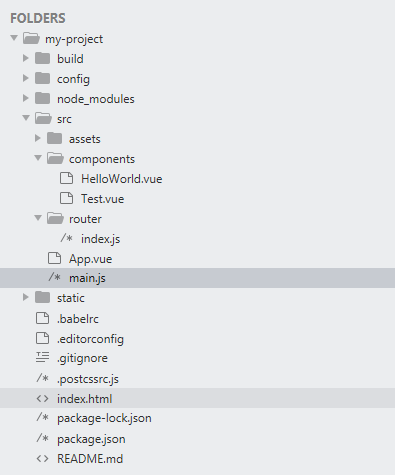
这里index.html是入口文件,建议只有一个入口的APP.vue, 其他页面都以全局组件形式写。
route负责路由控制,如router/index.js的内容,由import语句导入相关模块,通过path和component的对应关系决定页面跳转。
import Vue from 'vue'
import Router from 'vue-router'
import HelloWorld from '@/components/HelloWorld'
import Test from '@/components/Test'

Vue.use(Router)

export default new Router({
  routes: [
    {
      path: '/',
      name: 'HelloWorld',
      component: HelloWorld
    },{
      path: '/test',
      name: 'Test',
      component: Test
    }
  ]
})
在项目中可以使用如下的写法来写组件,可以说是非常舒服了,如components/HelloWorld.vue:
<template>
<div>
  <div class="hello">
    {{ msg }}
  </div>
  <router-link to="/test">Test跳转</router-link>
</div>
</template>

<script>
export default {
  name: 'HelloWorld',
  data () {
    return {
      msg: 'Hey boy, hello world!'
    }
  }
}
</script>

<!-- Add "scoped" attribute to limit CSS to this component only -->
<style scoped>

</style>


 9552
9552

 被折叠的 条评论
为什么被折叠?
被折叠的 条评论
为什么被折叠?
 到【灌水乐园】发言


