


作者:程序猿微录
出自:TinyRecord
原文:tinyice.cn/articles/123
Java 双亲委派机制的破坏—SPI机制
在Java的类加载机制中,默认的就是双亲委派机制,这种委派机制就是将类加载器进行优先级分层,在触发类加载的时候,当前类加载器会从低级层层往上委托父类加载器去加载,每层类加载器在加载时会判断是否已经加载过,如果加载过就不在重复加载,这样设计能够避免类重复加载、核心类被篡改等情况发生。双亲委派机制是JDK类加载的设计规范,有优点也有不足。
例如:如果对JDK的rt.jar中某个接口硬编码了具体的实现类,该类在使用时就会被双亲委派机制的最顶层类加载器加载,其他任何类加载器都不能对其进行修改,而且不会重复加载其他的接口实现,然而使用者又需要修改这个接口的实现,这样就无法满足使用需求。这种情况,JDK提供了SPI(Service Provider Interface 服务提供者接口)机制在运行时才来加载具体的接口实现类,使用者只需要按照SPI规范指定具体的接口实现即可实现加载自定义的接口实现类,实现策略模式和热拔插效果。这是一种“面向接口编程+策略模式+配置文件”组合实现的动态加载机制
主要使用场景就是自身只提供接口规范,然后让第三方去提供接口的具体实现,例如:JDBC驱动类的加载。当然自己也可以提供接口和实现类,然后运行时选择要使用的实现。另外根据这种机制可以进行很多扩展功能,例如Dubbo的SPI机制,Spring Boot的SPI机制。
简单示例
SPI(服务提供者接口)
package cn.tinyice.demo.spi;

/**
 * InterfaceSpi
 *
 * @author Tinyice
 */
public interface InterfaceSpi {

    String className();
}
接口具体实现
package cn.tinyice.demo.spi;

/**
 * InterfaceSpiImpl
 *
 * @author Tinyice
 */
public class InterfaceSpiImpl implements InterfaceSpi {

    @Override
    public String className() {
        return this.getClass().getSimpleName();
    }
}
配置文件
在Resources文件夹下的META-INF/services中创建接口包路径的同名文件
META-INF/services/cn.tinyice.demo.spi.InterfaceSpi文件内容为:接口的实现类全路径
cn.tinyice.demo.spi.InterfaceSpiImpl测试类
package cn.tinyice.demo.spi;

import lombok.extern.slf4j.Slf4j;

import java.util.ServiceLoader;

/**
 * Test
 *
 * @author Tinyice
 */
@Slf4j
public class Test {

    public static void main(String[] args) {
        ServiceLoader<InterfaceSpi> serviceLoader = ServiceLoader.load(InterfaceSpi.class);
        for (InterfaceSpi interfaceSpi : serviceLoader) {
            log.info("-----------------------------------------");
            log.info("classLoader = {}", interfaceSpi.getClass().getClassLoader());
            log.info("className = {}", interfaceSpi.className());

        }
    }
}
控制台
-----------------------------------------
classLoader = sun.misc.Launcher$AppClassLoader@b4aac2
className = InterfaceSpiImpl

Process finished with exit code 0
思考
这个示例,就是还有ServiceLoader加载一个接口实现啊?并没有看出来什么效果,这和普通的类加载有何不同?那么继续看示例
效果示例
接口实现2
package cn.tinyice.demo.spi;

/**
 * InterfaceSpiImpl2
 *
 * @author Tinyice
 */
public class InterfaceSpiImpl2 implements InterfaceSpi {

    @Override
    public String className() {
        return this.getClass().getSimpleName();
    }
}
测试类
package cn.tinyice.demo.spi;

import lombok.extern.slf4j.Slf4j;

import java.util.ServiceLoader;
import java.util.concurrent.TimeUnit;

/**
 * Test
 *
 * @author Tinyice
 */
@Slf4j
public class Test {

    public static void main(String[] args) throws InterruptedException {

        ServiceLoader<InterfaceSpi> serviceLoader = ServiceLoader.load(InterfaceSpi.class);
        for (InterfaceSpi interfaceSpi : serviceLoader) {
            log.info("-----------------------------------------");
            log.info("classLoader = {}", interfaceSpi.getClass().getClassLoader());
            log.info("className = {}", interfaceSpi.className());

        }
        // 在休眠期间,修改了classes下编译后的配置文件,将InterfaceSpiImpl改为InterfaceSpiImpl2
        TimeUnit.SECONDS.sleep(15);
        serviceLoader = ServiceLoader.load(InterfaceSpi.class);
        for (InterfaceSpi interfaceSpi : serviceLoader) {
            log.info("-----------------------------------------");
            log.info("classLoader = {}", interfaceSpi.getClass().getClassLoader());
            log.info("className = {}", interfaceSpi.className());

        }
    }
}
控制台
-----------------------------------------
classLoader = sun.misc.Launcher$AppClassLoader@b4aac2
className = InterfaceSpiImpl
-----------------------------------------
classLoader = sun.misc.Launcher$AppClassLoader@b4aac2
className = InterfaceSpiImpl2

Process finished with exit code 0
思考
这个时候就有点意思了,在运行时修改资源文件可以达到加载不同实现类的功能。但是这并不是SPI的主要用法,SPI是服务提供接口,主要是给第三方用的,例如:只提供InterfaceSpi接口,不提供实现。第三方需要使用该接口时自己提供实现,然后配置在配置文件中即可。
官方使用:JDBC
JDBC连接示例
public class Test {

    public static void main(String[] args) throws SQLException, ClassNotFoundException {

        // Class.forName("com.mysql.jdbc.Driver");  // JDK6 以后改行代码不需要了,JDK自身集成该代码
        DriverManager.getConnection("jdbc:mysql://localhost:3306/demo", "root", "1234");
    }
}
源码分析(JDK8)
DriverManager调用其静态方法 getConnection会触发其初始化,该类存在static块,会被优先执行
static {
	loadInitialDrivers();
	println("JDBC DriverManager initialized");
}
loadInitialDrivers
private static void loadInitialDrivers() {
	String drivers;
	/* ... 省略 ...  获取配置的驱动类名,多个使用冒号分割
	 * System.getProperty("jdbc.drivers")
	 */

	// SPI机制对Driver.class的处理
	AccessController.doPrivileged(new PrivilegedAction<Void>() {
		public Void run() {

			ServiceLoader<Driver> loadedDrivers = ServiceLoader.load(Driver.class);
			Iterator<Driver> driversIterator = loadedDrivers.iterator();

			try{
				while(driversIterator.hasNext()) {
					driversIterator.next();
				}
			} catch(Throwable t) {
			// Do nothing
			}
			return null;
		}
	});
	/* ... 省略 ...  尝试实例化驱动类,driversList为drivers使用冒号分割的数组
	 * 这里如果系统配置的驱动类直接实例化了
	 */
	for (String aDriver : driversList) {
		try {
			Class.forName(aDriver, true, ClassLoader.getSystemClassLoader());
		} catch (Exception ex) {
			println("DriverManager.Initialize: load failed: " + ex);
		}
	}
}在这里可以看到熟悉使用了ServiceLoader<Driver> loadedDrivers = ServiceLoader.load(Driver.class);,也就是这行代码会去静态文件中查找META-INF/services/java.sql.Driver文件,然后根据其内容加载实现类。例如:mysql-connector-java-5.1.44.jar
com.mysql.jdbc.Driver
com.mysql.fabric.jdbc.FabricMySQLDriver
这样以来第三方(Mysql)实现的Driver实现类就会被加载到JVM中,然后会被实例化了
底层原理
SPI的核心方法
ServiceLoader<Driver> loadedDrivers = ServiceLoader.load(Driver.class);调用链
public static <S> ServiceLoader<S> load(Class<S> service) {
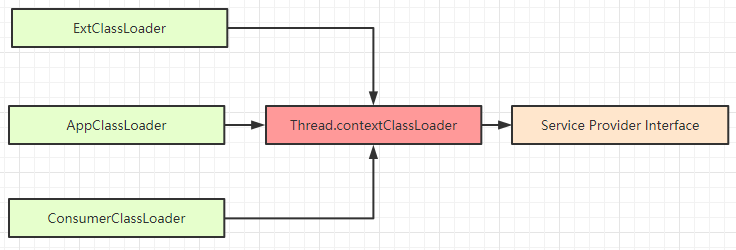
// 线程上下文类加载器,这个线程是开发者调用的线程,例如示例中引发的Test#main线程
ClassLoader cl = Thread.currentThread().getContextClassLoader();
// 重载
return ServiceLoader.load(service, cl);
}↓
public static <S> ServiceLoader<S> load(Class<S> service, ClassLoader loader){
	return new ServiceLoader<>(service, loader);
}
↓
private ServiceLoader(Class<S> svc, ClassLoader cl) {
	service = Objects.requireNonNull(svc, "Service interface cannot be null");
	// 根据流程,这里为上下文类加载器
	loader = (cl == null) ? ClassLoader.getSystemClassLoader() : cl;
	// 沙箱安全
	acc = (System.getSecurityManager() != null) ? AccessController.getContext() : null;
	// 加载
	reload();
}
↓
public void reload() {
    // 清空历史记录
	providers.clear();
	// 懒加载迭代器
	lookupIterator = new LazyIterator(service, loader);
}
LazyIterator
到这里有一个核心功能:迭代器,首先ServiceLoader实现了
Iterable接口,然后自身又维护了一个内部类
LazyIterator
public Iterator<S> iterator() {
	return new Iterator<S>() {
        // 已知的的提供者,这里所谓的已知是在懒加载迭代器中已经实例化过的
		Iterator<Map.Entry<String,S>> knownProviders = providers.entrySet().iterator();
        // 迭代器核心功能:hasNext
		public boolean hasNext() {
			if (knownProviders.hasNext())
				return true;
			return lookupIterator.hasNext();
		}
		// 迭代器核心功能:next
		public S next() {
			if (knownProviders.hasNext())
				return knownProviders.next().getValue();
			return lookupIterator.next();
		}

		public void remove() {
			throw new UnsupportedOperationException();
		}

	};
}
在迭代接口实现中这里进行了优化,在上面示例中可以知道一个服务提供接口的配置文件中可以通过换行来写多个实现类名称。因此这里设计为每读取一行为一个实现类名称,然后就实例化该类,并放入到providers加以区分,而还未读取到的就还在lookupIterator中。具体实现如下
private class LazyIterator implements Iterator<S> {

	Class<S> service;
	ClassLoader loader;
	Enumeration<URL> configs = null;
	Iterator<String> pending = null;
	String nextName = null;

	private LazyIterator(Class<S> service, ClassLoader loader) {
		this.service = service;
		this.loader = loader;
	}

	// 迭代器hasNext实现
	private boolean hasNextService() {
		if (nextName != null) {
			return true;
		}
		// 首次解析时configs==null
		if (configs == null) {
			try {
			    // 读取类文件的路径:String PREFIX = "META-INF/services/"
				String fullName = PREFIX + service.getName();
				// 类加载
				if (loader == null)
					configs = ClassLoader.getSystemResources(fullName);
				else
					configs = loader.getResources(fullName);
			} catch (IOException x) {
				fail(service, "Error locating configuration files", x);
			}
		}
		// 后续读取时,只需要判断configs是否解析完毕
		while ((pending == null) || !pending.hasNext()) {
			if (!configs.hasMoreElements()) {
				return false;
			}
			pending = parse(service, configs.nextElement());
		}
        // 下一个实现类名称
		nextName = pending.next();
		return true;
	}

    // 迭代器next实现
	private S nextService() {
		if (!hasNextService()) throw new NoSuchElementException();
		String cn = nextName;
		nextName = null;
		Class<?> c = null;
		try {
		    // 加载类但是不实例化 initialize=false
			c = Class.forName(cn, false, loader);
		} catch (ClassNotFoundException x) {
			fail(service,"Provider " + cn + " not found");
		}
		if (!service.isAssignableFrom(c)) {
			fail(service, "Provider " + cn  + " not a subtype");
		}
		try {
		    // 实例化,然后类型转换
			S p = service.cast(c.newInstance());
			// 放入到已知的服务提供者中
			providers.put(cn, p);
			// 返回
			return p;
		} catch (Throwable x) {
			fail(service, "Provider " + cn + " could not be instantiated", x);
		}
		throw new Error();
	}

    // hasNext沙箱安全判断
	public boolean hasNext() {
		if (acc == null) {
			return hasNextService();
		} else {
			PrivilegedAction<Boolean> action = new PrivilegedAction<Boolean>() {
				public Boolean run() { return hasNextService(); }
			};
			return AccessController.doPrivileged(action, acc);
		}
	}

	// next沙箱安全判断
	public S next() {
		if (acc == null) {
			return nextService();
		} else {
			PrivilegedAction<S> action = new PrivilegedAction<S>() {
				public S run() { return nextService(); }
			};
			return AccessController.doPrivileged(action, acc);
		}
	}

	public void remove() {
		throw new UnsupportedOperationException();
	}
}
通过
hasNextService
方法来达到调用的时候才去加载类文件,通过
nextService
方法来达到调用的时候去实例化类实现(这也是JDK6之后不需要写Class.forName的原
因)。当用ServiceLoader#load之后通过迭代器就可以实现实现类的逐个加载解析,甚至只加载解析一部分。从调用链可以知道使用的类加载器是线程上下文类加载器。这就是SPI机制的核心原理
图示


 670
670


 被折叠的 条评论
为什么被折叠?
被折叠的 条评论
为什么被折叠?
 到【灌水乐园】发言


