


最近突然有个奇妙的想法,就是当我对着电脑屏幕的时候,电脑会先识别屏幕上的人脸是否是本人,如果识别是本人的话需要回答电脑说的暗语,答对了才会解锁并且有三次机会。如果都没答对就会发送邮件给我,通知有人在动我的电脑并上传该人头像。
过程
环境是win10代码我使用的是python3所以在开始之前需要安装一些依赖包,请按顺序安装否者会报错
pip install cmake -i https://pypi.tuna.tsinghua.edu.cn/simplepip install dlib -i https://pypi.tuna.tsinghua.edu.cn/simplepip install face_recognition -i https://pypi.tuna.tsinghua.edu.cn/simplepip install opencv-python -i https://pypi.tuna.tsinghua.edu.cn/simple接下来是构建识别人脸以及对比人脸的代码
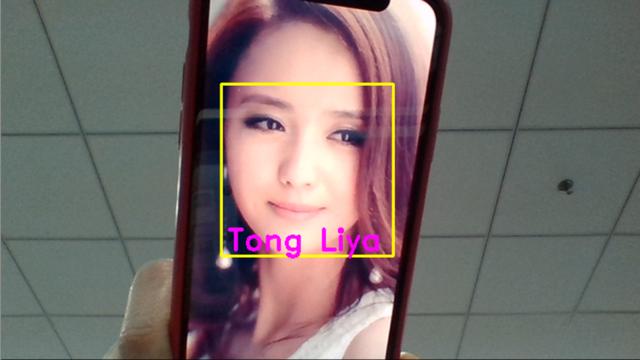
import face_recognitionimport cv2import numpy as npvideo_capture = cv2.VideoCapture(0)my_image = face_recognition.load_image_file("my.jpg")my_face_encoding = face_recognition.face_encodings(my_image)[0]known_face_encodings = [ my_face_encoding]known_face_names = [ "Admin"]face_names = []face_locations = []face_encodings = []process_this_frame = Truewhile True: ret, frame = video_capture.read() small_frame = cv2.resize(frame, (0, 0), fx=0.25, fy=0.25) rgb_small_frame = small_frame[:, :, ::-1] if process_this_frame: face_locations = face_recognition.face_locations(rgb_small_frame) face_encodings = face_recognition.face_encodings(rgb_small_frame, face_locations) face_names = [] for face_encoding in face_encodings: matches = face_recognition.compare_faces(known_face_encodings, face_encoding) name = "Unknown" face_distances = face_recognition.face_distance(known_face_encodings, face_encoding) best_match_index = np.argmin(face_distances) if matches[best_match_index]: name = known_face_names[best_match_index] face_names.append(name) process_this_frame = not process_this_frame for (top, right, bottom, left), name in zip(face_locations, face_names): top *= 4 left *= 4 right *= 4 bottom *= 4 font = cv2.FONT_HERSHEY_DUPLEX cv2.rectangle(frame, (left, top), (right, bottom), (0, 0, 255), 2) cv2.rectangle(frame, (left, bottom - 35), (right, bottom), (0, 0, 255), cv2.FILLED) cv2.putText(frame, name, (left + 6, bottom - 6), font, 1.0, (255, 255, 255), 1) cv2.imshow('Video', frame) if cv2.waitKey(1) & 0xFF == ord('q'): breakvideo_capture.release()cv2.destroyAllWindows()其中my.jpg需要你自己拍摄上传,运行可以发现在你脸上会出现Admin的框框,我去网上找了张图片类似这样子
识别功能已经完成了接下来就是语音识别和语音合成,这需要使用到百度AI来实现了,去登录百度AI的官网到控制台选择左边的语音技术,然后点击面板的创建应用按钮,来到创建应用界面
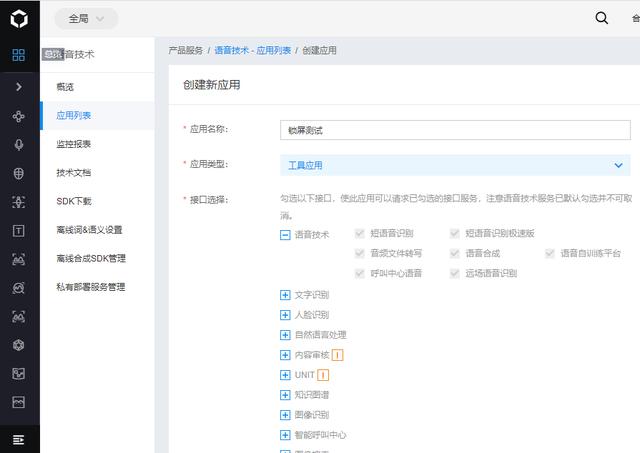
打造电脑版人脸屏幕解锁神器
创建后会得到AppID、API Key、Secret Key记下来,然后开始写语音合成的代码。安装百度AI提供的依赖包
pip install baidu-aip -i https://pypi.tuna.tsinghua.edu.cn/simplepip install playsound -i https://pypi.tuna.tsinghua.edu.cn/simple然后是简单的语音播放代码,运行下面代码可以听到萌妹子的声音
import sysfrom aip import AipSpeechfrom playsound import playsoundAPP_ID = ''API_KEY = ''SECRET_KEY = ''client = AipSpeech(APP_ID, API_KEY, SECRET_KEY)result = client.synthesis('你好吖', 'zh', 1, {'vol': 5, 'per': 4, 'spd': 5, })if not isinstance(result, dict): with open('auido.mp3', 'wb') as file: file.write(result)filepath = eval(repr(sys.path[0]).replace('', '/')) + '//auido.mp3'playsound(filepath)有了上面的代码就完成了检测是否在电脑前(人脸识别)以及电脑念出暗语(语音合成)然后我们还需要回答暗号给电脑,所以还需要完成语音识别。
import waveimport pyaudiofrom aip import AipSpeechAPP_ID = ''API_KEY = ''SECRET_KEY = ''client = AipSpeech(APP_ID, API_KEY, SECRET_KEY)CHUNK = 1024FORMAT = pyaudio.paInt16CHANNELS = 1RATE = 8000RECORD_SECONDS = 3WAVE_OUTPUT_FILENAME = "output.wav"p = pyaudio.PyAudio()stream = p.open(format=FORMAT, channels=CHANNELS, rate=RATE, input=True, frames_per_buffer=CHUNK)print("* recording")frames = []for i in range(0, int(RATE / CHUNK * RECORD_SECONDS)): data = stream.read(CHUNK) frames.append(data)print("* done recording")stream.stop_stream()stream.close()p.terminate()wf = wave.open(WAVE_OUTPUT_FILENAME, 'wb')wf.setnchannels(CHANNELS)wf.setsampwidth(p.get_sample_size(FORMAT))wf.setframerate(RATE)wf.writeframes(b''.join(frames))def get_file_content(): with open(WAVE_OUTPUT_FILENAME, 'rb') as fp: return fp.read()result = client.asr(get_file_content(), 'wav', 8000, {'dev_pid': 1537, })print(result)运行此代码之前需要安装pyaudio依赖包,由于在win10系统上安装会报错所以可以通过如下方式安装。到这个链接 https://www.lfd.uci.edu/~gohlke/pythonlibs/#pyaudio 去下载对应的安装包然后安装即可。

运行后我说了你好,可以看到识别出来了。那么我们的小模块功能就都做好了接下来就是如何去整合它们。可以发现在人脸识别代码中if matches[best_match_index]这句判断代码就是判断是否为电脑主人,所以我们把这个判断语句当作main函数的入口。
if matches[best_match_index]: # 在这里写识别到之后的功能 name = known_face_names[best_match_index]那么识别到后我们应该让电脑发出询问暗号,也就是语音合成代码,然我们将它封装成一个函数,顺便重构下人脸识别的代码。
import cv2import timeimport numpy as npimport face_recognitionvideo_capture = cv2.VideoCapture(0)my_image = face_recognition.load_image_file("my.jpg")my_face_encoding = face_recognition.face_encodings(my_image)[0]known_face_encodings = [ my_face_encoding]known_face_names = [ "Admin"]face_names = []face_locations = []face_encodings = []process_this_frame = Truedef speak(content): import sys from aip import AipSpeech from playsound import playsound APP_ID = '' API_KEY = '' SECRET_KEY = '' client = AipSpeech(APP_ID, API_KEY, SECRET_KEY) result = client.synthesis(content, 'zh', 1, {'vol': 5, 'per': 0, 'spd': 5, }) if not isinstance(result, dict): with open('auido.mp3', 'wb') as file: file.write(result) filepath = eval(repr(sys.path[0]).replace('', '/')) + '//auido.mp3' playsound(filepath)try: while True: ret, frame = video_capture.read() small_frame = cv2.resize(frame, (0, 0), fx=0.25, fy=0.25) rgb_small_frame = small_frame[:, :, ::-1] if process_this_frame: face_locations = face_recognition.face_locations(rgb_small_frame) face_encodings = face_recognition.face_encodings(rgb_small_frame, face_locations) face_names = [] for face_encoding in face_encodings: matches = face_recognition.compare_faces(known_face_encodings, face_encoding) name = "Unknown" face_distances = face_recognition.face_distance(known_face_encodings, face_encoding) best_match_index = np.argmin(face_distances) if matches[best_match_index]: speak("识别到人脸,开始询问暗号,请回答接下来我说的问题") time.sleep(1) speak("天王盖地虎") error = 1 / 0 name = known_face_names[best_match_index] face_names.append(name) process_this_frame = not process_this_frame for (top, right, bottom, left), name in zip(face_locations, face_names): top *= 4 left *= 4 right *= 4 bottom *= 4 font = cv2.FONT_HERSHEY_DUPLEX cv2.rectangle(frame, (left, top), (right, bottom), (0, 0, 255), 2) cv2.rectangle(frame, (left, bottom - 35), (right, bottom), (0, 0, 255), cv2.FILLED) cv2.putText(frame, name, (left + 6, bottom - 6), font, 1.0, (255, 255, 255), 1) cv2.imshow('Video', frame) if cv2.waitKey(1) & 0xFF == ord('q'): breakexcept Exception as e: print(e)finally: video_capture.release() cv2.destroyAllWindows()这里有一点需要注意,由于playsound播放音乐的时候会一直占用这个资源,所以播放下一段音乐的时候会报错,解决方法是修改~Python37Libsite-packages下的playsound.py文件,找到如下代码
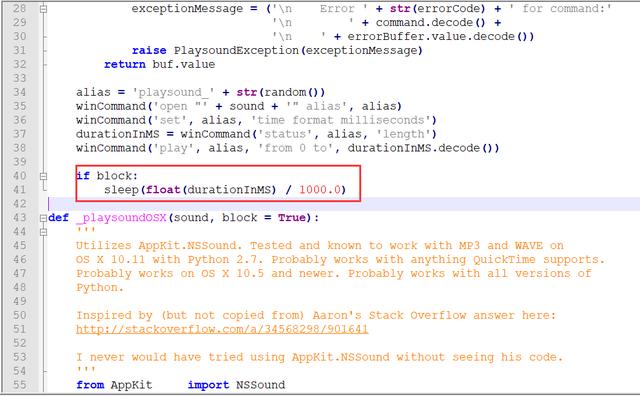
在sleep函数下面添加winCommand('close', alias)这句代码,保存下就可以了。运行发现可以正常将两句话都说出来。那么说出来之后就要去监听了,我们还要打包一个函数。
def record(): import wave import json import pyaudio from aip import AipSpeech APP_ID = '' API_KEY = '' SECRET_KEY = '' client = AipSpeech(APP_ID, API_KEY, SECRET_KEY) CHUNK = 1024 FORMAT = pyaudio.paInt16 CHANNELS = 1 RATE = 8000 RECORD_SECONDS = 3 WAVE_OUTPUT_FILENAME = "output.wav" p = pyaudio.PyAudio() stream = p.open(format=FORMAT, channels=CHANNELS, rate=RATE, input=True, frames_per_buffer=CHUNK) print("* recording") frames = [] for i in range(0, int(RATE / CHUNK * RECORD_SECONDS)): data = stream.read(CHUNK) frames.append(data) print("* done recording") stream.stop_stream() stream.close() p.terminate() wf = wave.open(WAVE_OUTPUT_FILENAME, 'wb') wf.setnchannels(CHANNELS) wf.setsampwidth(p.get_sample_size(FORMAT)) wf.setframerate(RATE) wf.writeframes(b''.join(frames)) def get_file_content(): with open(WAVE_OUTPUT_FILENAME, 'rb') as fp: return fp.read() result = client.asr(get_file_content(), 'wav', 8000, {'dev_pid': 1537, }) result = json.loads(str(result).replace("'", '"')) return result["result"][0]将识别到人脸后的代码修改成如下
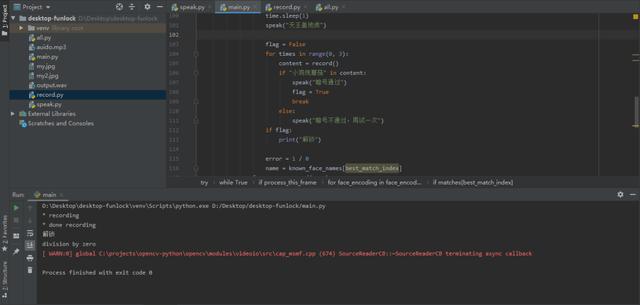
if matches[best_match_index]: speak("识别到人脸,开始询问暗号,请回答接下来我说的问题") time.sleep(1) speak("天王盖地虎") flag = False for times in range(0, 3): content = record() if "小鸡炖蘑菇" in content: speak("暗号通过") flag = True break else: speak("暗号不通过,再试一次") if flag: print("解锁") else: print("发送邮件并将坏人人脸图片上传!") error = 1 / 0 name = known_face_names[best_match_index]运行看看效果,回答电脑小鸡炖蘑菇,电脑回答暗号通过。这样功能就基本上完成了。
结语
至于发送邮件的功能和锁屏解锁的功能我就不一一去实现了,我想这应该难不倒大家的。锁屏功能可以HOOK让键盘时间无效化,然后用窗口再覆盖整个桌面即可,至于邮箱发送网上文章很多的。
如果你也觉得有趣,可以试一试哦!我整理了一些教程,需要python学习视频教程的伙伴,可以回复:python,获取!


 被折叠的 条评论
为什么被折叠?
被折叠的 条评论
为什么被折叠?
 到【灌水乐园】发言


