


转载自:安全
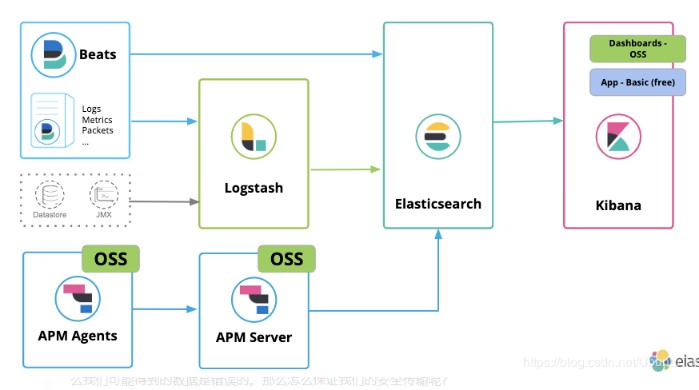
APM Agents 访问APM server若是不作安全的设置,那么任何一个应用都有可能把数据传输到APM server中。
若是是恶意的软件,那么咱们可能获得的数据是错误的。那么怎么保证咱们的安全传输呢?
答案是在传输的时候使用secret token。
服务器
Secret token 是什么?
您能够配置一个Secret token来受权对APM服务器的请求。 这样能够确保只有您的Agent才能将数据发送到您的APM服务器。
代理和APM服务器都必须配置相同的Secret toke,而且scecret token仅在与SSL/TLS结合使用时才提供安全性。app
要使用Secret token 保护APM代理与APM服务器之间的通讯安全:elasticsearch
- 在APM服务器中启用SSL/TLS
- 在Agent和服务器中设置Secret token
- 在APM agent中启用HTTPS

生成证书
在Elasticsearch安装的根目录下打入以下的命令:ide
./bin/elasticsearch-certutil ca --pem

This tool assists you in the generation of X.509 certificates and certificate
signing requests for use with SSL/TLS in the Elastic stack.

The 'ca' mode generates a new 'certificate authority'
This will create a new X.509 certificate and private key that can be used
to sign certificate when running in 'cert' mode.

Use the 'ca-dn' option if you wish to configure the 'distinguished name'
of the certificate authority

By default the 'ca' mode produces a single PKCS#12 output file which holds:
    * The CA certificate
    * The CA's private key

If you elect to generate PEM format certificates (the -pem option), then the output will
be a zip file containing individual files for the CA certificate and private key

Please enter the desired output file []:
上面的命令将会生成一个名字叫作的文件。咱们接着使用以下的命令把上面的文件进行解压:测试
unzip
Archive:
   creating: ca/
  inflating: ca/
  inflating: ca/
在当前的目录下生成了一个新的目录ca,里面含有两个文件:及。请注意这里的证书将在咱们一下的agent里将会被用到。 接下来,咱们按照以下的命令来生成证书:ui
./bin/elasticsearch-certutil cert --ca-cert ./ca/ --ca-key ./ca/ --pem --name localhost
This tool assists you in the generation of X.509 certificates and certificate
signing requests for use with SSL/TLS in the Elastic stack.

The 'cert' mode generates X.509 certificate and private keys.
    * By default, this generates a single certificate and key for use
       on a single instance.
    * The '-multiple' option will prompt you to enter details for multiple
       instances and will generate a certificate and key for each one
    * The '-in' option allows for the certificate generation to be automated by describing
       the details of each instance in a YAML file

    * An instance is any piece of the Elastic Stack that requires an SSL certificate.
      Depending on your configuration, Elasticsearch, Logstash, Kibana, and Beats
      may all require a certificate and private key.
    * The minimum required value for each instance is a name. This can simply be the
      hostname, which will be used as the Common Name of the certificate. A full
      distinguished name may also be used.
    * A filename value may be required for each instance. This is necessary when the
      name would result in an invalid file or directory name. The name provided here
      is used as the directory name (within the zip) and the prefix for the key and
      certificate files. The filename is required if you are prompted and the name
      is not displayed in the prompt.
    * IP addresses and DNS names are optional. Multiple values can be specified as a
      comma separated string. If no IP addresses or DNS names are provided, you may
      disable hostname verification in your SSL configuration.

    * All certificates generated by this tool will be signed by a certificate authority (CA).
    * The tool can automatically generate a new CA for you, or you can provide your own with the
         -ca or -ca-cert command line options.

By default the 'cert' mode produces a single PKCS#12 output file which holds:
    * The instance certificate
    * The private key for the instance certificate
    * The CA certificate

If you specify any of the following options:
    * -pem (PEM formatted output)
    * -keep-ca-key (retain generated CA key)
    * -multiple (generate multiple certificates)
    * -in (generate certificates from an input file)
then the output will be be a zip file containing individual certificate/key files

Please enter the desired output file []:

Certificates written to /Users/liuxg/elastic3/elasticsearch-7.6.2/

This file should be properly secured as it contains the private key for
your instance.

After unzipping the file, there will be a directory for each instance.
Each instance has a certificate and private key.
For each Elastic product that you wish to configure, you should copy
the certificate, key, and CA certificate to the relevant configuration directory
and then follow the SSL configuration instructions in the product guide.

For client applications, you may only need to copy the CA certificate and
configure the client to trust this certificate.
在上面的命令中,咱们生产一个绑定localhost的证书,也便是说这个证书只能在当前的localhost中进行使用。就像上面显示的那样,它在当前的目录中生产一个叫作的文件。这文件含有咱们所须要的证书信息。咱们使用以下的命令来解压缩这个文件:this
unzip
Archive:
   creating: localhost/
  inflating: localhost/
  inflating: localhost/
它在localhost中生成了咱们想要的证书文件及。咱们把这两个文件拷入到咱们的APM 服务器安装的根目录中。spa
另注:咱们能够使用以下的命令把一个.crt的证书转换为一个.pem的证书:.net
openssl x509 -in mycert.crt -out mycert.pem -outform PEM
配置APM 服务器
为咱们的APM服务器配置SSL/TLS
打开文件,并把以下的配置加到该文件的最后面:
apm-server.ssl.enabled: true
apm-server.secret_token: "123456"
: ""
: ""
经过上面的配置后,咱们从新启动咱们的APM server:
./apm-server -e
测试APM agent
把以前生成的证书拷入到该应用的根目录中,而后再引用的配置中新增俩参数
    serviceName: 'zipcode service',
    secretToken: '1234561', # 修改
    serverUrl: 'http://localhost:8200'
    verifyServerCert: true, # 新增
    serverCaCertFile: "" # 新增,最好使用绝对路径


 967
967


 被折叠的 条评论
为什么被折叠?
被折叠的 条评论
为什么被折叠?
 到【灌水乐园】发言


