


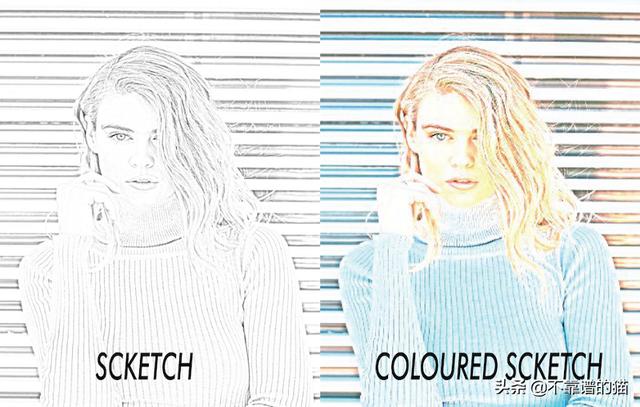
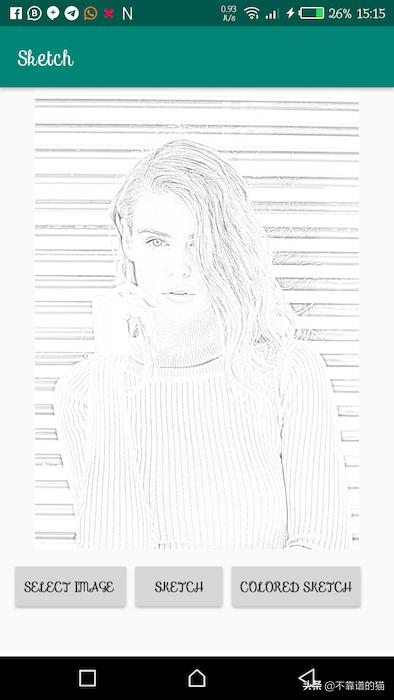
今天我们将制作一个Android应用程序,在OpenCV的帮助下将图像转换为铅笔素描。在我们开始之前:我假设您的android项目中已经安装了Open CV。
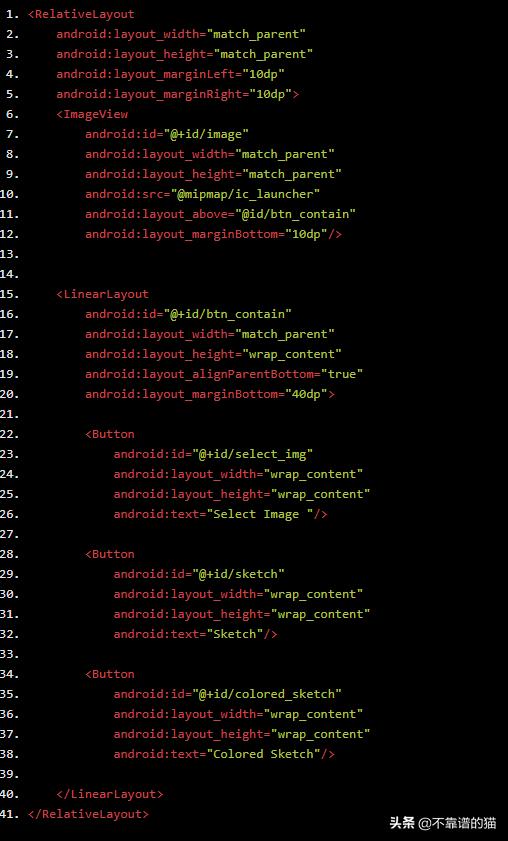
步骤1:打开activity_main。添加一个ImageView和3个按钮(第一个按钮用于从手机图库中选择图像,另两个按钮用于将图像转换为素描和彩色素描。
步骤2:打开MainActivity.java,再onCreate中添加如下java代码。
private ImageView image;private Button select, sketch, colored@Overrideprotected void onCreate(Bundle savedInstanceState) { super.onCreate(savedInstanceState); setContentView(R.layout.activity_main); OpenCVLoader.initDebug(); image = findViewById(R.id.image); select = findViewById(R.id.select_img); sketch = findViewById(R.id.sketch); colored = findViewById(R.id.colored_sketch);}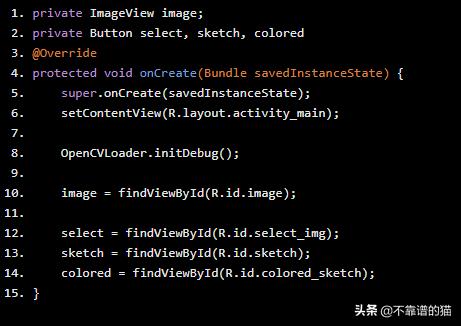
步骤3:创建一个ImageChooser函数,从图库中选择图像并显示在ImageView中。
为图像选择器声明几个变量。
private final int SELECT_PHOTO = 1;private Bitmap originBitmap = null;private File tempFile = new File("/sdcard/a.jpg");private Bitmap processImg;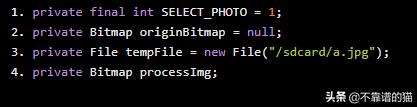
显示图像选择器的函数
private void showImageChooser() { Intent photoPickerIntent = new Intent(Intent.ACTION_PICK); photoPickerIntent.setType("image/*"); startActivityForResult(photoPickerIntent, SELECT_PHOTO);}@Overridepublic void onActivityResult(int requestCode, int resultCode, Intent data) { super.onActivityResult(requestCode, resultCode, data); if (requestCode == SELECT_PHOTO && resultCode == RESULT_OK && null != data) { Uri selectedImage = data.getData(); InputStream imageStream; try { imageStream = getContentResolver().openInputStream(selectedImage); originBitmap = BitmapFactory.decodeStream(imageStream); } catch (FileNotFoundException e) { e.printStackTrace(); } if (originBitmap != null) { tempFile.delete(); this.image.setImageBitmap(originBitmap); } }}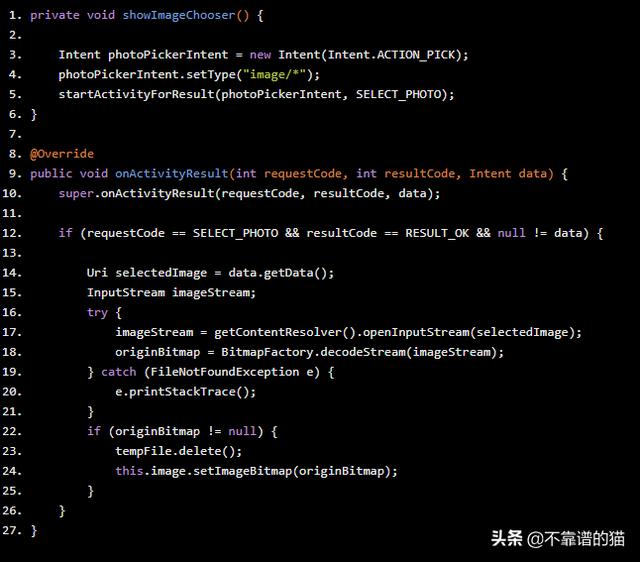
将OnClickListener设置为图像选择按钮
select.setOnClickListener(new View.OnClickListener() { @Override public void onClick(View view) { showImageChooser(); }});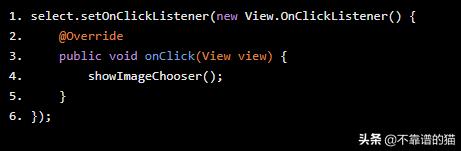

步骤4:让我们将效果应用到选定的图像。
为了将图像转换为素描,我们需要制作3个不同的图像层
- 灰度(第1层)
- 反转灰度图像(第2层)
- 将高斯模糊应用于inverted image(第3层)
- 用于铅笔素描的颜色减淡和混合(第3层,第1层),用于彩色素描的颜色减淡(原始图像,第1层)。
素描函数的java代码如下:
public void Sketch(Bitmap bitmap, String type){ bitmap=bitmap.copy(Bitmap.Config.ARGB_8888, true); Mat src = new Mat(bitmap.getHeight(), bitmap.getWidth(), CvType.CV_8UC4); Mat dest = new Mat(bitmap.getHeight(), bitmap.getWidth(), CvType.CV_8UC4); Mat grey = new Mat(bitmap.getHeight(), bitmap.getWidth(), CvType.CV_8UC4); Mat invert = new Mat(bitmap.getHeight(), bitmap.getWidth(), CvType.CV_8UC4); Bitmap inv, gray; Utils.bitmapToMat(bitmap, src); Imgproc.cvtColor(src, grey, Imgproc.COLOR_BGR2GRAY); Imgproc.cvtColor(grey, grey, Imgproc.COLOR_GRAY2RGBA, 4); Core.bitwise_not( grey, invert); Imgproc.GaussianBlur(invert,invert, new Size(11,11),0); inv = Bitmap.createBitmap(invert.cols(),invert.rows(),Bitmap.Config.ARGB_8888); gray = Bitmap.createBitmap(invert.cols(),invert.rows(),Bitmap.Config.ARGB_8888); Utils.matToBitmap(invert, inv); Utils.matToBitmap(grey, gray); Bitmap b = null; if (type.equals("normal")) { b = ColorDodgeBlend(inv, gray); }else if(type.equals("colored")){ b = ColorDodgeBlend(inv, bitmap); } processImg = Bitmap.createBitmap(dest.cols(),dest.rows(),Bitmap.Config.ARGB_8888); Utils.matToBitmap(dest, processImg); image.setImageBitmap(b);}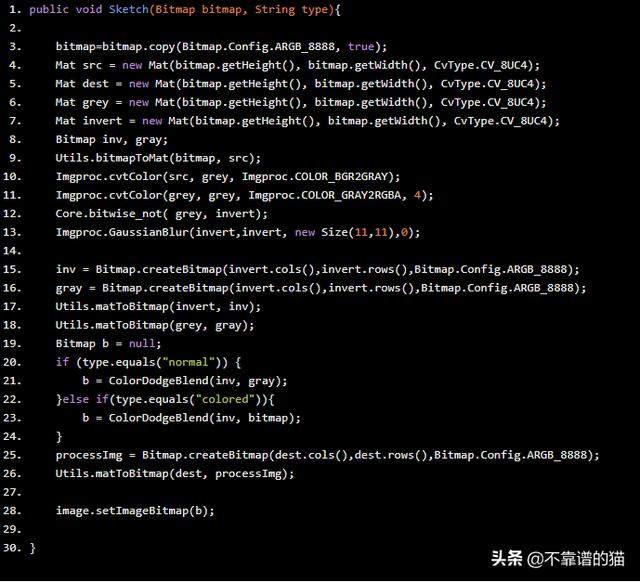
颜色减淡和混合的java代码:
private static int colordodge(int in1, int in2) { float image = (float)in2; float mask = (float)in1; return ((int) ((image == 255) ? image:Math.min(255, (((long)mask << 8 ) / (255 - image)))));}public static Bitmap ColorDodgeBlend(Bitmap source, Bitmap layer) { Bitmap base = source.copy(Bitmap.Config.ARGB_8888, true); Bitmap blend = layer.copy(Bitmap.Config.ARGB_8888, false); IntBuffer buffBase = IntBuffer.allocate(base.getWidth() * base.getHeight()); base.copyPixelsToBuffer(buffBase); buffBase.rewind(); IntBuffer buffBlend = IntBuffer.allocate(blend.getWidth() * blend.getHeight()); blend.copyPixelsToBuffer(buffBlend); buffBlend.rewind(); IntBuffer buffOut = IntBuffer.allocate(base.getWidth() * base.getHeight()); buffOut.rewind(); while (buffOut.position() < buffOut.limit()) { int filterInt = buffBlend.get(); int srcInt = buffBase.get(); int redValueFilter = Color.red(filterInt); int greenValueFilter = Color.green(filterInt); int blueValueFilter = Color.blue(filterInt); int redValueSrc = Color.red(srcInt); int greenValueSrc = Color.green(srcInt); int blueValueSrc = Color.blue(srcInt); int redValueFinal = colordodge(redValueFilter, redValueSrc); int greenValueFinal = colordodge(greenValueFilter, greenValueSrc); int blueValueFinal = colordodge(blueValueFilter, blueValueSrc); int pixel = Color.argb(255, redValueFinal, greenValueFinal, blueValueFinal); buffOut.put(pixel); } buffOut.rewind(); base.copyPixelsFromBuffer(buffOut); blend.recycle(); return base;}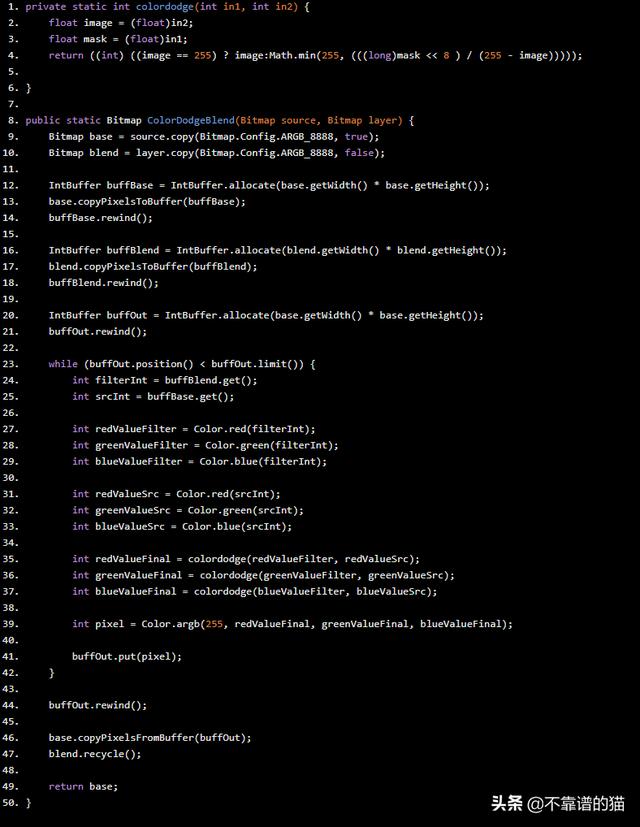
将OnClickListener添加到按钮
sketch.setOnClickListener(new View.OnClickListener() { @Override public void onClick(View view) { if (originBitmap != null) { Sketch(originBitmap, "normal"); } }});colored.setOnClickListener(new View.OnClickListener() { @Override public void onClick(View view) { if (originBitmap != null) { Sketch(originBitmap, "colored"); } }});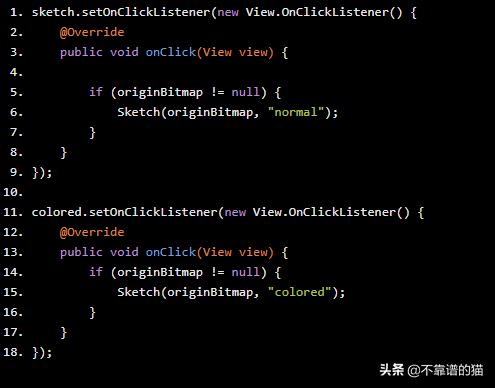


 889
889


 被折叠的 条评论
为什么被折叠?
被折叠的 条评论
为什么被折叠?
 到【灌水乐园】发言


