


在做自动化测试的时候,经常会遇到这种情况,某个页面元素,你必须要把鼠标移动到上面才能显示出元素。那么这种情况,我们怎么处理呢?
selenium给我们提供了一个类来处理这类事件——ActionChains。
ActionChains可以对需要模拟鼠标操作才能进行的情况,比如单击、双击、点击鼠标右键、拖拽等等进行操作。
使用鼠标事件之前需要要导入ActionChains类,导入方法如下:
- from selenium.webdriver.common.action_chains import ActionChains
复制代码
那么我们通过一个场景来看下鼠标事件的应用范围吧,如我们现在要去操作下快捷导航中的某个控件(搜索板块控件)
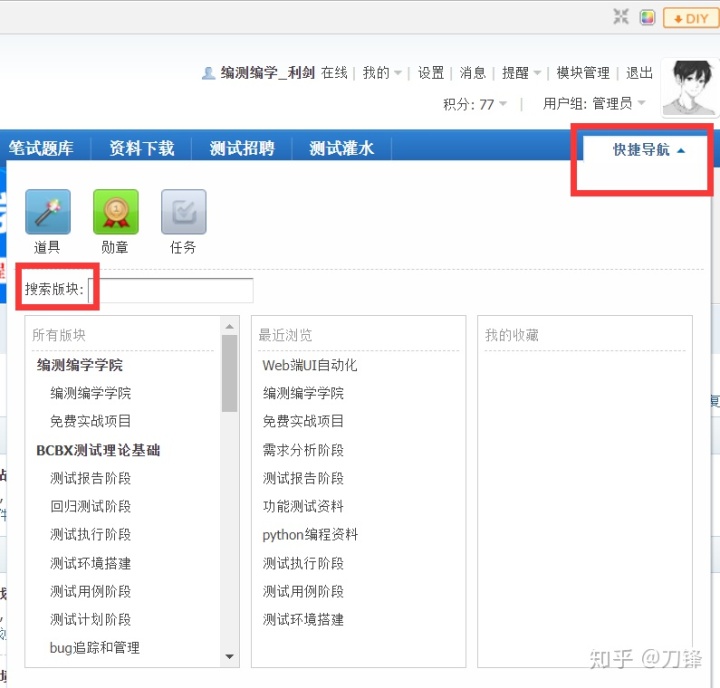
首先我们得先定位到快捷导航控件,然后通过鼠标事件讲鼠标挪动到快捷导航快捷,那么我们先看下鼠标事件的方法:
1、move_to_element
- def move_to_element(self, to_element):
- """
- Moving the mouse to the middle of an element.
- :Args:
- - to_element: The WebElement to move to.
- """
- if self._driver.w3c:
- self.w3c_actions.pointer_action.move_to(to_element)
- self.w3c_actions.key_action.pause()
- else:
- self._actions.append(lambda: self._driver.execute(
- Command.MOVE_TO, {'element': to_element.id}))
- return self
复制代码
其实看源码就会发现方法很简单,需要传入的参数就是鼠标要挪动到的控件上,那么代码如何实现:
- from selenium import webdriver
- import time
- from selenium.webdriver.common.action_chains import ActionChains
- driver = webdriver.Chrome()
- driver.get('http://www.bcbxhome.com')
- driver.maximize_window()
- time.sleep(1)
- ele = driver.find_element_by_id('qmenu') ###定位到的快捷导航控件
- time.sleep(2)
- ActionChains(driver).move_to_element(ele).perform()
复制代码
2、move_to_element_with_offset
- def move_to_element_with_offset(self, to_element, xoffset, yoffset):
- """
- Move the mouse by an offset of the specified element.
- Offsets are relative to the top-left corner of the element.
- :Args:
- - to_element: The WebElement to move to.
- - xoffset: X offset to move to.
- - yoffset: Y offset to move to.
- """
- if self._driver.w3c:
- self.w3c_actions.pointer_action.move_to(to_element, xoffset, yoffset)
- self.w3c_actions.key_action.pause()
- else:
- self._actions.append(
- lambda: self._driver.execute(Command.MOVE_TO, {
- 'element': to_element.id,
- 'xoffset': int(xoffset),
- 'yoffset': int(yoffset)}))
- return self
复制代码
看到源码我们就知道需要传入三个参数,第一参数就是鼠标从哪里看是挪到,是从这个控件的左上角,偏移量是相对这个左上角进行偏移的,偏移x和y方向
- from selenium import webdriver
- import time
- from selenium.webdriver.common.action_chains import ActionChains
- driver = webdriver.Chrome()
- driver.get('http://www.bcbxhome.com')
- driver.maximize_window()
- time.sleep(1)
- ele = driver.find_element_by_id('qmenu')
- time.sleep(2)
- ActionChains(driver).move_to_element_with_offset(ele,10,10).perform()
复制代码
3、click_and_hold(on_element=None) ——点击鼠标左键,不松开
4、context_click(on_element=None) ——点击鼠标右键
5、double_click(on_element=None) ——双击鼠标左键
6、drag_and_drop(source, target) ——拖拽到某个元素然后松开
7、drag_and_drop_by_offset(source, xoffset, yoffset) ——拖拽到某个坐标然后松开
8、key_down(value, element=None) ——按下某个键盘上的键
9、key_up(value, element=None) ——松开某个键
10、move_by_offset(xoffset, yoffset) ——鼠标从当前位置移动到某个坐标


 531
531

 被折叠的 条评论
为什么被折叠?
被折叠的 条评论
为什么被折叠?
 到【灌水乐园】发言


