


本文将为您详细介绍如何在 CentOS 系统下部署 Nginx 项目。
本文在示例步骤中的软件版本如下,在实际操作时,请您以实际软件版本为准。
- 操作系统:CentOS 7.5
- Nginx 版本:Nginx 1.12.2
安装 Nginx
# 安装 n=Nginx:yum -y install nginx # 查看 Nginx 版本nginx -v# 查看 Nginx 安装目录rpm -ql nginx# 启动 Nginxservice nginx start按照上面步骤按照好nginx后,访问服务器的公网 IP 地址,出现如下页面则表示 Nginx 部署完成:

Nginx 的默认根目录 root 是/usr/share/nginx/html,直接修改 html 下的 index.html 静态页面,用来标识这个页面的特殊性。
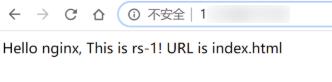
vim /usr/share/nginx/html/index.html# 在页面中输入Hello nginx , This is rs-1!URL is index.html负载均衡(原“应用型负载均衡”)可以根据后端服务器的路径来进行请求转发,在/image路径下部署静态页面,相关命令如下:
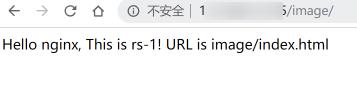
# 新建目录 imagemkdir /usr/share/nginx/html/imagecd /usr/share/nginx/html/imagevim index.html# 在页面中输入Hello nginx , This is rs-1!URL is image/index.html
注意:Nginx 的默认端口是80,如果想修改端口请修改配置文件并重启 Nginx。
验证 Nginx 服务
访问服务器的公网 IP + 路径,如果可以显示出已部署好的静态页面,则证明 Nginx 部署成功。
rs-1 的 index.html 页面:
rs-1 的 /image/index.html 页面:


 1853
1853

 被折叠的 条评论
为什么被折叠?
被折叠的 条评论
为什么被折叠?
 到【灌水乐园】发言


