


什么是双链表
双向链表,又称为双链表,是链表的一种,它的每个数据结点中都有两个指针,分别指向直接后继和直接前驱。所以,从双向链表中的任意一个结点开始,都可以很方便地访问它的前驱结点和后继结点。
基本结构
golang的双链表在container/list中包中,整个链表称为List。
双向链表是线性结构,由一个root节点起始,形成的双向循环链表List

双链表List
type List struct { root Element len int }每个链表元素为Element,Element基本包含三要素Prev头部指向它的前驱节点的指针,Next尾部指向它的后继节点的指针,最后就是当前元素存储的数据value。
基本元素element
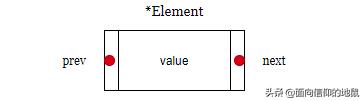
element
type Element struct { next, prev *Element list *List Value interface{}}初始化过程
一开始链表会初始化成一个前驱和后继都指向自己(root)的空链表。
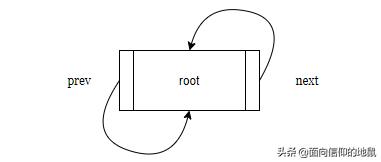
初始化空链表
func (l *List) Init() *List { l.root.next = &l.root l.root.prev = &l.root l.len = 0 return l}基本操作
这里省略了遍历、获取元素等方法,因为比较简单,感兴趣可以自行阅读源码,下面对操作方法进行讲解。
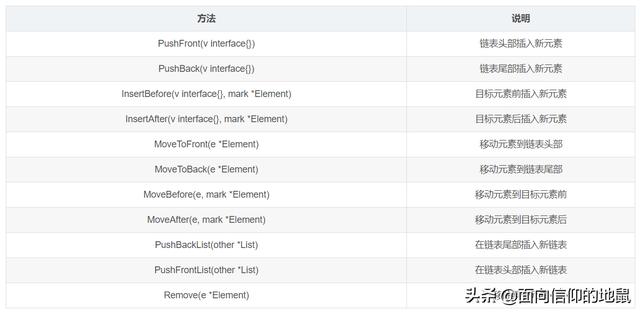
链表操作的相关方法
方法实现基本可以概括为2个基本的操作,一个是插入、删除。 所以下面就来分析下插入、删除的源码。
插入操作:在目标节点at后插入节点e
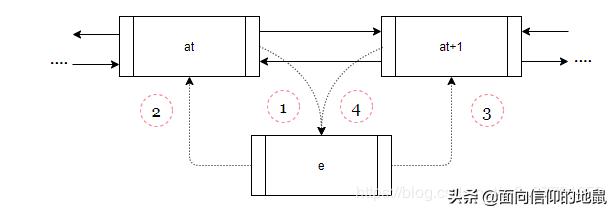
目标节点at后插入节点e
func (l *List) insert(e, at *Element) *Element { n := at.next at.next = e e.prev = at e.next = n n.prev = e e.list = l l.len++ return e}- 临时保存at的后继节点指针为n
- at的后继指向指针e//步骤1
- e的前驱指向at指针//步骤2
- e的后继指向指针n//步骤3
- n的前驱指向指针e//步骤4
- 链表长度+1
删除操作:删除元素e
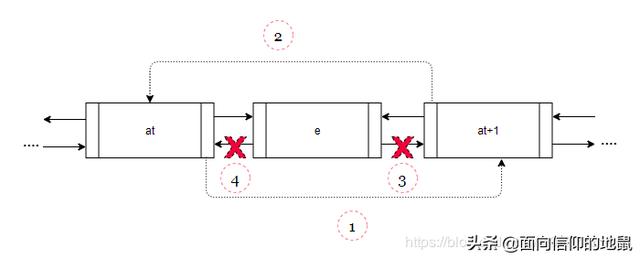
删除元素e
func (l *List) remove(e *Element) *Element { e.prev.next = e.next e.next.prev = e.prev e.next = nil e.prev = nil e.list = nil l.len-- return e}- e的上一个节点的后驱指向e的后驱节点指针 //步骤1
- 当前元素e的下一个节点的前驱指向e的前驱节点指针 //步骤2
- e的后驱指针置为nil //步骤3
- e的前驱指针置为nil //步骤4
- 链表长度-1
元素的移动: 其实移动就是先删除后插入的过程,这里不再重复讲解
func (l *List) move(e, at *Element) *Element { if e == at { return e } //删除的步骤 e.prev.next = e.next e.next.prev = e.prev //插入的步骤 n := at.next at.next = e e.prev = at e.next = n n.prev = e return e}在掌握了插入和删除的方法后,其他的操作方法就很清晰了。
欢迎关注,后面会有更多系统的讲解。


 2800
2800


 被折叠的 条评论
为什么被折叠?
被折叠的 条评论
为什么被折叠?
 到【灌水乐园】发言


