


如果您使用过高级开发语言,比如C++,C#,Java等,然后再去接触网站开发时,会发现不能编译是件多么痛苦的事情。C++等语言都是静态语言,对类型有严格要求,所以编码时的不规范很容易被编译器指出来,这样可以避免运行时的很多错误。再看看这些脚本语言,(web前端开发时,设计很多脚本语言,比如HTMLCSSJSTS)是解释执行的,所以就没有编译的过程,仅仅会在执行过程中遇到错误直接终止执行。这些脚本语言大部分本来也属于动态类型语言,语法格式不是那么严格,为了简化了开发过程,能省的都省了,理论上开发效率会很高。但是问题来了,不编译了,也不能调试了,也不方便找到错误了,这样效率不就反而更低了吗,如何解决?难道真的用,语言自带的输出到命令行。比如:console.log(),去把错误打印出来。
经过了一周的折腾,终于找到了理想的解决办法,所以在此记录一下,希望也能帮到有同样问题的您。解决问题的关键还是利用好VS Code这个神器。简称:VSC。本文尝试了三种情景的调试实验,分别是:
1.HTML + JS 调试;
2.Node JS 调试;
3.TypeScript 调试;
VSC 我们常用的是打开文件夹,但是如果想管理多个文件夹时需要用的工作区。下面我们开始创建工作区等一系列工作。
//
//分割线 //
开始:
在VSC中安装:Debugger for Chrome 插件,用于谷歌浏览器调试启动。
一、创建工作区:
VSC中,文件--将工作区另存为...--选择需要保存的路径:,比如叫:debugTest,完成后会在选择的目录下生成工作区文件:debugTest.code-workspace
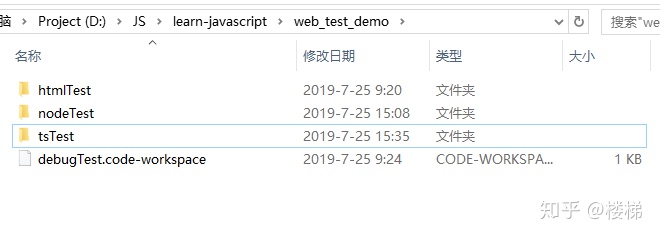
二、手动创建文件夹:
手动创建三个项目的文件夹,并且在每个下面再创建 src 文件夹,将来存放源码:
1、htmlTest
2、nodeTest
3、tsTest
如下目录结构,
三、添加文件夹到工作区
在VSC中,文件--将文件夹添加到工作区...
完成后如图:

三个目录都需要手动添加相应的调试配置,添加了配置就可以F5来“调试运行”了,比如给
htmlTest文件夹添加配置的方法如图:

VSC会在对应的文件夹下生成.vscode文件夹,用来保存各自的配置,具体是在 launch.json 文件中。
四、配置htmlTest目录。
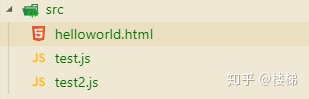
在对应的src文件夹中创建源码文件:
helloworld.html
//helloworld.html

<!DOCTYPE html>
<html lang="en">
    <head>
        <meta charset="UTF-8">
        <title>Bird Whisperer</title>
    </head>

    <body>
        <script src='./test2.js'></script>
        <div id='test-promise-log'>

            <ul>
                <li>Collee</li>
                <li>Milk</li>
                <li>tea</li>
            </ul>

        </div>
    </body>
</html>
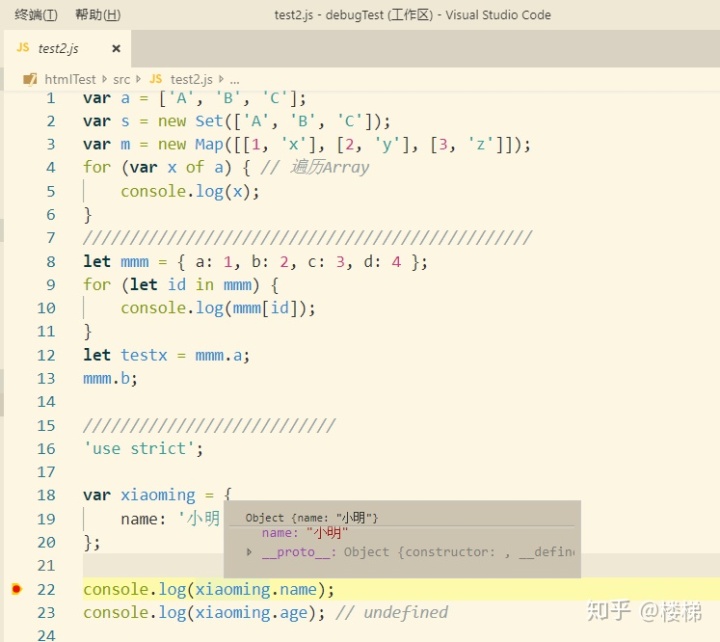
//test2.js
//test2.js

var a = ['A', 'B', 'C'];
var s = new Set(['A', 'B', 'C']);
var m = new Map([[1, 'x'], [2, 'y'], [3, 'z']]);
for (var x of a) { // 遍历Array
    console.log(x);
}

let mmm = { a: 1, b: 2, c: 3, d: 4 };
for (let id in mmm) {
    console.log(mmm[id]);
}
let testx = mmm.a;
mmm.b;

///
'use strict';

var xiaoming = {
    name: '小明'
};

console.log(xiaoming.name);
console.log(xiaoming.age); // undefined
//launch.json
//launch.json
{
    // 使用 IntelliSense 了解相关属性。
    // 悬停以查看现有属性的描述。
    // 欲了解更多信息,请访问: https://go.microsoft.com/fwlink/?linkid=830387
    "version": "0.2.0",
    "configurations": [
        {
            "type": "chrome",
            "request": "launch",
            "file": "${workspaceRoot}/src/helloworld.html",
            "runtimeExecutable": "F:toolSoftWareGoogleChromeApplicationchrome.exe", // 改成您的 Chrome 安装路径
            "sourceMaps": true,
            "name": "Run js on html",
            //"url": "http://localhost:8080",
            //"url": "file:///D:/JS/learn-javascript/helloworld/helloworld.html",
            "webRoot": "${workspaceRoot}",
            "userDataDir":"${cwd}",
            "port": 8088
        },
    ]
}
截图:

成功后F5调试
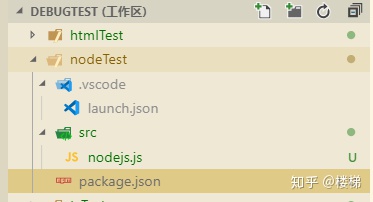
五、配置Node JS 目录。
首先你得安装了node。
目录结构:
launch.json
{
    // 使用 IntelliSense 了解相关属性。
    // 悬停以查看现有属性的描述。
    // 欲了解更多信息,请访问: https://go.microsoft.com/fwlink/?linkid=830387
    "version": "0.2.0",
    "configurations": [

        // {
        //     "type": "chrome",
        //     "request": "launch",
        //     "file": "${workspaceRoot}/helloworld.html",
        //     "runtimeExecutable": "F:toolSoftWareGoogleChromeApplicationchrome.exe", // 改成您的 Chrome 安装路径
        //     "sourceMaps": true,
        //     "name": "Run test2.js on html",
        //     //"url": "http://localhost:8080",
        //     "url": "file:///D:/JS/learn-javascript/helloworld/helloworld.html",
        //     "webRoot": "${workspaceRoot}",
        //     "userDataDir":"${cwd}",
        //     "port": 8088
        // },
        {
            "name": "Run nodejs.js",
            "type": "node",
            "request": "launch",
            "program": "${workspaceRoot}/src/nodejs.js",
            "stopOnEntry": false,
            "args": [],
            "cwd": "${workspaceRoot}",
            "preLaunchTask": null,
            "runtimeExecutable": null,
            "runtimeArgs": [
                "--nolazy"
            ],
            "env": {
                "NODE_ENV": "development"
            },
            "sourceMaps": false,
        }

    ]
}
nodejs.js
'use strict';
// var fs = require('fs');
// fs.stat('sample.txt', function (err, stat) {
// if (err) {
// console.log(err);
// } else {
// // 是否是文件:
// console.log('isFile: ' + stat.isFile());
// // 是否是目录:
// console.log('isDirectory: ' + stat.isDirectory());
// if (stat.isFile()) {
// // 文件大小:
// console.log('size: ' + stat.size);
// // 创建时间, Date对象:
// console.log('birth time: ' + stat.birthtime);
// // 修改时间, Date对象:
// console.log('modified time: ' + stat.mtime);
// }
// }
// });
function count() {
var arr = [];
for (var i=1; i<=3; i++) {
arr.push((function (n) {
return function () {
return n * n;
}
})(i));
}
return arr;
}
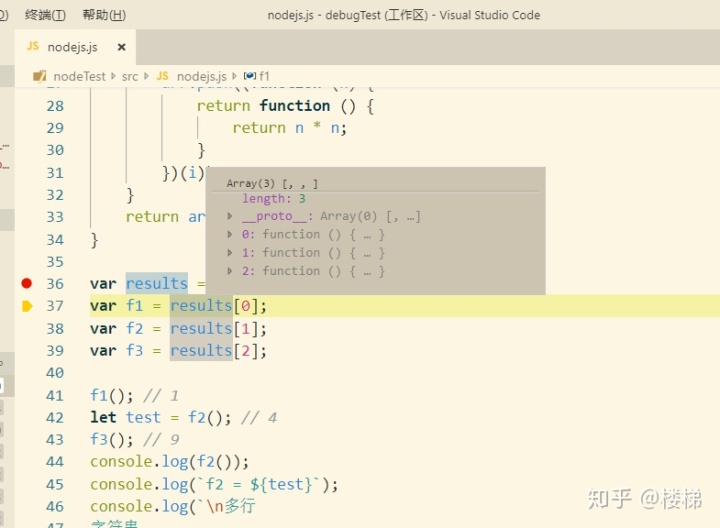
var results = count();
var f1 = results[0];
var f2 = results[1];
var f3 = results[2];
f1(); // 1
let test = f2(); // 4
f3(); // 9
console.log(f2());
console.log(`f2 = ${test}`);
console.log(`n多行
字符串
测试`);
var obj = {
birth: 1990,
getAge: function () {
var b = this.birth; // 1990
var fn = () => new Date().getFullYear() - this.birth; // this指向obj对象
return fn();
}
};
test =obj.getAge();
var obj = {
birth: 1990,
getAge: function (year) {
var b = this.birth; // 1990
var fn = (y) => y - this.birth; // this.birth仍是1990
return fn.call({birth:2000}, year);
}
};
test = obj.getAge(2015); // 25在调试F5前选择launch.json文件中"name"对应的值,如: "Run nodejs.js"。
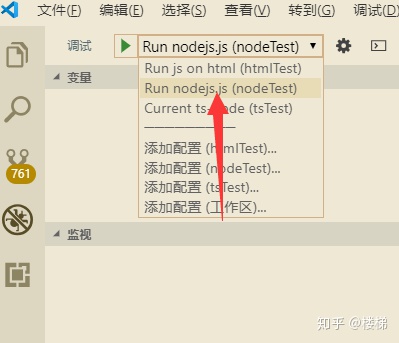
调试成功。
六、配置tsTest 目录,TypeScript 调试
这个是最麻烦的,把人搞的晕晕的。这里使用ts-node 来调试,据说还有其他办法我没有尝试……
ts-node 需要安装:
# 用于调试 TypeScript:
yarn add typescript ts-node
index.ts
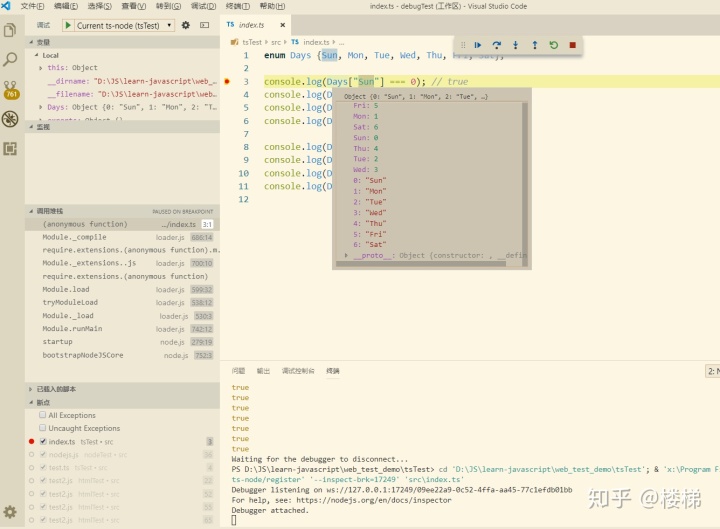
enum Days {Sun, Mon, Tue, Wed, Thu, Fri, Sat};

console.log(Days["Sun"] === 0); // true
console.log(Days["Mon"] === 1); // true
console.log(Days["Tue"] === 2); // true
console.log(Days["Sat"] === 6); // true

console.log(Days[0] === "Sun"); // true
console.log(Days[1] === "Mon"); // true
console.log(Days[2] === "Tue"); // true
console.log(Days[6] === "Sat"); // true
launch.json
{
    // 使用 IntelliSense 了解相关属性。
    // 悬停以查看现有属性的描述。
    // 欲了解更多信息,请访问: https://go.microsoft.com/fwlink/?linkid=830387
    "version": "0.2.0",
    "configurations": [
        // {
        //     "name": "TS launch Program",
        //     "type": "node",
        //     "request": "launch",
        //     "runtimeArgs": [
        //         "-r",
        //         "ts-noderegister"
        //     ],
        //     "args": [
        //         "${workspaceFolder}srctest.ts"
        //     ]
        // },
        {
            "name": "Current ts-node",
            "type": "node",
            "request": "launch",
            "args": [
             "${relativeFile}"
                // "${workspaceRoot}/src/test.ts"
            ],
            "runtimeArgs": [
              "--nolazy",
              "-r",
              "ts-node/register"
            ],
            "sourceMaps": true,
            "cwd": "${workspaceRoot}",
            "protocol": "inspector",
            "console": "integratedTerminal",
            // "program": "${workspaceRoot}/src/test.ts",
            "internalConsoleOptions": "neverOpen"
        },

    ]
}
tsconfig.json
  {
    "compilerOptions": {
      // 指定输出的 JS 代码所使用的 ECMAScript 版本,可选值为:ES3、ES5、ES2015、ES2016、ES2017、ES2018 和 ESNEXT。请根据具体的兼容性要求选择。
      "target": "es5",
      // 指定输出的 JS 代码所使用的模块化方案,可选值为:none、commonjs、amd、system、umd、es2015 或 ESNext。
      "module": "commonjs",
      // 指定编译过程中要使用的库,视具体情况而定。
      // "lib": [],
      "lib": [
        "dom",
        "es2015"
       ],
      // 是否编译 JS 文件。
      "allowJs": true,
      // 是否报告 JS 源码中的错误。
      "checkJs": true,
      // 启用 JSX 语法,可选值为 perserve、react-native、react。
      "jsx": "preserve",
      // 是否生成相关的 '.d.ts' 声明文件。
      // "declaration": true,
      // 是否生成 sourceMap 文件
      "sourceMap": true,
      // 将输出的 JS 代码整合为单个文件
      // "outFile": "./",
      // 指定输出目录
      "outDir": "./outDir",
      // 指定源码根目录
      "rootDir": "./",
      // 是否引入 tslib
      "importHelpers": true,
      // 当目标版本为 'ES5' 或 'ES3',用以提供完整的解构、'for-of iterable' 支持
      "downlevelIteration": true,

      // 启用所有严格类型检查,区别于 JS 的 strict mode。
      "strict": true,
      // 使用 any 类型时必须明确声明
      // "noImplicitAny": true,
      // 严格检查 null 类型
      // "strictNullChecks": true,
      // 严格检查函数类型
      // "strictFunctionTypes": true,
      // 严格检查 bind、call、apply 类型
      // "strictBindCallApply": true,
      // 严格检查类属性初始化
      // "strictPropertyInitialization": true,
      // 当 this 具有隐含 any 类型时报错
      // "noImplicitThis": true,
      // 始终使用严格模式(指 JS 中的严格模式)
      // "alwaysStrict": true,

      /* 实验性选项 */
      // 对 ES7 中的修饰器 decorator 提供实验性支持
      "experimentalDecorators": true,
    },
    "include": [
      "src/*"
  ],
  "exclude": [
    "node_modules",
    "src/js/*"
  ]

  }
package.json
{
  "name": "tsTest",
  "version": "1.0.0",
  "main": "index.js",
  "license": "MIT",
  "dependencies": {
    "ts-node": "^8.3.0",
    "typescript": "^3.5.3"
  }
}
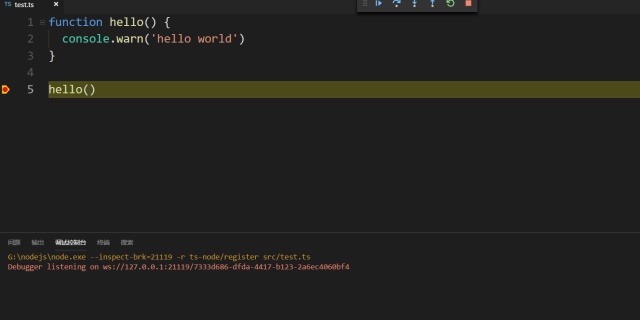
结果:
源代码在腾讯开发者平台上,地址:
git@git.dev.tencent.com:LouTi/WebDebug.git
主要参考网页:
Typescript 配置 调试www.jianshu.com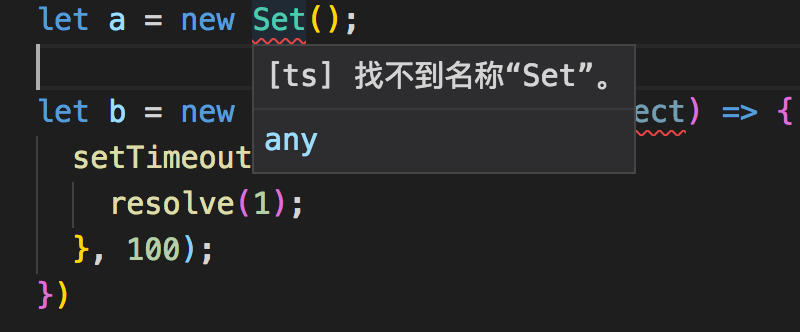


 3126
3126

 被折叠的 条评论
为什么被折叠?
被折叠的 条评论
为什么被折叠?
 到【灌水乐园】发言


