


集群规划
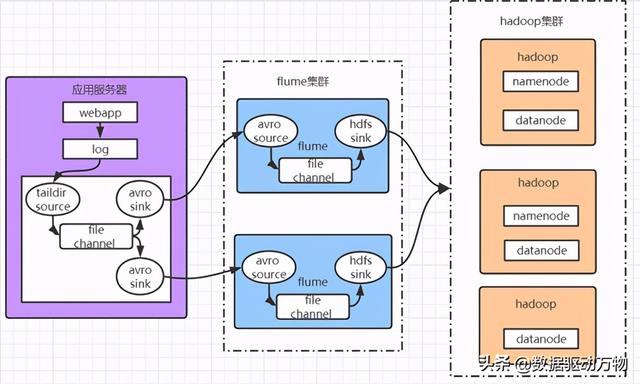
Flume集群,负载均衡和故障转移模式,笔者准备了3台机器安装了flume,其中webapp200是应用服务器,flume安装在这里,目的是收集应用服务器上的日志,通过2个avro sink分别对接到flume130和flume131机器;再通过flume130和flume131将数据传输到HDFS。(注:吞吐量大的channels可以换成kafka)。
Webapp200:TAILDIR -> file -> avro
Flume130:avro -> file -> hdfs
Flume131:avro -> file -> hdfs
流程图
下载安装
下载地址
官网:http://flume.apache.org/
解压
解压到/opt/module/目录
$ tar -zxvf apache-flume-1.9.0-bin.tar.gz -C /opt/module/配置环境变量
配置JAVA_HOME
修改配置文件名称
$ mv flume-env.sh.template flume-env.sh修改Flume-env.sh
$ vi conf/flume-env.sh修改JAVA_HOME,修改成自己的JAVA_HOME
export JAVA_HOME=/opt/module/jdk1.8.0_221配置完后,将flume分发到其他机器
配置Agent
webapp200中的Agent
创建taildir-file-hdfs.conf,并添加如下内容:
# Name the components on this agenta1.sources = r1a1.sinks = k1 k2a1.channels = c1 # Describe/configure the sourcea1.sources.r1.type = TAILDIRa1.sources.r1.channels = c1a1.sources.r1.positionFile = /opt/module/apache-flume-1.9.0-bin/position/taildir_position.jsona1.sources.r1.filegroups = f1a1.sources.r1.filegroups.f1 = /opt/logs/info*.log* # Describe the sinkgroupsa1.sinkgroups = g1a1.sinkgroups.g1.sinks = k1 k2 k3a1.sinkgroups.g1.processor.type = load_balancea1.sinkgroups.g1.processor.backoff = truea1.sinkgroups.g1.processor.selector = round_robina1.sinkgroups.g1.processor.selector.maxTimeOut=10000 #Define the sink k1a1.sinks.k1.type = avroa1.sinks.k1.channel = c1a1.sinks.k1.hostname = flume130a1.sinks.k1.port = 4545 #Define the sink k2a1.sinks.k2.type = avroa1.sinks.k2.channel = c1a1.sinks.k2.hostname = flume131a1.sinks.k2.port = 4545 # Use a channel which buffers events in memorya1.channels.c1.type = filea1.channels.c1.checkpointDir=/opt/module/apache-flume-1.9.0-bin/data/checkpoint/balancea1.channels.c1.dataDirs=/opt/module/apache-flume-1.9.0-bin/data/balancea1.channels.c1.capacity = 1000a1.channels.c1.transactionCapacity = 100 # Bind the source and sink to the channela1.sources.r1.channels = c1a1.sinks.k1.channel = c1a1.sinks.k2.channel = c1flume130和flume131中的Agent
# Name the components on this agenta1.sources = r1a1.sinks = k1a1.channels = c1 # Describe/configure the sourcea1.sources.r1.type = avroa1.sources.r1.channels = c1a1.sources.r1.bind = 0.0.0.0a1.sources.r1.port = 4545 # Describe the sinka1.sinks.k1.type = hdfsa1.sinks.k1.channel = c1a1.sinks.k1.hdfs.path = hdfs://hadoop100:9000/flume/events/%y-%m-%d/%Ha1.sinks.k1.hdfs.useLocalTimeStamp = truea1.sinks.k1.hdfs.filePrefix = events-a1.sinks.k1.hdfs.batchSize=100a1.sinks.k1.hdfs.fileType=DataStreama1.sinks.k1.hdfs.rollInterval=0a1.sinks.k1.hdfs.rollSize=134217700a1.sinks.k1.hdfs.rollCount=0a1.sinks.k1.hdfs.round = truea1.sinks.k1.hdfs.roundValue = 1a1.sinks.k1.hdfs.roundUnit = hour # Use a channel which buffers events in memorya1.channels.c1.type = filea1.channels.c1.checkpointDir=/opt/module/apache-flume-1.9.0-bin/data/checkpoint/balancea1.channels.c1.dataDirs=/opt/module/apache-flume-1.9.0-bin/data/balancea1.channels.c1.capacity = 1000a1.channels.c1.transactionCapacity = 100 # Bind the source and sink to the channela1.sources.r1.channels = c1a1.sinks.k1.channel = c1注意HDFS sink 需要放置相应的jar包和xml配置文件到flume目录下,下载和使用链接(笔者亲测有效,注意版本):flume hdfs sink所需jar包(flume1.9.0 hadoop3.1.2)。
启动flume
启动命令
$ bin/flume-ng agent -n a1 -c conf -f job/taildir-file-avro.conf后台启动,在结尾加上&
$ nohup bin/flume-ng agent -n a1 -c conf -f job/taildir-file-avro.conf &再加上nohup可以把原本在console输出的运行日志输出在[当前运行目录]/nohup.out中
关闭flume
flume进程启动动没有关闭的命令,只能kill掉。
查看占用4545端口的进程ID
$ netstat -nap | grep 4545或者直接jps找到flume进程,然后kill
$ kill [pid]


 332
332


 被折叠的 条评论
为什么被折叠?
被折叠的 条评论
为什么被折叠?
 到【灌水乐园】发言


