


Blurs an image using the median filter.C++:void medianBlur(InputArray src, OutputArray dst, int ksize)Python:cv2.medianBlur(src, ksize[, dst]) → dstParameters:src – input 1-, 3-, or 4-channel image; when ksize is 3 or 5, the image depth should be CV_8U, CV_16U, or CV_32F, for larger aperture sizes, it can only be CV_8U.
dst – destination array of the same size and type as src.
ksize – aperture linear size; it must be odd and greater than 1, for example: 3, 5, 7 ...
The function smoothes an image using the median filter with the
 aperture. Each channel of a multi-channel image is processed independently. In-place operation is supported.
中值滤波将图像的每一个像素用邻域 (以当前像素为中心的正方形区域)像素的中值取代 。
与邻域平均法相似,但计算的是中值
本博客全部内容是原创,假设转载请注明来源
#用中值法
for y in xrange(1,myh-1):
for x in xrange(1,myw-1):
lbimg[y,x]=np.median(tmpimg[y-1:y+2,x-1:x+2]
以下是调用opencv 的函数
# -*- coding: utf-8 -*-
#code:myhaspl@myhaspl.com
#中值滤波
import cv2
import numpy as np
fn="test3.jpg"
myimg=cv2.imread(fn)
img=cv2.cvtColor(myimg,cv2.COLOR_BGR2GRAY)
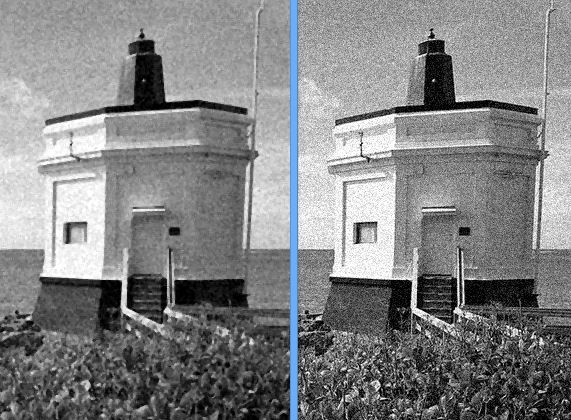
#加上椒盐噪声
#灰阶范围
w=img.shape[1]
h=img.shape[0]
newimg=np.array(img)
#噪声点数量
noisecount=50000
for k in xrange(0,noisecount):
xi=int(np.random.uniform(0,newimg.shape[1]))
xj=int(np.random.uniform(0,newimg.shape[0]))
newimg[xj,xi]=255
#滤波去噪
lbimg=cv2.medianBlur(newimg,3)
cv2.imshow('src',newimg)
cv2.imshow('dst',lbimg)
cv2.waitKey()
cv2.destroyAllWindows()
中值滤波忽略了较高阶灰度和较低阶灰度,直接取中值,由于有效得过滤椒盐噪声

对高斯噪声的滤波


 被折叠的 条评论
为什么被折叠?
被折叠的 条评论
为什么被折叠?
 到【灌水乐园】发言


