


这篇文章我们使用 scrapy 来爬取字节跳动的所有职位信息,网址如下:
加入字节跳动job.bytedance.com爬取的信息包括:职位名称(PositionName)、工作地点(WorkLocation)、职位类型(PositionType)、职位简介(PositionInfo)。
首先修改 items.py 文件,在文件中定义这些属性:
import 然后打开开发者工具,找到这些信息对应的 HTML 代码,观察多个职位信息后发现 class 属性名并没有变化:
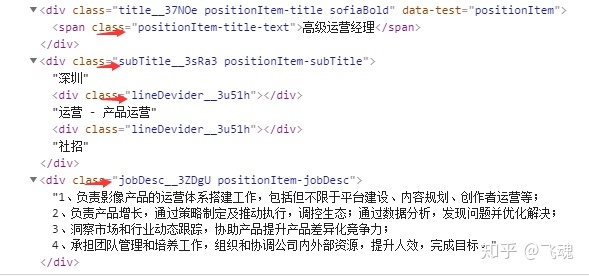
得到以上信息和规律后,用 xpath 解析后写在 Spider 类的 parse 函数中,如下:
def parse(self, response):
item = BytedanceItem()
node_list = response.xpath('//div[@class="positionItem__1giWi positionItem"]')
for node in node_list:
item['PositionName'] = node.xpath('.//span[@class="positionItem-title-text"]//text()').extract()
item['WorkLocation'] = node.xpath('.//div[@class="subTitle__3sRa3 positionItem-subTitle"]//text()[1]').extract()
item['PositionType'] = node.xpath('.//div[@class="subTitle__3sRa3 positionItem-subTitle"]//text()[2]').extract()
item['PositionInfo'] = node.xpath('normalize-space(.//div[@class="jobDesc__3ZDgU positionItem-jobDesc"]//text())').extract()
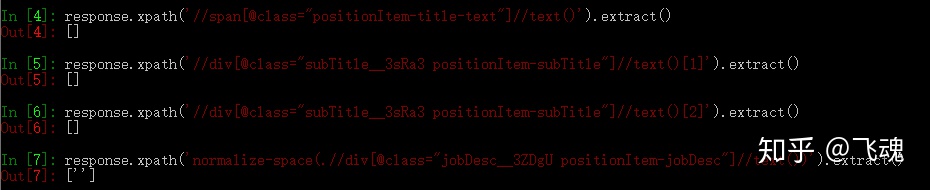
yield item最后执行爬虫代码,按照流程应该会在控制台中得到对应的输出,但实际并没有。问题出在哪里呢?仔细分析代码可知:只有 xpath 解析可能存在问题,但解析式是否有问题呢?我们这里采用 Xpath Helper 插件来验证一下。关于 Xpath Helper 插件的安装大家可自行参考其他博文,这里不做详述。
Xpath Helper 的测试结果如下:


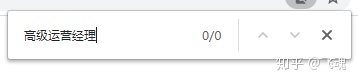
从上图可以看到,xpath 的解析式是没有问题的。然后我们再用 scrapy shell 测试:
这里我们就发现问题所在了,是在爬取过程中并没有获得职位信息,查看网页的源代码发现代码中并没有我们所要的信息,这就说明该网页是动态加载的,采用普通 xpath 解析方法是没有效果的。
对动态网页的爬取一般有两种方式:分析网页的 Ajex 请求和采用 selenium 模拟,第二种方法的普适性比第一种高。因为在分析网页的 xhr 类型中很难找出其 Ajex 的规律以及内容,因此本文采用第二种方式即 selenium 模拟浏览器行为来抓取动态加载的内容。
在 scrapy 框架中使用 selenium 来截取爬虫引擎发出的 request 请求,获取后 request 后打开网页,完成内容的加载,再返回 response 给 spider,这样 spider 就可以提取到异步加载的内容。
在本篇文章中,我们主要使用 selenium 完成两件事情:加载每页的内容和自动跳转下一页。selenium 操作主要在项目的 middlewares.py 文件中完成,这里只放入修改的内容:
from scrapy import signals
import scrapy
from selenium import webdriver
import time
from selenium.webdriver.support.ui import WebDriverWait
from scrapy.http import HtmlResponse
from selenium.webdriver.support import expected_conditions as EC
from selenium.webdriver.common.by import By

class BytedanceDownloaderMiddleware:

    def __init__(self):
        self.driver = webdriver.Chrome()
        self.driver.maximize_window()
        self.wait = WebDriverWait(self.driver, 10)

    def __del__(self):
        self.driver.close()

    def process_request(self, request, spider):

        offset = request.meta.get('offset', 1)
        self.driver.get(request.url)
        time.sleep(1)
        if offset > 1:
            self.driver.find_element_by_xpath('.//*[@class="anticon"]').click()
        #html = self.driver.page_source
        #self.wait.until(EC.presence_of_element_located((By.CSS_SELECTOR, '.m-itemlist .items .item')))
        return scrapy.http.HtmlResponse(url = request.url, body = self.driver.page_source.encode('utf-8'), encoding = 'utf-8', request = request, status = 200)# Called for each request that goes through the downloader
首先导入相应的包文件,然后在 BytedanceDownloaderMiddleware 类中做一定的修改,DownloaderMiddleware 是下载器中间件,是介于 scrapy 的 request/response 处理的钩子框架,是用于全局修改 scrapy request 和 response 的一个轻量、底层的系统。
接着在 __init_() 函数中启动浏览器,__del__() 函数用来数据获取后浏览器的关闭。
process_request() 函数为重点,先用 offset 获取偏移量代表页码,然后获取 URL,再做一个判定,如果 offset 大于 1 的话说明要爬取后续页码,这时就要用 selenium 模拟点击下一页,找到表示下一页的属性:

然后用 xpath 解析并模拟点击:
self.driver.find_element_by_xpath('.//*[@class="anticon"]').click()最后 http.HtmlResponse 是Response 的用于 HTTP 返回信息的子类,能自动发现编码方式并返回 request 的实例,更多 HtmlResponse 的参数及用法见下:
https://www.programcreek.com/python/example/71413/scrapy.http.HtmlResponsewww.programcreek.comspider 中的代码如下:
import scrapy
from scrapy import Request, Spider
from urllib.parse import quote
from bytedance.items import BytedanceItem

class ByteSpider(scrapy.Spider):
    name = 'Byte'
    allowed_domains = ['job.bytedance.com']
    url = "https://job.bytedance.com/society/position?current="
    offset = 1
    start_urls = [url + str(offset)]

    def start_requests(self):
        for offset in range(1, 10):
            url = self.url + str(offset)
            yield Request(url = url, callback = self.parse, meta = {'offset': offset}, dont_filter = True)

    def parse(self, response):
        item = BytedanceItem()
        node_list = response.xpath('//div[@class="positionItem__1giWi positionItem"]')
        for node in node_list:
            item['PositionName'] = node.xpath('.//span[@class="positionItem-title-text"]//text()').extract()
            item['WorkLocation'] = node.xpath('.//div[@class="subTitle__3sRa3 positionItem-subTitle"]//text()[1]').extract()
            item['PositionType'] = node.xpath('.//div[@class="subTitle__3sRa3 positionItem-subTitle"]//text()[2]').extract()
            item['PositionInfo'] = node.xpath('normalize-space(.//div[@class="jobDesc__3ZDgU positionItem-jobDesc"]//text())').extract()
            yield item
可以看到,与正常的爬虫文件并没有太大变化,只是在爬取多页时利用 offset 变量来控制。另外 parse 函数也没有变化,这次我们可以正常爬取的前提是爬虫已经使用 selenium 模拟浏览器的行为获取了网页加载后的源代码。
接着我们要修改 pipelines.py 文件将爬取下来的数据写入 json 文件:
import json

class BytedancePipeline:
    def __init__(self):
        self.f = open("bytedance.json", "w",encoding = 'utf-8')
    def process_item(self, item, spider):
        content = json.dumps(dict(item), ensure_ascii = False) + 'n'
        self.f.write(content)
        return item
    def close_spider(self, spider):
        self.f.close()
上述代码不做过多解释。
最后我们还要在 settings.py 文件中增加一些内容:
ROBOTSTXT_OBEY = False
USER_AGENT = 'Mozilla/5.0 (Windows NT 10.0; Win64; x64) AppleWebKit/537.36 (KHTML, like Gecko) Chrome/83.0.4103.116 Safari/537.36'
DOWNLOADER_MIDDLEWARES = {
    'bytedance.middlewares.BytedanceDownloaderMiddleware': 543,
}
ITEM_PIPELINES = {
    'bytedance.pipelines.BytedancePipeline': 300,
}
其中首先设置不遵循 robot 协议以便我们能正常获取数据,然后配置 user_agent属性可以伪装成浏览器请求,然后激活自定义的下载器中间件组件,最后还要激活 json 的保存。
这样我们的整个项目就基本完成了,最后看一下爬取的结果:

最后本文的代码已经放在我的 github 中。
https://github.com/feihun1/Pythongithub.comEND!
此专栏持续更新~~欢迎大家点赞关注收藏!


 1198
1198


 被折叠的 条评论
为什么被折叠?
被折叠的 条评论
为什么被折叠?
 到【灌水乐园】发言


