


写在前面
说来尴尬,这周我们组内阶段回顾会议中聊到我们似乎并不怎么使用 VSCode 的 Debug 功能。公司的技术探索部门(第一次知道我们还有这个部门 )之前和我们组的 Tech Lead 交流 TypeScript 和 C++的交叉调试,我们突然意识到之前我们的 Debug 更多依赖于 logs 和测试,几乎没有用到过IDE的 runtime debug 功能。虽然自己对debug 工具本身并不执着,更希望通过分析而不是试验来寻找逻辑漏洞,不过 Tech Lead 觉得用不用是一回事,有没有就是另一回事了。我们还是决定完善一下我们的debug 设置,我们组大部分人用的都是 VSCode,这次就主要研究一下怎么在 launch.json 设置统一的调试启动选项。
Visual Studio Code
launch.json
VSCode的调试设置文件保存为 ${workspace}/.vscode/launch.json 。最常用的 configuration request 种类是 launch 和 attach,大部分时候都可以直接使用 Add Configuration... 一键生成设置。
设置 launch nodejs
这个是相对最简单的用例,直接告诉debugger想要运行的目标文件就行了,选择这个选项之后就会直接运行server.js并进入debugging process。
{
    "name": "Launch Nodejs Program",
    "program": "${workspaceFolder}/src/server.js",
    "request": "launch",
    "skipFiles": [
        "<node_internals>/**"
    ],
    "type": "pwa-node"
},
sourcemap
VSCode提供的内置Node.js runtime 调试工具支持包括TypeScript 在内的很多可以 transpile 为 JavaScript 的语言。比如调试TypeScript程序时,虽然运行的是 JS 代码,调试环境会把动态响应反应在TS文件中,从而直观地显示代码进程。其实主要就是确保 debugger 能够通过 sourcemap 把 JS 代码映射到 TS 中去。可以通过在tsconfig.json 中加入 "sourceMap": true或者 tsc --sourcemap生成sourcemap。
可以选择用 "preLaunchTask": "tsc: build - tsconfig.json", 在每次运行时都自动编译。这么一来每次启动debugger时都会直接跳到TS中设置的断点中。
设置 launch mocha test
设置运行测试的debugger重点就是告诉 debugger 测试文件所在目录、mocha executable所在路径、以及其它mocharc的选项。比如:
{
    "type": "node",
    "request": "launch",
    "name": "debug unit tests",
    "cwd": "${workspaceRoot}",
    "program": "${workspaceRoot}/node_modules/mocha/bin/_mocha",
    "args": [ "--require","source-map-support/register" ],
    "sourceMaps": true,
    "internalConsoleOptions": "openOnSessionStart"
},
设置 launch via npm
如果要启动 npm script 执行的命令,比如 npm start ,就可以选择 "request": "launch", 配合 runtimeExecutable 和 runtimeArgs。其实用 runtimeExecutable几乎可以启动所有 task runner tool 启动的NodeJS 程序。
比如项目package.json中的start 指令是启动一个 js 文件:
"scripts": {
    "start": "node src/server.js"
},
对应的 launch configuration 就是:
{
    "name": "Launch via NPM",
    "request": "launch",
    "runtimeExecutable": "npm",
    "runtimeArgs": [
        "run-script",
        "start"
    ],
    "skipFiles": [
        "<node_internals>/**"
    ],
    "type": "pwa-node"
  },
比较实用的一些attributes:
runtimeExecutable就是程序启动的命令,还可以用runtimeVersion定义用哪个版本。比如要用node@12.3.0就要写:
 {
 "type": "node",
 "request": "launch",
 "name": "Launch test",
 "runtimeVersion": "12.3.0",
 "program": "${workspaceFolder}/test.js"
}- 如果要设置环境变量,可以用文件或者直接定义变量值:
 //...
 "envFile": "${workspaceFolder}/.env",
 "env": { "ENV": "LIVE" }
//...
设置 attach to process
将debugger 附在在某个正在运行的nodejs进程的做法有很多,最好用的就是设置成在用 --inspect or --inspect-brk运行程序时自动attach。
首先要在 .vscode/settings.json中加入以下2个设置:
{
    "debug.node.autoAttach": "on",
    "debug.javascript.autoAttachFilter": "onlyWithFlag"
}
autoAttachFilter 的另外2个选项always 是自动attach所有node程序,不是很适合; smart可以配合blacklist 和whitelist 使用(debug.JavaScript.autoAttachSmartPattern),限制哪些目录下的js文件运行时触发auto attach。选择了onlyWithFlag 之后每次运行 node --inspect src/server.js 就会自动停在有设置断点的地方。
当然不用设置 autoAttach 也可以,运行 node --inspect-brk src/server.js使进程开始,但是在attach之前不要运行程序,其间可以在process picker里选择该程序(一般都是9229端口,也可以通过--inspect=12345或 --inspect-brk=12345修改)。当然也可以写在 launch.json中,然后用 --inspect-brk开启后选择Attach Process开始debug :
{
    "name": "Attach Process",
    "port": 9229,
    "request": "attach",
    "skipFiles": [
        "<node_internals>/**"
    ],
    "type": "pwa-node"
},
最后这种方式对调试 TS 也适用。 autoAttach 似乎对TS的兼容性不是很好(不确定是不是设置的不对,每次都会看到 Could not load source '/server.ts': Unable to retrieve source content.,可能是 TS 的路径需要设置…)
设置 launch browser
如果要调试在浏览器内部运行的代码,需要额外的插件支持,比如 Chrome 可以用 Debugger for Chrome。
{
    "type": "chrome",
    "request": "launch",
    "name": "Launch Chrome against localhost",
    "url": "http://localhost:8080",
    "webRoot": "${workspaceRoot}"
}
启动本地web server之后选择 Launch Chrome against localhost就会自动启动browser并进入8080口访问server,并停留在代码中设置的断点中。
拓展阅读
Debug Node.js Apps using Visual Studio Codecode.visualstudio.com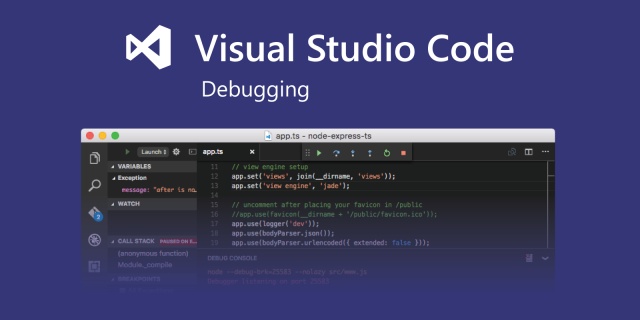


 689
689


 被折叠的 条评论
为什么被折叠?
被折叠的 条评论
为什么被折叠?
 到【灌水乐园】发言


