


究竟什么是多线程呢?
我们学过计算机组成原理都知道,进程是计算机中的一个概念,它可以保护多个线程。
那什么又是进程呢?
计算机关于某数据集合上的一次运行,是操作系统动态进行资源分配和调度的基本单位,什么意思呢?通俗易懂讲就是每个启动程序。
使用通俗易懂的表达就 类似于排队的模式,就如说我们去银行柜台取钱,为了同时进行,我们可以规定让每个人一次只能取100,取完之后就下一个人取,如此循环,先取完就等同于程序执行完了,然后慢的就继续刚刚的排队。

排队
线程是操作系统动态执行的最小单元,为什么要引入线程。因为比如你取完钱还有比较重要的事要去做,你就希望快点把钱取完,然后你就可以喊你基友,女票,你的爸妈等过来和你一起排队,这样取钱的速度就会变快,你叫的那些人就可以理解为多个线程。我们通常把进程作为分配资源的基本单位,而线程基本不占用资源,所以系统对它的调度开销就会小一些,能够更高效的提高多个程序同时执行的效率。
java为什么有多线程呢?
有效利用多线程的关键是理解程序是并发执行而不是串行执行的。例如:程序中有两个子系统需要并发执行,这时候就需要利用多线程编程。通过对多线程的使用,可以编写出非常高效的程序。不过请注意,如果你创建太多的线程,程序执行的效率实际上是降低了,而不是提升了。请记住,上下文的切换开销也很重要,如果你创建了太多的线程,CPU 花费在上下文的切换的时间将多于执行程序的时间!
简而言之,多线程是通过提高系统资源的利用率来提高我们的运行效率,当然提高执行效率选择没错了。那怎么使用呢???
Java 提供了三种创建线程的方法:
- 通过实现 Runnable 接口;
- 通过继承 Thread 类本身;
- 通过 Callable 和 Future 创建线程。
我们先不讨论他们之间的区别,那看一下怎么使用。
1.继承 Thread 类
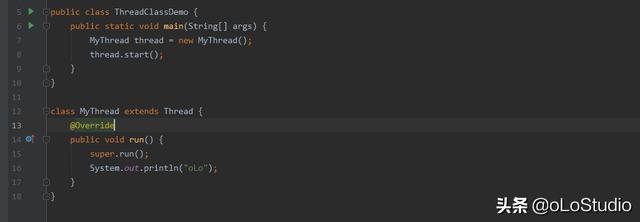
public class ThreadClassDemo { public static void main(String[] args) { MyThread thread = new MyThread(); thread.start(); }}class MyThread extends Thread { @Override public void run() { super.run(); System.out.println("oLo"); }}run结果:
oLo
2.实现 Runnable 接口
public class ThreadClassDemo implements Callable { public static void main(String [] args) { ThreadClassDemo ctt = new ThreadClassDemo(); FutureTask ft = new FutureTask<>(ctt); for(int i = 0;i < 100;i++) { System.out.println(Thread.currentThread().getName()+" 的循环变量i的值"+i); if(i==20) { new Thread(ft,"有返回值的线程").start(); } } try { System.out.println("子线程的返回值:"+ft.get()); } catch (InterruptedException e) { e.printStackTrace(); } catch (ExecutionException e) { e.printStackTrace(); } } @Override public Integer call() throws Exception { int i = 0; for(;i<100;i++) { System.out.println(Thread.currentThread().getName()+" "+i); } return i; }}运行结果是:
Runnable创建的线程...
3.通过 Callable 创建线程。
public class ThreadClassDemo implements Callable { public static void main(String [] args) { ThreadClassDemo ctt = new ThreadClassDemo(); FutureTask ft = new FutureTask<>(ctt); for(int i = 0;i < 100;i++) { System.out.println(Thread.currentThread().getName()+" 的循环变量i的值"+i); if(i==20) { new Thread(ft,"有返回值的线程").start(); } } try { System.out.println("子线程的返回值:"+ft.get()); } catch (InterruptedException e) { e.printStackTrace(); } catch (ExecutionException e) { e.printStackTrace(); } } @Override public Integer call() throws Exception { int i = 0; for(;i<100;i++) { System.out.println(Thread.currentThread().getName()+" "+i); } return i; }}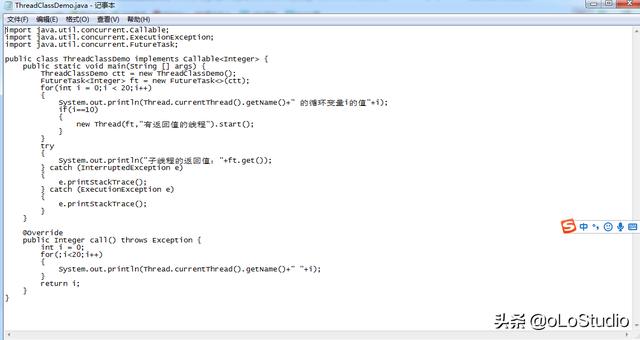
全部代码
run效果:
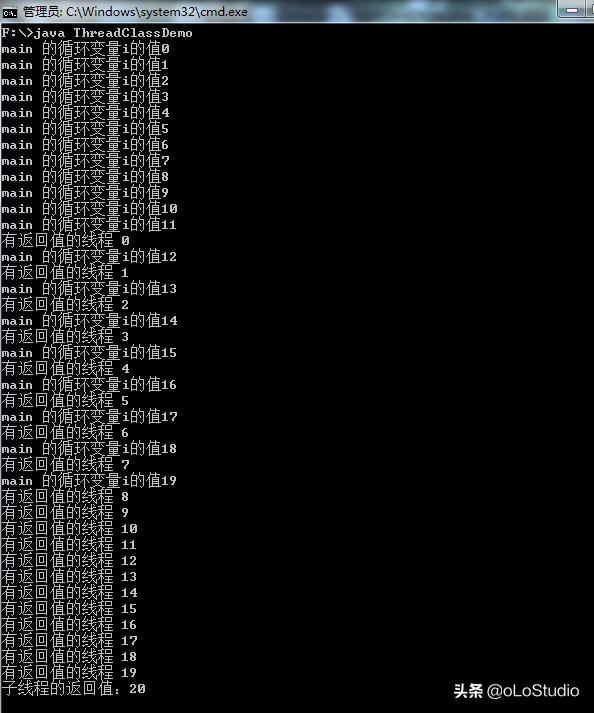
dos
知道怎么使用了,那我们接下来看看他们间的区别是什么,
采用实现 Runnable、Callable 接口的方式创建多线程时,线程类只是实现了 Runnable 接口或 Callable 接口,还可以继承其他类。建议使用 实现Runable接口方式。解决单继承的局限性。使用继承 Thread 类的方式创建多线程时,编写简单,如果需要访问当前线程,则无需使用 Thread.currentThread() 方法,直接使用 this 即可获得当前线程。注意:线程的调度是由cpu决定,执行子任务时间具有不确定性,线程运行结果与执行顺序无关。
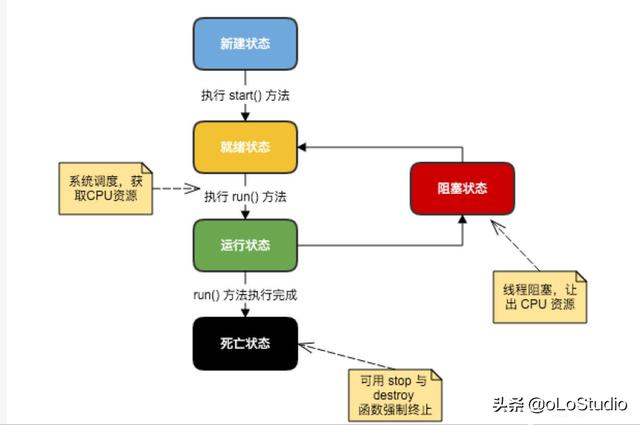
一个线程的生命周期
线程是一个动态执行的过程,它也有一个从产生到死亡的过程。
一个线程完整的生命周期如下:
线程的几个主要概念
在多线程编程时,你需要了解以下几个概念:
- 线程同步
- 线程间通信
- 线程死锁
- 线程控制:挂起、停止和恢复
线程之间变量有共享与不共享之分,共享理解为大家都使用同一份,不共享理解为每个单独持有一份。
public class ThreadClassDemo { public static void main(String[] args) { Runnable runnable = new ShareVariableRunnable(); Thread[] threads = new Thread[10]; for (int i = 0; i < 10; i++) { threads[i] = new Thread(runnable, "thread:" + (i+1)); } for (Thread thread : threads) { thread.start(); } } } class ShareVariableRunnable implements Runnable { private int num = 10; public void run() { System.out.println("" + Thread.currentThread().getName() + ",num:" + num--); } } 运行结果有重复现象,解决方案在访问变量方法中增加synchronized关键字,synchronized关键字,含有synchronized关键字的这个方法称为“互斥区” 或“临界区”,只有获得这个关键字对应的锁才能执行方法体,方法体执行完自动会释放锁。
class ShareVariableRunnable implements Runnable { private int num = 5; public synchronized void run() { System.out.println("" + Thread.currentThread().getName() + ",num:" + num--); }}如图每次输出正常递减。
停止线程
终止正在运行的线程方法有三种:
1)使用退出标志,使线程正常的执行完run方法终止。
2)使用interrupt方法,使线程异常,线程进行捕获或抛异常,正常执行完run方法终止。
3)使用stop方法强制退出。
这里主要说明前两种方法; 1.使用退出标志方法
public class ThreadClassDemo { public static void main(String[] args) throws InterruptedException { StopThread thread = new StopThread("t1"); thread.start(); Thread.sleep(1); thread.Stop(); } } class StopThread extends Thread { private boolean interrupt = true; public StopThread(String name) { super(name); } public void run() { System.out.println(Thread.currentThread().getName() + ":start!"); int i = 0; while(interrupt) { System.out.println("" + (i++)); } System.out.println("stop! timer:" + System.currentTimeMillis()); } public void Stop() { System.out.println(Thread.currentThread().getName() + ":stop! timer:" + System.currentTimeMillis()); this.interrupt = false; } }run:
t1:start!
1
2
3
4
5
6
7
8
9
10
main:stop! timer:1582787223844
t1:start!
stop! timer:1582787223882
启动了一个while循环,一直打印i的累加值
2.使用interrupt方法
public class ThreadInterruptDemo { public static void main(String[] args) throws InterruptedException { Thread thread = new InterruptThread("thread_1"); thread.start(); Thread.sleep(1); System.out.println(thread.getName() + "线程设置:interrupt"); thread.interrupt(); }}class InterruptThread extends Thread { public InterruptThread(String name) { super(name); } @Override public void run() { System.out.println(Thread.currentThread().getName() + "线程开始!"); for(int i =0; i < 1000; i++) { try { Thread.sleep(0); System.out.println("" + (i + 1)); } catch (InterruptedException e) { System.out.println(Thread.currentThread().getName() + "线程捕获异常,退出循环!"); break; } } System.out.println(Thread.currentThread().getName() + "线程结束!"); }}总结
本篇主要介绍线程基础功能,比较常用的线程创建,线程安全,停止线程。只有掌握这些基础才能更好的服务后面线程知识。
内容太多了,关于线程的使用还有很多,今天就写到这里,用户再更新。


 3472
3472


 被折叠的 条评论
为什么被折叠?
被折叠的 条评论
为什么被折叠?
 到【灌水乐园】发言


