


使用脚本语言混淆,不需要讲脚本添加到工程中
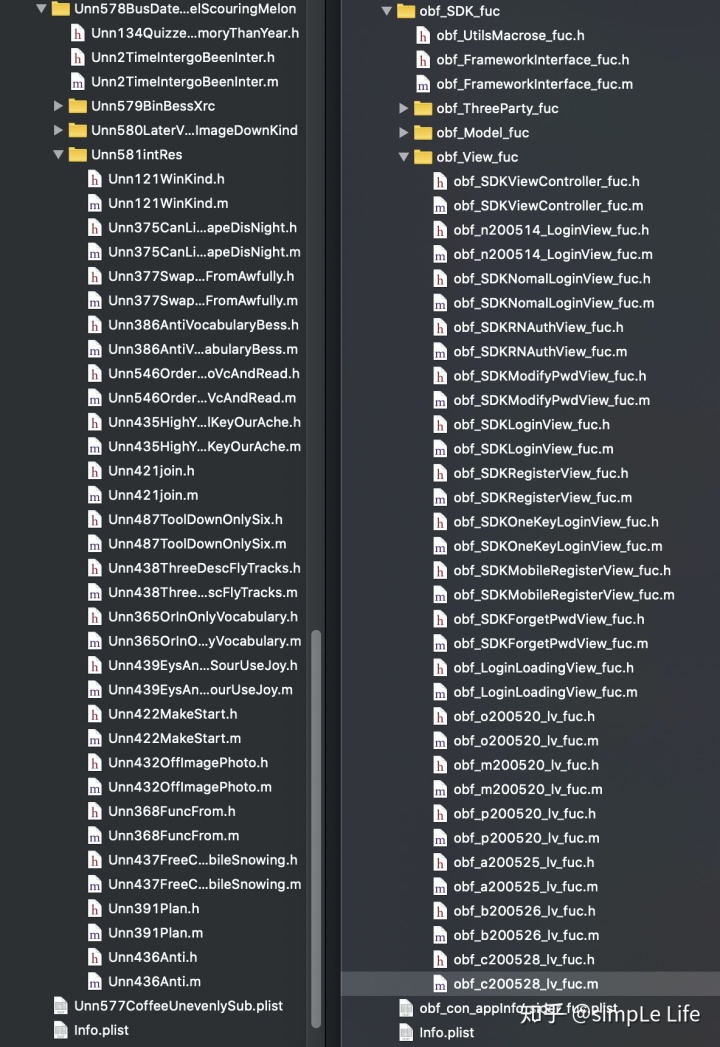
先看下效果图:
本文 脚本修改好路径即可直接使用,也可以根据需要修改为适合自己的正则表达式
下面直接上代码
类名,方法名,字段混淆脚本
混淆脚本:
#!/bin/sh
##################################
# (该脚本是在https://github.com/heqingliang/CodeObfus 上找到的)
#  代码混淆脚本
#
##################################

#识别含有多字节编码字符时遇到的解析冲突问题
export LC_CTYPE=C
export LANG=C

#配置项:
#项目路径,会混淆该路径下的文件
ProjectPath="/Users/项目路径/"
FileDir="/Users/存放路径"
#这个路径是混淆成功后,原文本和替换文本解密对应的文件存放路径(该路径不能在项目目录或其子目录),
#混淆成功后会在该路径下生成一个解密时需要的文件,根据该文件的文本内容把混淆后的内容更换为原文本内容,
#该文件名的组成由$(date +%Y%m%d)"_"$(date +%H%M)及日期_小时组成,每分钟会不一样。
#所以解密的时候需要每次更换文件路径
SecretFile=$FileDir"/tihuan"$(date +%Y%m%d)"_"$(date +%H%M)

if [[ ! -d "$FileDir" ]];   #判断此目录是否不存在
then
mkdir $FileDir;  #不存在则创建
fi
#第一个参数为项目路径
if [[ $1 ]]
then
if [[ $1 != "_" ]]; then
ProjectPath=$1
fi
fi
#第二个参数指定密钥文件路径及文件名
if [[ $2 ]]
then
if [[ $2 != "_" ]]; then
SecretFile=$2
fi
fi
##############!注意 字段中间不要包含obf_或者_fuc,没有适配中文 ##############
#查找文本中所有要求混淆的属性方法类,
#只会替换文本中符合 obf_[A-Za-z0-9_]*_fuc的字符(区分大小写,例如oB_就不会做混淆),
#如果注释内容有该类型的字符串,也会进行替换。前后缀及正则表达式可以自行置
#对于使用 _下划线访问的变量属性,不会有影响,一样会替换成对应_的混淆内容。
resultfiles=`grep 'obf_[A-Za-z0-9_]*_fuc' -rl $ProjectPath`
#查找结果为空则退出
if [[ -z $resultfiles ]]
then
echo "项目没有需要混淆的代码"
exit
else
echo "开始混淆代码..."
echo  > $SecretFile
fi

x=$(awk  '
BEGIN{srand();k=0;}
#随机数生成函数
function random_int(min, max) {
return int( rand()*(max-min+1) ) + min;
}
#随机字符串生成函数
function random_string(len) {
result="Unn"k;
#字符替换字典,可以自行设置
alpbetnum=split("Melon,Seed,Juice,Scab,Ice,Mole,Vine,Sour,Grape,Wood,Flat,Blight,Blow,Sauce,Oil,Peach,Bloom,Darling,Dear,Lief,Loving,Tootsy,Trials,Sweet,Dorsal,Dreams,Enough,Real,Hug,Desc,Them,Comes,Want,Awfully,Pick,Have,Only,Just,There,Much,Moments,Slow,Morning,Enhance,Privacy,Leave,Slime,Coffee,Forget,Key,Label,Count,Random,One,Two,Three,Six,Use,Salar,Sub,Cons,Mobile,Seabed,Devastate,Colonial,Dialect,Unevenly,Anti,Tool,Can,Down,Pass,Allow,Glider,Say,Inter,Other,Know,From,City,Swap,File,May,Max,Load,Date,Data,Msg,Or,Net,Book,Every,Been,Site,Bin,My,Idaho,Bess,Me,Present,Perfect,Scouring,Info,Online,Moment,Air,Tracks,Bus,Tree,See,Start,Come,Plan,Dis,Dev,Photo,Free,Easy,Read,Write,Any,Secure,Cry,Protect,Support,Del,Ensure,Func,Hooray,Snowing,Time,Make,Runs,Big,go,Hello,int,Test,Your,Vocabulary,With,Our,Fun,Image,Quizzes,Joy,Kid,Later,Min,Nor,Opp,Pig,Que,Res,Sub,Ter,Until,Tame,Vc,Win,Xin,Graze,Aversion,Arsenal,Obsession,Barren,Yun,Zoo,Com,Only,Memory,Ache,Blind,Cable,Drp,Eys,Fly,Good,High,Index,Job,join,Select,Last,Lag,Jump,And,Kind,Line,Moon,Night,Option,Off,On,In,Call,Than,The,Order,Pic,Que,Red,Sole,Tip,Up,Ver,Wind,Xrc,Year,Zero", alpbet, ",");
for (i=0; i<len; i++) {
result = result""alpbet[ random_int(1, alpbetnum) ];
}
return result;
}
/obf_[A-Za-z0-9_]*_fuc/{
x = $0;
#匹配需要混淆的属性变量方法
while (match(x, "obf_[A-Za-z0-9_]*_fuc") > 0) {
tempstr=substr(x, RSTART, RLENGTH);
#判断是否有之前已经找过的重复字符串
for ( i = 0; i < k; i++ ){
if (strarr[i] == tempstr){break;}
}
if(i<k){
#重复字符串,直接删除。所以不用担心混淆内容过多,可能会出现重复的混淆字符串
x=substr(x, RSTART+RLENGTH);
continue;
}else{
#不是重复字符串,添加到替换数组
strarr[k++]=tempstr;
}
#可以设置最长几个单词,目前最长6个单词,最少1个单词
randomstr=random_string(random_int(1, 6));
printf("%s:%s|", tempstr,randomstr);
#替换随机字符串
gsub(tempstr,randomstr, x);
x = substr(x, RSTART+RLENGTH);
}
}' $resultfiles )

#加密对写入密钥文件
echo $x > $SecretFile

recordnum=1
while [[ 1 == 1 ]]; do
record=`echo $x|cut -d "|" -f$recordnum`
if [[ -z $record ]]
then
break
fi
record1=`echo $record|cut -d ":" -f1`
echo "原项:"$record1
record2=`echo $record|cut -d ":" -f2`
echo "加密项:"$record2
#替换文件夹中所有文件的内容(支持正则)
#单引号不能扩展
sed -i '' "s/${record1}/${record2}/g" `grep $record1 -rl $ProjectPath`
echo "第"$recordnum"项混淆代码处理完毕"
let "recordnum = $recordnum + 1"
done

#查找需要混淆的文件名并替换
filerecordnum=1
while [[ 1 == 1 ]]; do
filerecord=`echo $x|cut -d "|" -f$filerecordnum`
if [[ -z $filerecord ]]
then
break
fi
filerecord1=`echo $filerecord|cut -d ":" -f1`
#echo "原项:"$filerecord1
filerecord2=`echo $filerecord|cut -d ":" -f2`
#echo "加密项:"$filerecord2
#改文件名

find $ProjectPath -name $filerecord1"*"| awk '
BEGIN{frecord1="'"$filerecord1"'";frecord2="'"$filerecord2"'";finish=1}
{
filestr=$0;
gsub(frecord1,frecord2,filestr);
print "mv " $0 " " filestr";echo 第"finish"个混淆文件处理完毕";
finish++;
}'|bash
let "filerecordnum = $filerecordnum + 1"
done
解混淆脚本:
#!/bin/sh
######################################
#
#  代码还原脚本
#
######################################

#识别含有多字节编码字符时遇到的解析冲突问题
export LC_CTYPE=C
export LANG=C

#配置项:
#已经混淆的项目路径
ProjectPath="/Users/项目路径/"
#这个是文件路径而不是目录,是混淆的时候生成的文本文件路径,每次不一样。
#所以每次加密后,解密时需要更换路径
SecretFile="/Users/存放路径/obfuscation/tihuan20200603_1714"
#第一个参数为项目路径
if [[ $1 ]]
then
if [[ $1 != "_" ]]; then
ProjectPath=$1
fi
fi
#第二个参数指定密钥文件路径及文件名
if [[ $2 ]]
then
if [[ $2 != "_" ]]; then
SecretFile=$2
fi
fi
##############################################################################
#内容还原
x=`cat $SecretFile`
recordnum=1
while [[ 1 == 1 ]]; do
record=`echo $x|cut -d "|" -f$recordnum`
if [[ -z $record ]]
then
break
fi
record1=`echo $record|cut -d ":" -f1`
echo "原项:"$record1
record2=`echo $record|cut -d ":" -f2`
echo "加密项:"$record2
#若项目中加密项与密钥文件的加密项不符合则退出程序
searchresult=`grep $record2 -rl $ProjectPath`
if [[ -z $searchresult ]]; then
echo "指定的密钥文件不能还原"
exit
fi
#替换文件夹中所有文件的内容(支持正则)
#单引号不能扩展
sed -i '' "s/${record2}/${record1}/g" $searchresult
echo "第"$recordnum"项混淆代码还原完毕"
let "recordnum = $recordnum + 1"
done
#文件还原
filerecordnum=1
while [[ 1 == 1 ]]; do
filerecord=`echo $x|cut -d "|" -f$filerecordnum`
if [[ -z $filerecord ]]
then
break
fi
filerecord1=`echo $filerecord|cut -d ":" -f1`
#echo "原项:"$filerecord1
filerecord2=`echo $filerecord|cut -d ":" -f2`
#echo "加密项:"$filerecord2
#改文件名

find $ProjectPath -name $filerecord2"*"| awk '
BEGIN{
frecord1="'"$filerecord1"'";
frecord2="'"$filerecord2"'";
finish=1;
}
{
filestr=$0;
gsub(frecord2,frecord1,filestr);
print "mv " $0 " "filestr ";echo 第"finish"个混淆文件还原完毕"
finish++;
}'|bash
let "filerecordnum = $filerecordnum + 1"
done
使用:
- 添加脚本代码到 obfuscation.sh 和 dis_obfuscation.sh 文件中 ,配置好需要混淆的字符格式(例如:obf_study_fuc),路径
- 打开终端 cd到脚本所在目录,chmod 777 obfuscation.sh 获取执行权限
- 终端输入 ./obfuscation.sh 执行混淆脚本
- 解混淆 终端输入 ./dis_obfuscation.sh 执行解混淆脚本
明文字符串混淆脚本(需要Python环境)
宏定义及还原字符串方法:
//confusion_NSSTRING(@"字符串混淆加密 和 解密的宏开关")
//#define obfuscation_confusion
#ifdef obfuscation_confusion
    #define confusion_NSSTRING(string) obf_decryptConstString_fuc(string)
#else
    #define confusion_NSSTRING(string) string
#endif
//confusion_NSSTRING(@"obf_Miszng_fuc 是base64串能解码为原字符串的钥匙,钥匙字符串是这样的:@"[`~!#$^&*+|{}';',[]<>?!¥ ‘;:”“’。,、?"]"")
#define obf_Miszng_fuc @"W2B+ISMkXiYqK3x7fSc7JyxcW1xdPD7vvIHvv6XigKbigKbvvIjvvInjgJDjgJHigJjvvJvvvJrigJ3igJzigJnjgILvvIwiXQ=="

static NSString* obf_decryptConstString_fuc(NSString* s){
    //confusion_NSSTRING(@"运行时会执行decryptConstString函数还原字符串")
    NSString *obf_resultString_fuc = [[NSString alloc]initWithData:[[NSData alloc]initWithBase64EncodedString:s options:0] encoding:NSUTF8StringEncoding];
    NSString *obf_regexString_fuc =  [[NSString alloc]initWithData:[[NSData alloc]initWithBase64EncodedString:obf_Miszng_fuc options:0] encoding:NSUTF8StringEncoding];
    NSRegularExpression *obf_regex_fuc = [NSRegularExpression regularExpressionWithPattern:obf_regexString_fuc options:0 error:NULL];
    return [obf_regex_fuc stringByReplacingMatchesInString:obf_resultString_fuc options:0 range:NSMakeRange(0, [obf_resultString_fuc length]) withTemplate:@""];
}
混淆脚本:
#!/usr/bin/env python
# encoding=utf8
# -*- coding: utf-8 -*-
# author by one
# 脚本将会用于对指定目录下的.h .m源码中的字符串进行转换
# 替换所有字符串常量为base64串
import importlib
import os
import re
import sys
import base64
import random
if sys.getdefaultencoding() != 'utf-8':
    reload(sys)
    sys.setdefaultencoding('utf-8')

# replace替换字符串为base64串
def replace(match):
    string = match.group(2)
    print("string : "+string)
    charlist = [';','+','$','&','*','[',']','{','}','<','>','!','#','`','~']
    list_str = [charlist[random.randint(0,len(charlist)-1)]+v+charlist[random.randint(0,len(charlist)-1)] for v in string.decode("utf8")]
    replaced_string = ''.join(str(i) for i in list_str)
    # print("替换后 :" + replaced_string)
    replaced_string = '@"' + base64.b64encode(replaced_string.encode("utf-8")) + '"'
    return match.group(1) + replaced_string + match.group(3)


# obfuscate方法是修改传入文件源代码中用confusion_NSSTRING标记的所有字符串
# 使用replace函数对字符串进行异或转换
def obfuscate(file):
    with open(file, 'r') as f:
        code = f.read()
        f.close()
        code = re.sub(r'(confusion_NSSTRING(|confusion_CSTRING()@"(.*?)"())', replace, code)
        # code = re.sub(r'(confusion_TAG(|confusion_CSTRING()(.*?)())', replace, code)
        code = re.sub(r'//#define obfuscation_confusion', '#define obfuscation_confusion', code)
        with open(file, 'w') as f:
            f.write(code)
            f.close()


# openSrcFile方法是读取源码路径下的所有.h和.m 文件
# 对每个文件执行obfuscate函数
def openSrcFile(path):
    print("混淆的路径为 : "+ path)
    # this folder is custom
    for parent,dirnames,filenames in os.walk(path):
        #case 1:
        #        for dirname in dirnames:
        #            print((" parent folder is:" + parent).encode('utf-8'))
        #            print((" dirname is:" + dirname).encode('utf-8'))
        #case 2
        for filename in filenames:
            extendedName = os.path.splitext(os.path.join(parent,filename))
            if (extendedName[1] == '.h' or extendedName[1] == '.m'):
                print("n处理源代码文件: "+ os.path.join(parent,filename))
                obfuscate(os.path.join(parent,filename))


#这里需要修改源码的路径为自己工程的文件夹名称
srcPath = '/Users/项目路径'

if __name__ == '__main__':
    print("本脚本用于对源代码中被标记的字符串进行加密")

    if len(srcPath) > 0:
        openSrcFile(srcPath)
    else:
        print("请输入正确的源代码路径")
        sys.exit()
解混淆脚本:
#!/usr/bin/env python
# encoding=utf8
# -*- coding: utf-8 -*-
# author by one
# 解密脚本
# 替换所有标记过的base64串为字符串常量,""

import importlib
import os
import re
import base64
import sys
if sys.getdefaultencoding() != 'utf-8':
    reload(sys)
    sys.setdefaultencoding('utf-8')
# 替换base64串为原字符串
def replace(match):
    string = match.group(2)
    string = base64.b64decode(string).decode("utf-8")
    decodeConfusion_string = re.sub("[+,$^*&#`<!;{>}][+"']+|[+!!,][。;<{>}?`、~#¥……&*()]+",'',string.decode('utf8'));
    replaced_string = '@"' + decodeConfusion_string + '"'
    print("replaced_string = " + replaced_string)
    return match.group(1) + replaced_string + match.group(3)
#ios解码: NSString *regexString = ;

# 修改源代码,加入字符串加密的函数
def obfuscate(file):
    with open(file, 'r') as f:
        code = f.read()
        f.close()
        # code = re.sub(r'(confusion_NSSTRING(|confusion_CSTRING()((char []) {(.*?)})())', replace, code)
        code = re.sub(r'(confusion_NSSTRING(|confusion_CSTRING()@"(.*?)"())', replace, code)
        # code = re.sub(r'(confusion_TAG(|confusion_CSTRING()(.*?)())', replace, code)
        code = re.sub(r'#define obfuscation_confusion', '//#define obfuscation_confusion', code)
        with open(file, 'w') as f:
            f.write(code)
            f.close()


#读取源码路径下的所有.h和.m 文件
def openSrcFile(path):
    print("解密路径: "+ path)
    # this folder is custom
    for parent,dirnames,filenames in os.walk(path):
        #case 1:
        #        for dirname in dirnames:
        #            print((" parent folder is:" + parent).encode('utf-8'))
        #            print((" dirname is:" + dirname).encode('utf-8'))
        #case 2
        for filename in filenames:
            extendedName = os.path.splitext(os.path.join(parent,filename))
            #读取所有.h和.m 的源文件
            if (extendedName[1] == '.h' or extendedName[1] == '.m'):
                print("已解密文件:"+ os.path.join(parent,filename))
                obfuscate(os.path.join(parent,filename))


#源码路径
srcPath = '/Users/项目路径'
if __name__ == '__main__':
    print("字符串解混淆脚本,将被标记过的base64串转为字符串,还原代码")
    if len(srcPath) > 0:
        openSrcFile(srcPath)
    else:
        print("请输入正确的源代码路径!")
        sys.exit()
使用:
- 项目中添加宏定义及还原字符串方法,添加脚本代码到 confusion.py和decrypt.py文件中 配置好项目路径
- 混淆字符串 终端输入 python 脚本路径/confusion.py
- 解混淆 终端输入 python 脚本路径/decrypt.py
其它加密方式可以根据需要自行修改脚本中的 def replace(match): 方法加解密.和项目代码中的decryptConstString还原字符串方法(与解密脚本的def replace(match): 相对应).
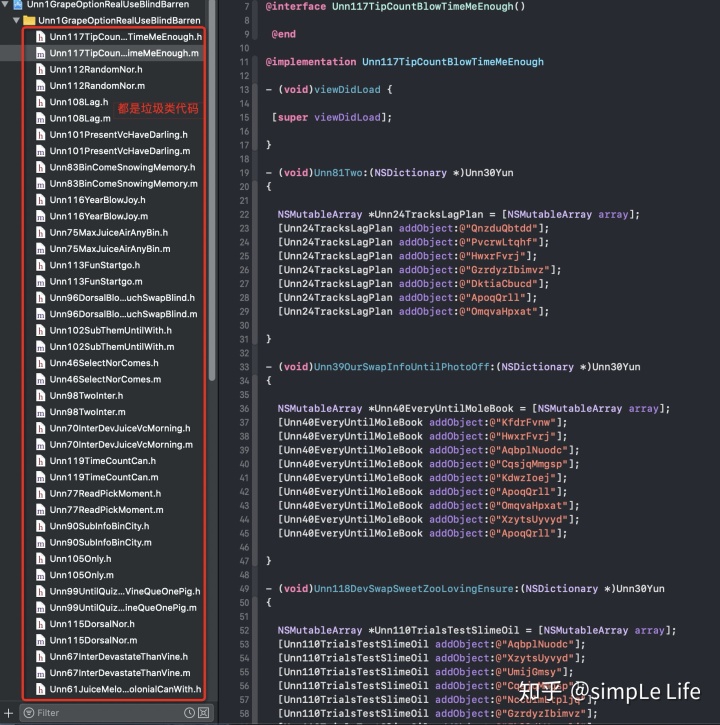
添加垃圾类代码
#!/usr/bin/env python
# _*_ coding:utf-8 _*_
#第一步:首先生成一个500位的数组 驼峰类型的元素 用作文件名 eg:AsdfdfGsd
import random
import os,sys
import string

first = "ABCDEFGHIJKLMNOPQRSTUVWXYZ"
second = "abcdefghijklmnopqrstuvwxyz"
number = "345"
index = 0
array = []
for i in range(500):
    final=(random.choice(first))
    index = random.randint(3, 5)
    for i in range(index):
        final+=(random.choice(second))
    final += (random.choice(first))
    for i in range(index):
        final+=(random.choice(second))
    array.append(final)
print (array)

#第二步:
#用上边生成的数组来创建对应的.h和.m文件
# -*- coding: utf-8 -*-
import random
import os
import string
#创建.h文件
def text_createH(fileNmae,msg,msg1,propertyNumber,methodArray,msg3):
    # full_path = sys.path[0] + '/OCFiles/' + fileNmae + '.h'  #文件所在文件夹
    full_path = '/Users/user/Downloads/SDKworkSpace_copy/GameSDK/obf_GameSDK_fuc/' + fileNmae + '.h' #工程所在目录
    file = open(full_path, 'w')
    file.write('//n//  '+fileNmae+'.hnn')
    file.write(msg)
    file.write(msg1)
    propryNameArray = []
    for index in range(1,propertyNumber):
        propryNameArray.append(random.choice(array))
    propryNameArray = list(set(propryNameArray))
    for propertyName in propryNameArray:
        file.write('@property(nonatomic,strong)'+random.choice(classArray)+' * '+'obf_'+propertyName+'_fuc;n')
    file.write('nn')
    for methodName in methodArray:
        file.write('- (void)obf_pushTo'+methodName+'VC_fuc:(NSDictionary *)obf_info_fuc;n')
    file.write(msg3)
    file.close()
    print('Done')
#创建.m文件
def text_createM(fileNmae,msg,msg1,methodArray,msg3):
    # full_path = sys.path[0] + '/OCFiles/' + fileNmae + '.m' #文件所在文件夹
    full_path = '/Users/项目路径/垃圾代码存放目录/' + fileNmae + '.m'#工程所在目录
    file = open(full_path, 'w')
    file.write('//n//  '+fileNmae+'.mnnn')
    file.write(msg)
    file.write(msg1)
    for methodName in methodArray:
        file.write('- (void)obf_pushTo'+methodName+'VC_fuc:(NSDictionary *)obf_info_fucn{nn  NSMutableArray *obf_'+methodName+'_fuc = [NSMutableArray array];n')
        number = random.randint(3, 10)
        for i in range(1,number):
            file.write('  [obf_'+methodName+'_fuc addObject:@"'+random.choice(array)+'"];n')
        file.write('n}nn')
    file.write(msg3)
    file.close()
    print('Done')

classArray = ['NSString','UILabel','NSDictionary','NSData','UIScrollView','UIView']
array = ['HwxrFvrj', 'QnzduQbtdd', 'PvcrwLtqhf', 'UvdhDbjn', 'SuntmyTxvyzg', 'CvlxwBipbp', 'GzrdyzIbimvz', 'CqsjqMmgsp', 'OxaaeuWjhasc', 'NjiardRvwgbi', 'NcculmLtpljq', 'ApoqQrll', 'GkgokDyvjb', 'EblldkVouplj', 'KfdrFvnw', 'SfhyhObftc', 'SmruByoc', 'YzcccvXmpmit', 'OmqvaHpxat', 'XzytsUyvyd', 'MjforNnnyi', 'ZvjhuIdogs', 'BzfrxzSeahxc', 'PycycwFjtpny', 'XvngtoSedljr', 'DktiaCbucd', 'AqbplNuodc', 'MzkvgZuala', 'KdwzIoej', 'AaynatUpqcfd', 'IyvwhZvtjc', 'UmijGmsy', 'AoayndXxghym']
array = list(set(array))

for name in array:
    number = random.randint(3, 10)
    methodArray = []
    for i in range(1,5):
        methodArray.append(random.choice(array))
    methodArray = list(set(methodArray))#数组去重
    text_createH('obf_'+name+'ViewController_fuc', '#import <UIKit/UIKit.h>n','@interface '+'obf_'+name+ 'ViewController_fuc:'+ 'UIViewControllernn',number,methodArray,'nn@end')
    text_createM('obf_'+name+'ViewController_fuc', '#import "'+'obf_'+name+'ViewController_fuc.h"nn' '@interface '+'obf_'+ name+'ViewController_fuc()nn @endnn','@implementation '+'obf_'+name+'ViewController_fucnn- (void)viewDidLoad { nn [super viewDidLoad];nn}nn',methodArray,'nn@end')
使用:
- 将脚本代码添加到obfuscation_addCode.py 文件,并 配置好路径.
- 打开终端 执行 python 脚本代码所在目录/obfuscation_addCode.py
可以先使用这个脚本添加好垃圾类代码再进行混淆,这样可以把垃圾类也一同混淆了.


 593
593


 被折叠的 条评论
为什么被折叠?
被折叠的 条评论
为什么被折叠?
 到【灌水乐园】发言


