


红帽rehl 6.3 升级openssh 8.0p1
适用于6.2 或者任何openssh版本为5.3p1的Linux系统
Openssl升级篇
1. 查看openssl版本
[root@localhost ~]# openssl version -a
built on: Tue May 15 05:55:51 EDT 2012
platform: linux-x86_64
options: bn(64,64) md2(int) rc4(16x,int) des(idx,cisc,16,int) blowfish(idx)
compiler: gcc -fPIC -DOPENSSL_PIC -DZLIB -DOPENSSL_THREADS -D_REENTRANT -DDSO_DLFCN -DHAVE_DLFCN_H -DKRB5_MIT -m64 -DL_ENDIAN -DTERMIO -Wall -O2 -g -pipe -Wall -Wp,-D_FORTIFY_SOURCE=2 -fexceptions -fstack-protector --param=ssp-buffer-size=4 -m64 -mtune=generic -Wa,--noexecstack -DMD32_REG_T=int -DOPENSSL_IA32_SSE2 -DOPENSSL_BN_ASM_MONT -DSHA1_ASM -DSHA256_ASM -DSHA512_ASM -DMD5_ASM -DAES_ASM -DWHIRLPOOL_ASM
OPENSSLDIR: "/etc/pki/tls"
engines: aesni dynamic
2. 将下载好的最新的openssl上传到服务器。
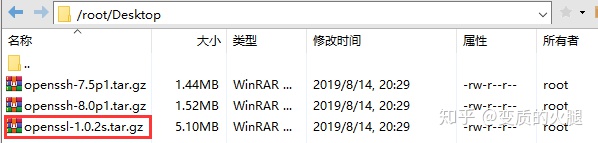
因为最新版的openssh安装需要openssl1.0.1版本以上
3. 解压并安装
[root@localhost Desktop]# tar -zxvf openssl-1.0.2s.tar.gz
[root@localhost Desktop]# cd opensslop
[root@localhost Desktop]# tar -zxvf openssl-1.0.2s.tar.gz
[root@localhost openssl-1.0.2s]# ./configure shared
[root@localhost openssl-1.0.2s]# .make && make install
没有gcc4会安装失败!
4. 替换老的openssl命令
[root@localhost Desktop]# mv /usr/bin/openssl /usr/bin/openssl.old
[root@localhost Desktop]# ln -s /usr/local/ssl/bin/openssl /usr/bin/openssl
[root@localhost Desktop]#ln -s /usr/local/ssl/include/openssl /usr/include/openssl
5. 调整配置使之加载库文件
[root@localhost ~]# echo "/usr/local/ssl/lib" >> /etc/ld.so.conf
[root@localhost ~]# ldconfig -v
ldconfig: Path `/usr/local/ssl/lib' given more than once
/usr/lib64/mysql:
libmysqlclient.so.16 -> libmysqlclient.so.16.0.0
libmysqlclient_r.so.16 -> libmysqlclient_r.so.16.0.0
/usr/lib64/qt-3.3/lib:
libqui.so.1 -> libqui.so.1.0.0
libqt-mt.so.3 -> libqt-mt.so.3.3.8
/usr/lib64/xulrunner-2:
libmozsqlite3.so -> libmozsqlite3.so
libmozalloc.so -> libmozalloc.so
libxpcom.so -> libxpcom.so
libxul.so -> libxul.so
/usr/local/ssl/lib:
libcrypto.so.1.0.0 -> libcrypto.so.1.0.0
libssl.so.1.0.0 -> libssl.so.1.0.0
/lib:
/lib64:
libdevmapper.so.1.02 -> libdevmapper.so.1.02
libreadline.so.6 -> libreadline.so.6.0
libfreebl3.so -> libfreebl3.so
libcap-ng.so.0 -> libcap-ng.so.0.0.0
libdb-4.7.so -> libdb-4.7.so
libidn.so.11 -> libidn.so.11.6.1
libgio-2.0.so.0 -> libgio-2.0.so.0.2200.5
~~~~~~~~~~~~~~~~~~太多了不粘了
检查是否升级成功
[root@localhost ~]# openssl version -a
OpenSSL 1.0.2s 28 May 2019
built on: reproducible build, date unspecified
platform: linux-x86_64
options: bn(64,64) rc4(16x,int) des(idx,cisc,16,int) idea(int) blowfish(idx)
compiler: gcc -I. -I.. -I../include -fPIC -DOPENSSL_PIC -DOPENSSL_THREADS -D_REENTRANT -DDSO_DLFCN -DHAVE_DLFCN_H -m64 -DL_ENDIAN -O3 -Wall -DOPENSSL_IA32_SSE2 -DOPENSSL_BN_ASM_MONT -DOPENSSL_BN_ASM_MONT5 -DOPENSSL_BN_ASM_GF2m -DRC4_ASM -DSHA1_ASM -DSHA256_ASM -DSHA512_ASM -DMD5_ASM -DAES_ASM -DVPAES_ASM -DBSAES_ASM -DWHIRLPOOL_ASM -DGHASH_ASM -DECP_NISTZ256_ASM
OPENSSLDIR: "/usr/local/ssl"
[root@localhost ~]#
此处显示OpenSSl 1.0.2s表示升级成功
Openssh7.5升级篇
1. 登陆服务器查看并卸载openssh
[root@localhost ~]# rpm -qa | grep openssh
openssh-5.3p1-81.el6.x86_64
openssh-clients-5.3p1-81.el6.x86_64
openssh-server-5.3p1-81.el6.x86_64
openssh-askpass-5.3p1-81.el6.x86_64
[root@localhost ~]# rpm -e --nodeps openssh-5.3p1-81.el6.x86_64
[root@localhost ~]# rpm -e --nodeps openssh-clients-5.3p1-81.el6.x86_64
[root@localhost ~]# rpm -e --nodeps openssh-server-5.3p1-81.el6.x86_64
[root@localhost ~]# rpm -e --nodeps openssh-askpass-5.3p1-81.el6.x86_64
2. 配置openssh7.5安装环境
[root@localhost ~]# install -v -m700 -d /var/lib/sshd
install: creating directory `/var/lib/sshd'
[root@localhost ~]# chown -v root:sys /var/lib/sshd
changed ownership of `/var/lib/sshd' to root:sys
[root@localhost ~]# groupadd -g 50 sshd
groupadd: group 'sshd' already exists
[root@localhost ~]# useradd -c 'sshd PrivSep' -d /var/lib/sshd -g sshd -s /bin/false -u 50 sshd
useradd: user 'sshd' already exists
用户已经存在了,可以忽略
3. 将openssh安装包上传至服务器并解压
4. 安装openssh7.5
[root@localhost Desktop]# cd openssh-7.5p1
[root@localhost openssh-7.5p1]# ./configure --prefix=/usr --sysconfdir=/etc/ssh --with-md5-passwords --with-pam --with-zlib --with-ssl-dir=/usr/local/ssl --with-privsep-path=/var/lib/sshd
报错!
checking whether OpenSSL's PRNG is internally seeded... yes
configure: error: PAM headers not found
[root@localhost openssh-7.5p1]#yum -y install pam-devel 使用yum本地源哦
在此执行一遍上面的命令即可

这里提示你将本地安装包的pam文件拷贝的pam目录里面,安装完执行。前提是你用pam认证的话。还需要在/etc/ssh/sshd_config中打开UsePAM yes才可以。反正先考进去吧。
[root@localhost openssh-7.5p1]# cp -p contrib/redhat/sshd.pam /etc/pam.d/sshd
[root@localhost openssh-7.5p1]# make && make install
5. 配置验证openssh
[root@localhost openssh-7.5p1]# echo 'X11Forwarding yes' >> /etc/ssh/sshd_config
[root@localhost openssh-7.5p1]# echo "PermitRootLogin yes" >> /etc/ssh/sshd_config
[root@localhost openssh-7.5p1]# cp -p contrib/redhat/sshd.init /etc/init.d/sshd
[root@localhost openssh-7.5p1]# chmod +x /etc/init.d/sshd
[root@localhost openssh-7.5p1]# chkconfig --add sshd
[root@localhost openssh-7.5p1]# chkconfig sshd on
以上开启root登陆,将sshd服务添加到系统服务
添加开机自启动
验证:
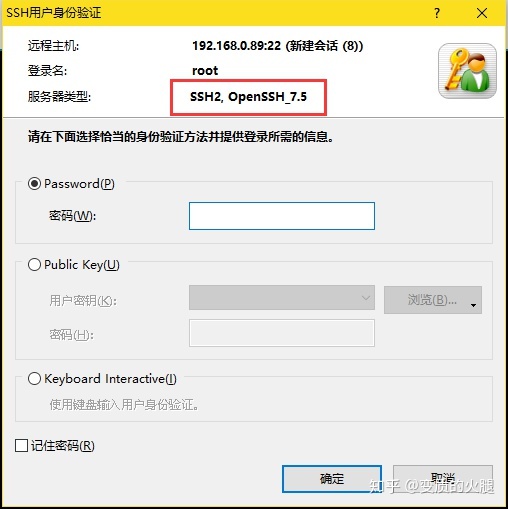
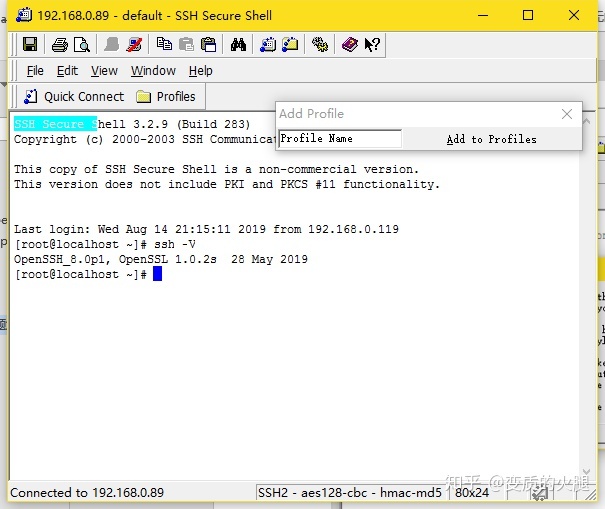
[root@localhost openssh-7.5p1]# ssh -V
OpenSSH_7.5p1, OpenSSL 1.0.2s 28 May 2019
显示Openssh7.5 表示升级成功!
Openssh 8.0 升级篇
1. 升级安装openssh8.0p1
[root@localhost Desktop]# cd openssh-8.0p1
[root@localhost openssh-8.0p1]# ./configure --prefix=/usr --sysconfdir=/etc/ssh --with-md5-passwords --with-pam --with-zlib --with-ssl-dir=/usr/local/ssl --with-privsep-path=/var/lib/sshd
一样,愿意更新一下pam文件就执行以下命令。
[root@localhost openssh-8.0p1]# cp -p contrib/redhat/sshd.pam /etc/pam.d/sshd
cp: overwrite `/etc/pam.d/sshd'? y
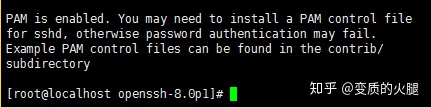
[root@localhost openssh-8.0p1]# make && make install
安装完毕后,直接执行ssh -V即可
[root@localhost openssh-8.0p1]# ssh -V
OpenSSH_8.0p1, OpenSSL 1.0.2s 28 May 201
以上显示OpenSSH8.0 完成升级
老旧SSH客户端疑难杂症问题解决
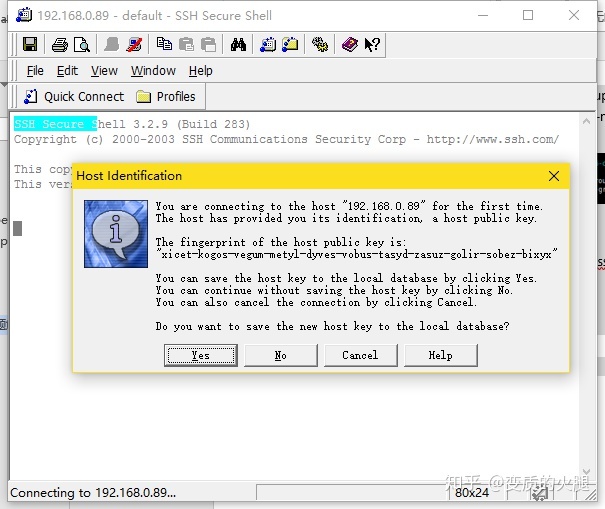
给客户升级完ssh后,客户反映使用SSH Client登陆报错,无法进行远程管理,于是查了一下错误,意思是服务器没有相对应算法导致的。
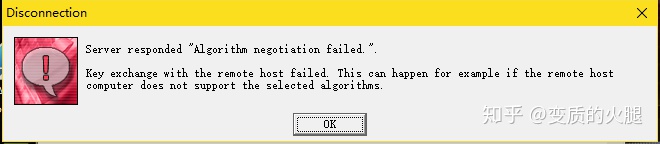
测试了Xshell,putty两款软件均无任何问题,所以因为升级openssh8.0,去掉了一些老旧的有漏洞的算法,而SSH Client软件版本时间太长,所以如果用户没办法改变客户端管理的话,需要进行以下操作。
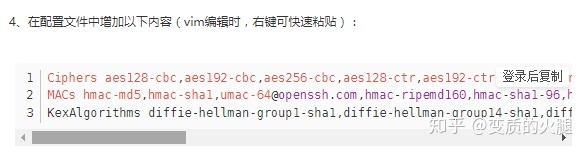
1.编辑sshd_config文件
[root@localhost openssh-8.0p1]# vim /etc/ssh/sshd_config
在文档末尾添加以下算法支持
Ciphers aes128-cbc,aes192-cbc,aes256-cbc,aes128-ctr,aes256-ctr,3des-cbc
MACs hmac-md5,hmac-sha1
KexAlgorithms diffie-hellman-group1-sha1,diffie-hellman-group14-sha1,diffie-hellman-group-exchange-sha1,diffie-hellman-group-exchange-sha256,ecdh-sha2-nistp256,ecdh-sha2-nistp384,diffie-hellman-group1-sha1,curve25519-sha256@libssh.org

重启服务即可
[root@localhost openssh-8.0p1]# service sshd restart
Stopping sshd: [ OK ]
Starting sshd: [ OK ]
2.验证测试
最后的话:
最后的问题解决,参照了网上了很多答案。不管是谁,这个算法都写了一大堆,但是我添加上之后,重启服务均失败,所有的帖子都这么写的,晕~
然后我就开始找问题,一开始没有用openssl1.0.2.s,而是用得1.0.1g版本,我觉得版本太低不支持此算法,才升级到1.0.2s,升级完毕后粘贴进去还是不行,依旧提示提示报错。
我就一个一个的将Ciphers后面的算法删除,每次删除一个重启一下服务,最后Ciphers删除了几个,MACs删除了很多才通过的。
所以网络上的帖子真是千篇一律,还是不能拿来主义,多开动小脑袋变通一下就可以解决问题了。


 4224
4224


 被折叠的 条评论
为什么被折叠?
被折叠的 条评论
为什么被折叠?
 到【灌水乐园】发言


