


目前主流的安全管理框架主要有Spring Security和Shiro。Shiro是一个轻量级框架,配置较为简单。而Spring Security则较为复杂,但功能相对较多。
Spring Boot 中对Spring Security做了一系列自动化配置,使得在Spring Boot中使用Spring Security相当方便。
Spring Security
当引入Spring Security依赖后,所有的接口都将被保护起来,访问接口时需要输入用户名和密码。用户名默认为user,密码在控制台随机生成。这是spring boot 为spring security提供的自动化配置。
当然,登录的用户名可以自己配置,配置的方法主要有两种 - 在配置文件中配置
在application.properties中添加如下配置,即可设置登录的用户名和密码
spring.security.user.name=admin
spring.security.user.password=123
spring.security.user.roles=admin- 使用Java代码配置 创建Security配置类,继承自WebSecurityConfigurerAdapter类,重写 configure(AuthenticationManagerBuilder auth)方法,如下:
@Override
    protected void configure(AuthenticationManagerBuilder auth) throws Exception {
        auth.inMemoryAuthentication()
            .withUser("admin").password("123").roles("admin")
            .and()
            .withUser("zby").password("123").roles("user");
    }
这里设置了两个用户admin和zby,用户角色分别是admin和user。
HttpSecurity
HttpSecurity是Spring Security Config用于配置http请求安全控制的安全构建器(类似于Spring Security XML配置中的http命名空间配置部分),它的构建目标是一个SecurityFilterChain,实现类使用DefaultSecurityFilterChain。该目标SecurityFilterChain最终会被Spring Security的安全过滤器FilterChainProxy所持有和应用于相应的http请求的安全控制。
spring security类中为我们提供了configure(HttpSecurity http),可以在这个方法中配置拦截规则,实现http请求的安全管理
使用方法如下:
@Override
    protected void configure(HttpSecurity http) throws Exception {
        http.authorizeRequests() //开启配置
                .antMatchers("/admin/**").hasRole("admin")
                .antMatchers("user/**").hasAnyRole("admin","user")
                .anyRequest().authenticated()
                .and()
                .formLogin()
                .loginProcessingUrl("/doLogin")
                .permitAll()
                .and()
                .csrf().disable();
    }
控制器
@RestController
public class HelloController {
    @GetMapping("/hello")
    public String hello(){
        return "hello";
    }
    @GetMapping("/admin/hello")
    public String admin(){
        return "hello admin";
    }
    @GetMapping("/user/hello")
    public String user(){
        return "hello user";
    }
}
这里设置了admin、user角色的访问权限,/admin的接口仅允许角色为admin的用户访问,/user接口角色为user和admin用户都可访问,其他页面登录后即可访问。 登录zby用户后,若要访问/admin/hello接口,浏览将会报错,显示没有权限
This application has no explicit mapping for /error, so you are seeing this as a fallback.

Tue Feb 25 15:11:50 CST 2020
There was an unexpected error (type=Forbidden, status=403).
Forbidden
/hello和/user/hello则可以正常访问。
配置多个HttpSecurity
@Configuration
    @Order(1)
    public static class AdminSecurityConfig extends WebSecurityConfigurerAdapter{
        @Override
        protected void configure(HttpSecurity http) throws Exception {
            http.antMatcher("/admin/**").authorizeRequests().anyRequest().hasRole("admin");
        }
    }

    @Configuration
    public static class OtherSecurity extends WebSecurityConfigurerAdapter{
        @Override
        protected void configure(HttpSecurity http) throws Exception {
            http.authorizeRequests().anyRequest().authenticated()
                    .and()
                    .formLogin()
                    .loginProcessingUrl("/login")
                    .permitAll()
                    .and()
                    .csrf().disable();
        }
    }
表单登录配置
配置表单登录时我们可以在 successHandler方法中,配置登录成功的回调,如果是前后端分离开发的话,登录成功后返回 JSON 即可,同理,failureHandler 方法中配置登录失败的回调,logoutSuccessHandler 中则配置注销成功的回调。
//登录成功的处理器
.successHandler(new AuthenticationSuccessHandler() {
    @Override
    public void onAuthenticationSuccess(HttpServletRequest req, HttpServletResponse resp, Authentication authentication) throws IOException, ServletException {
        resp.setContentType("application/json;charset=utf-8");
        PrintWriter out = resp.getWriter();
        Map<String, Object> map = new HashMap<>();
        map.put("status",200);
        map.put("msg",authentication.getPrincipal());
        out.write(new ObjectMapper().writeValueAsString(map));
        out.flush();
        out.close();
    }
})
登录成功后返回的json
{
    "msg": {
        "password": null,
        "username": "admin",
        "authorities": [
            {
                "authority": "ROLE_admin"
            }
        ],
        "accountNonExpired": true,
        "accountNonLocked": true,
        "credentialsNonExpired": true,
        "enabled": true
    },
    "status": 200
}
登录失败的处理器
//登录失败的处理器
.failureHandler(new AuthenticationFailureHandler() {
    @Override
    public void onAuthenticationFailure(HttpServletRequest req, HttpServletResponse resp, AuthenticationException e) throws IOException, ServletException {
        resp.setContentType("application/json;charset=utf-8");
        PrintWriter out = resp.getWriter();
        Map<String, Object> map = new HashMap<>();
        map.put("status",401);
        if(e instanceof LockedException){
            map.put("msg","账号被锁定,登录失败");
        }else if(e instanceof BadCredentialsException){
            map.put("msg","用户名或密码错误,登录失败");
        }
        out.write(new ObjectMapper().writeValueAsString(map));
        out.flush();
        out.close();
    }
})
注销登录
.logoutSuccessHandler(new LogoutSuccessHandler() {
    @Override
    public void onLogoutSuccess(HttpServletRequest req, HttpServletResponse resp, Authentication authentication) throws IOException, ServletException {
        resp.setContentType("application/json;charset=utf-8");
        PrintWriter out = resp.getWriter();
        Map<String, Object> map = new HashMap<>();
        map.put("status",200);
        map.put("msg","注销成功");
        out.write(new ObjectMapper().writeValueAsString(map));
        out.flush();
        out.close();
    }
})
注销成功,返回的json
{
    "msg": "注销成功",
    "status": 200
}
密码加密
在Spring5之后,密码必须加密后才能应用。加密密码则需要配置一个密码的编码器,可以通过PasswordEncoder实现
spring security中提供了BCryptPasswordEncoder工具进行密码加密,如将同一串进行十次加密
@Test
    void contextLoads() {
        for (int i = 0; i < 10; i++) {
            BCryptPasswordEncoder encoder = new BCryptPasswordEncoder();
            System.out.println(encoder.encode("123"));
        }
    }
得到结果如下:

同一串字符每次加密产生的结构不同,这就实现了密码的加密。
方法安全
Spring Security框架支持通过在方法上加注解来确保方法的安全。
方法安全在Spring Security中默认是没有开启的,在Spring Security配置类上加@EnableGlobalMethodSecurity(prePostEnabled = true,securedEnabled = true),开启方法安全的相关注解
@Configuration
@EnableGlobalMethodSecurity(prePostEnabled = true,securedEnabled = true)
public class MultiHttpSecurityConfig{
    ......
}
创建Service类
@Service
public class MethodService {
   @PreAuthorize("hasRole('admin')")
    public String admin(){
        return "hello admin";
    }
    @Secured("ROLE_user")
    public String user(){
        return "hello user";
    }
    @PreAuthorize("hasAnyRole('admin','author')")
    public String hello(){
        return "hello world";
    }
}
为三个方法分别赋予相应的角色。
在Controller中调用三个方法
@Autowired
    MethodService methodService;
    @GetMapping("/hello1")
    public String hello1(){
        return methodService.admin();
    }
    @GetMapping("/hello2")
    public String hello2(){
        return methodService.user();
    }
    @GetMapping("/hello3")
    public String hello3(){
        return methodService.hello();
    }
这时每个接口都可以被访问,但只有相应的角色才能调用接口中的方法。
基于数据库的认证
创建项目后并配置数据库信息
spring.datasource.url=jdbc:mysql://localhost:3306/demo?serverTimezone=GMT%2B8&characterEncoding=UTF-8
spring.datasource.username=root
spring.datasource.password=admin
spring.datasource.type=com.alibaba.druid.pool.DruidDataSource
创建User和Role的实体类
@Data
public class User implements UserDetails {
    private Integer id;
    private String username;
    private String password;
    private Boolean enabled;
    private Boolean locked;
    private List<Role> roles;
    //返回用户所以角色
    @Override
    public Collection<? extends GrantedAuthority> getAuthorities() {
        return null;
    }
    //账户是否未过期
    @Override
    public boolean isAccountNonExpired() {
        return true;
    }
    //账户是否未锁定
    @Override
    public boolean isAccountNonLocked() {
        return locked;
    }
    //密码是否未过期
    @Override
    public boolean isCredentialsNonExpired() {
        return true;
    }
    //是否可用
    @Override
    public boolean isEnabled() {
        return enabled;
    }
}
这里定义用户时需要实现UserDetails接口。
@Data
public class Role {
    private Integer id;
    private String name;
    private String nameZh;
}
Service:
@Service
public class UserService implements UserDetailsService {
    @Autowired
    UserMapper userMapper;

    @Override
    public UserDetails loadUserByUsername(String username) throws UsernameNotFoundException {
        User user = userMapper.loadUserByUsername(username);
        if(user == null){
            throw new UsernameNotFoundException("用户名不存在");
        }
        user.setRoles(userMapper.getUserRolesById(user.getId()));
        return user;
    }
}
配置SpringSecurity
@Configuration
public class SecurityConfig extends WebSecurityConfigurerAdapter {
    @Autowired
    UserService userService;

    @Override
    protected void configure(AuthenticationManagerBuilder auth) throws Exception {
        auth.userDetailsService(userService);
    }

    @Bean
    PasswordEncoder passwordEncoder(){
        return new BCryptPasswordEncoder();
    }
}
角色继承的配置
@Bean
RoleHierarchy roleHierarchy() {
    RoleHierarchyImpl roleHierarchy = new RoleHierarchyImpl();
    String hierarchy = "ROLE_dba > ROLE_admin n ROLE_admin > ROLE_user";
    roleHierarchy.setHierarchy(hierarchy);
    return roleHierarchy;
}
配置完成后,接下来指定角色和资源的对应关系即可,如下:
@Override
protected void configure(HttpSecurity http) throws Exception {
    http.authorizeRequests().antMatchers("/admin/**")
            .hasRole("admin")
            .antMatchers("/db/**")
            .hasRole("dba")
            .antMatchers("/user/**")
            .hasRole("user")
            .and()
            .formLogin()
            .loginProcessingUrl("/doLogin")
            .permitAll()
            .and()
            .csrf().disable();
}
这个表示 /db/ 格式的路径需要具备 dba 角色才能访问, /admin/ 格式的路径则需要具备 admin 角色才能访问, /user/ 格式的路径,则需要具备 user 角色才能访问,此时提供相关接口,会发现,dba 除了访问 /db/ ,也能访问 /admin/ 和 /user/ ,admin 角色除了访问 /admin/ ,也能访问 /user/ ,user 角色则只能访问 /user/** 。
动态权限配置
动态权限配置就是要将权限也存入数据库中,通过数据库中数据之间的关系来确定权限。 数据库权限如下图所示 [图片上传失败...(image-a9aca8-1582887592116)] 通过user确定role,在通过role定位到相应的menu
要实现动态权限配置,首先要配置过滤器,创建一个filter类,实现FilterInvocationSecurityMetadataSource接口,并实现接口中的方法
@Component
public class MyFilter implements FilterInvocationSecurityMetadataSource {
    //路径匹配符
    AntPathMatcher pathMatcher = new AntPathMatcher();
    @Autowired
    MenuService menuService;
    //根据请求地址,分析请求需要的角色
    @Override
    public Collection<ConfigAttribute> getAttributes(Object o) throws IllegalArgumentException {
        String requestUrl = ((FilterInvocation) o).getRequestUrl();
        List<Menu> allMenus = menuService.getAllMenus();
        for (Menu menu : allMenus) {
            if(pathMatcher.match(menu.getPattern(),requestUrl)){
                List<Role> roles = menu.getRoles();
                String[] rolesStr = new String[roles.size()];
                for (int i = 0; i < roles.size(); i++) {
                    rolesStr[i] = roles.get(i).getName();
                }
                return SecurityConfig.createList(rolesStr);
            }
        }
        return SecurityConfig.createList("ROLE_login");
    }

    @Override
    public Collection<ConfigAttribute> getAllConfigAttributes() {
        return null;
    }

    @Override
    public boolean supports(Class<?> aClass) {
        return true;
    }
}
另外还需要配置一个类用于查询是否具备请求需要的角色,若不存在则该请求是一个非法请求,该类要实现AccessDecisionManager接口。该接口提供了三个方法decide方法和两个supports方法,两个supports方法默认返回值为true。decide方法中有三个参数
void decide(Authentication authentication, Object o, Collection<ConfigAttribute> collection)- authentication:保存当前登录用户信息,代表用户拥有的角色
- o:是一个FilterInvocation对象,用于获取当前请求对象,代表需要的角色
- collection:是MyFilter类中Collection getAttributes(Object o)的返回值
@Component
public class MyAccessDecisionManager implements AccessDecisionManager {
    @Override
    public void decide(Authentication authentication, Object o, Collection<ConfigAttribute> collection) throws AccessDeniedException, InsufficientAuthenticationException {
        for (ConfigAttribute attribute : collection) {
            if("ROLE_login".equals(attribute.getAttribute())){
                //判断是否登录,若是匿名用户则表示没有登录,抛出异常
                if(authentication instanceof AnonymousAuthenticationToken){
                    throw new AccessDeniedException("非法请求!");
                }else break;
            }
            //获取当前用户具备的角色
            Collection<? extends GrantedAuthority> authorities = authentication.getAuthorities();
            for (GrantedAuthority authority : authorities) {
                if(authority.getAuthority().equals(attribute.getAttribute())){
                    break;
                }
            }
        }
        throw new AccessDeniedException("非法请求!");
    }

    @Override
    public boolean supports(ConfigAttribute configAttribute) {
        return true;
    }

    @Override
    public boolean supports(Class<?> aClass) {
        return true;
    }
}
两个类写完之后,在security配置类中引入,并在HttpSecurity方法中做如下配置:
@Autowired
MyFilter myFilter;
@Autowired
MyAccessDecisionManager myAccessDecisionManager;

 @Override
    protected void configure(HttpSecurity http) throws Exception {
        http.authorizeRequests()
            .withObjectPostProcessor(new ObjectPostProcessor<FilterSecurityInterceptor>() {
                @Override
                public <O extends FilterSecurityInterceptor> O postProcess(O o) {
                    o.setAccessDecisionManager(myAccessDecisionManager);
                    o.setSecurityMetadataSource(myFilter);
                    return o;
                }
            })
            .and()
            .formLogin()
            .permitAll()
            .and()
            .csrf().disable();
    }
编写接口测试
@RestController
public class HelloController {
    @GetMapping("/hello")
    public String hello(){
        return "hello";
    }
    @GetMapping("/db/hello")
    public String db(){
        return "hello db";
    }

    @GetMapping("/admin/hello")
    public String admin(){
        return "hello admin";
    }

    @GetMapping("/user/hello")
    public String user(){
        return "hello user";
    }
}
OAuth2协议
OAuth(Open Authorization,开放授权)是为用户资源的授权定义了一个安全、开放及简单的标准,第三方无需知道用户的账号及密码,就可获取到用户的授权信息
- 应用场景
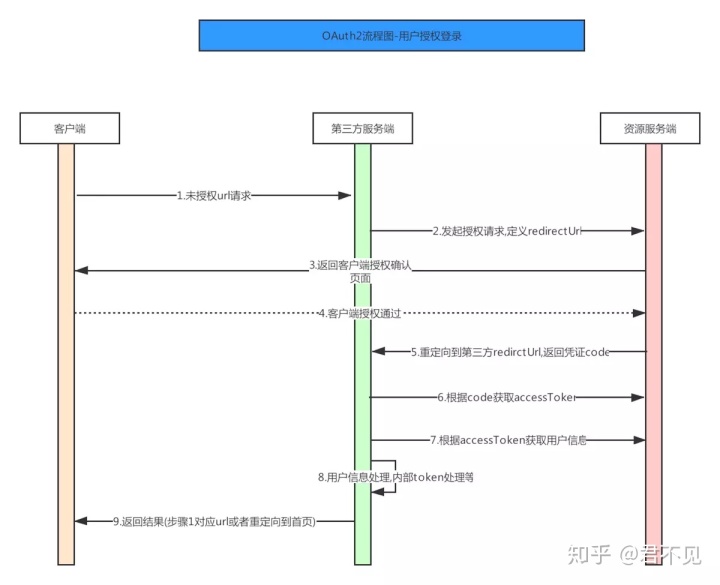
第三方应用授权登录:在APP或者网页接入一些第三方应用时,时常会需要用户登录另一个合作平台,比如QQ,微博,微信的授权登录,第三方应用通过oauth2方式获取用户信息
具体的实现流程图如下:
- Spring Security结合OAuth2 Spring Boot下的OAuth2是在spring security的基础上完成的。 添加OAuth2的依赖:
<dependency>
    <groupId>org.springframework.security.oauth</groupId>
    <artifactId>spring-security-oauth2</artifactId>
    <version>2.3.6.RELEASE</version>
</dependency>
将OAuth中的Token令牌放在Redis中,因此需要再添加Redis依赖:
<dependency>
    <groupId>org.springframework.boot</groupId>
    <artifactId>spring-boot-starter-data-redis</artifactId>
</dependency>
配置Redis
spring.redis.host=localhost
spring.redis.port=6379
spring.redis.database=0
在OAuth2中需要配置两个服务器,一个授权服务器和一个资源服务器 1.配置授权服务器
@Override
    public void configure(ClientDetailsServiceConfigurer clients) throws Exception {
        clients.inMemory()
                .withClient("password")
                .authorizedGrantTypes("password","refresh_token")//配置授权模式
                .accessTokenValiditySeconds(1800)//Token过期时间
                .resourceIds("rid")
                .scopes("all")
                .secret("$2a$10$9zMfB82E5BnYvnKriQUdaudC39H5JEu.HN80ywI2EQY/2.MuOj.i.");
    }

    //配置Token存取
    @Override
    public void configure(AuthorizationServerEndpointsConfigurer endpoints) throws Exception {
        endpoints.tokenStore(new RedisTokenStore(redisConnectionFactory))
                .authenticationManager(authenticationManager)
                .userDetailsService(userDetailsService);
    }

    //支持clientId和client security做登录认证
    @Override
    public void configure(AuthorizationServerSecurityConfigurer security) throws Exception {
        security.allowFormAuthenticationForClients();
    }
2.配置资源服务器
@Configuration
@EnableResourceServer
public class ResourceServerConfig extends ResourceServerConfigurerAdapter {
    @Override
    public void configure(ResourceServerSecurityConfigurer resources) throws Exception {
        resources.resourceId("rid").stateless(true);
    }

    @Override
    public void configure(HttpSecurity http) throws Exception {
        http.authorizeRequests().antMatchers("/admin/**").hasRole("admin")
                .antMatchers("/user/**").hasRole("user")
                .anyRequest().authenticated();
    }
}
根据OAuth2协议,先从授权服务器中获取Token,再到资源服务器上获取资源,判断给出的Token令牌是否有权限访问资源。
最后配置Security
@Configuration
public class SecurityConfig extends WebSecurityConfigurerAdapter {
    @Override
    @Bean
    protected AuthenticationManager authenticationManager() throws Exception {
        return super.authenticationManager();
    }
    @Override
    @Bean
    protected UserDetailsService userDetailsService() {
        return super.userDetailsService();
    }
    @Override
    protected void configure(AuthenticationManagerBuilder auth) throws Exception {
        auth.inMemoryAuthentication()
                .withUser("zby")
                .password("$2a$10$9zMfB82E5BnYvnKriQUdaudC39H5JEu.HN80ywI2EQY/2.MuOj.i.")
                .roles("admin")
                .and()
                .withUser("user")
                .password("$2a$10$9zMfB82E5BnYvnKriQUdaudC39H5JEu.HN80ywI2EQY/2.MuOj.i.")
                .roles("user");
    }
    @Override
    protected void configure(HttpSecurity http) throws Exception {
        http.antMatcher("/oauth/**")
                .authorizeRequests()
                .antMatchers("/oauth/**").permitAll()
                .and().csrf().disable();
    }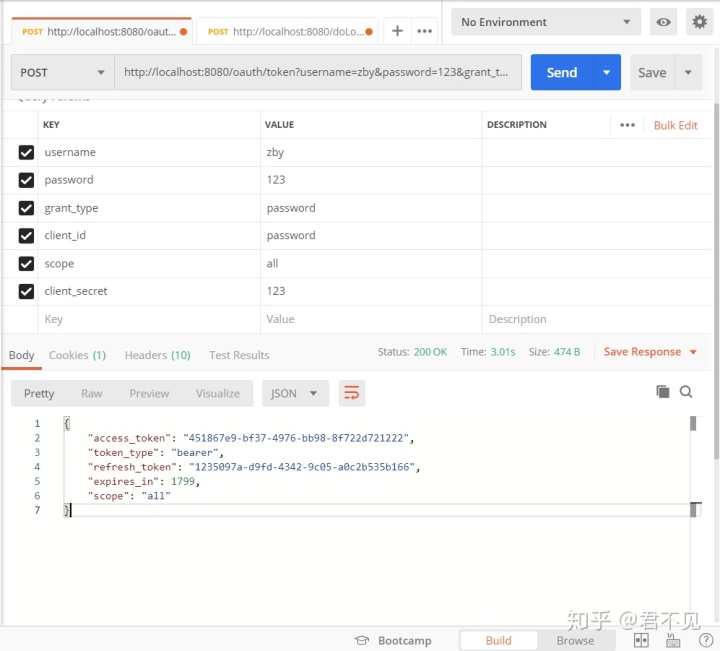
}- 测试 在PostMan中,向测试接口发送请求,可得到token
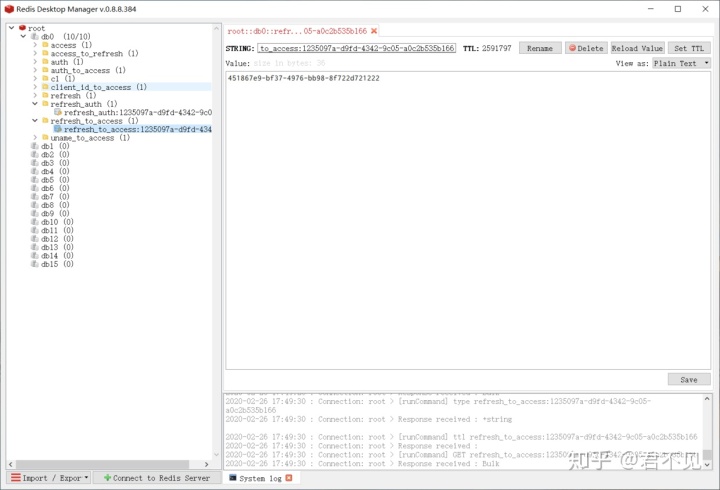
Redis中存储的Token信息
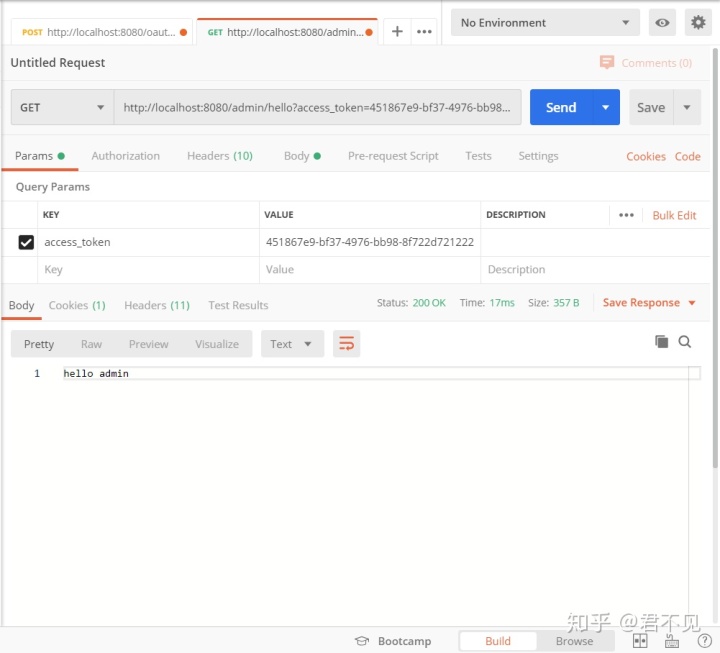
用Token去访问相应资源
token过期时可利用refresh_token参数,通过post请求获取新的token
发送请求:http://localhost:8080/oauth/token?grant_type=refresh_token&refresh_token=1235097a-d9fd-4342-9c05-a0c2b535b166&client_id=password&client_secret=123
得到新的token
{
    "access_token": "37a62e16-0774-4fc4-b043-824343b3709b",
    "token_type": "bearer",
    "refresh_token": "1235097a-d9fd-4342-9c05-a0c2b535b166",
    "expires_in": 1799,
    "scope": "all"
}
Spring Security使用Json登录
keyValue形式的登录主要通过过滤器UsernamePasswordAuthenticationFilter来实现。所以,要实现Json登录需要重新一个过滤器。
创建过滤器MyFilter类,继承UsernamePasswordAuthenticationFilter并重写attemptAuthentication方法。
public class MyFilter extends UsernamePasswordAuthenticationFilter {
    @Override
    public Authentication attemptAuthentication(HttpServletRequest request, HttpServletResponse response) throws AuthenticationException {
        //先判断发来的是否是Post请求
        if (!request.getMethod().equals("POST")) {
            throw new AuthenticationServiceException("Authentication method not supported: " + request.getMethod());
        }
        //解析Json
        if(request.getContentType().equals(MediaType.APPLICATION_JSON_VALUE)){
            //若if条件成立,说明用户以JSON形式传递参数
            String username = null;
            String password = null;

            try {
                Map<String,String> map = new ObjectMapper().readValue(request.getInputStream(), Map.class);
                username = map.get("username");
                password = map.get("password");
            } catch (IOException e) {
                e.printStackTrace();
            }


            if (username == null) {
                username = "";
            }

            if (password == null) {
                password = "";
            }

            username = username.trim();
            UsernamePasswordAuthenticationToken authRequest = new UsernamePasswordAuthenticationToken(username, password);
            this.setDetails(request, authRequest);
            return this.getAuthenticationManager().authenticate(authRequest);
        }
        //否则调用父类的方法登录
        return super.attemptAuthentication(request, response);
    }
}
之后,在Security配置类中进行配置,使MyFilter中的方法生效
整合JWT
JWT,全称是Json Web Token,是一种JSON风格的轻量级的授权和身份认证规范,可实现无状态、分布式的Web应用授权。特别适用于分布式站点的单点登录(SSO)场景。
jwt数据格式
jwt数据格式一般包括三部分:
1.头部(Header)
头部用于描述关于该JWT的最基本的信息,例如其类型以及签名所用的算法等。这也可以被表示成一个JSON对象。对头部进行Base64Url编码(可解码),得到第一部分数据。
2.载荷(Payload)
就是有效数据,在官方文档中(RFC7519),这里给了7个示例信息:
- iss (issuer):表示签发人
- exp (expiration time):表示token过期时间
- sub (subject):主题
- aud (audience):受众
- nbf (Not Before):生效时间
- iat (Issued At):签发时间
- jti (JWT ID):编号 这部分也会采用Base64Url编码,得到第二部分数据。
3.签名(Signature)
是整个数据的认证信息。一般根据前两步的数据,再加上服务的的密钥secret(密钥保存在服务端,不能泄露给客户端),通过Header中配置的加密算法生成。用于验证整个数据完整和可靠性。
将这三部分用.连接成一个完整的字符串,构成了最终的jwt:
eyJhbGciOiJIUzI1NiIsInR5cCI6IkpXVCJ9.eyJzdWIiOiIxMjM0NTY3ODkwIiwibmFtZSI6IkpvaG4gRG9lIiwiYWRtaW4iOnRydWV9.TJVA95OrM7E2cBab30RMHrHDcEfxjoYZgeFONFh7HgQ
JWT交互流程
1.应用程序或客户端向授权服务器请求授权 2.获取到授权后,授权服务器会向应用程序返回访问令牌 3、应用程序使用访问令牌来访问受保护资源(如API)
因为JWT签发的token中已经包含了用户的身份信息,并且每次请求都会携带,这样服务的就无需保存用户信息,甚至无需去数据库查询,这样就完全符合了RESTful的无状态规范。
在Spring Security中整合JWT
首先创建一个Spring Boot项目,创建时添加Spring Security依赖,创建完成后,添加 jjwt 依赖,pom.xml文件如下:
<dependency>
    <groupId>io.jsonwebtoken</groupId>
    <artifactId>jjwt</artifactId>
    <version>0.9.1</version>
</dependency>
然后在项目中创建一个简单的 User 对象实现 UserDetails 接口。
再创建一个HelloController,内容如下:
@RestController
public class HelloController {
    @GetMapping("/hello")
    public String hello() {
        return "hello jwt !";
    }
    @GetMapping("/admin")
    public String admin() {
        return "hello admin !";
    }
}
HelloController有两个接口,设计是 /hello 接口可以被具有 user 角色的用户访问,而 /admin 接口则可以被具有 admin 角色的用户访问。
接下来提供两个和 JWT 相关的过滤器配置:
一个是用户登录的过滤器,在用户的登录的过滤器中校验用户是否登录成功,如果登录成功,则生成一个token返回给客户端,登录失败则给前端一个登录失败的提示。用户登录的过滤器 JwtLoginFilter 继承自 AbstractAuthenticationProcessingFilter,并实现其中的三个默认方法。 在attemptAuthentication方法中,从登录参数中提取出用户名密码,然后调用AuthenticationManager.authenticate()方法去进行自动校验。
如果校验成功,就会来到successfulAuthentication回调中,在successfulAuthentication方法中,将用户角色遍历然后用一个“,”连接起来,然后再利用Jwts去生成token,按照代码的顺序,生成过程一共配置了四个参数,分别是用户角色、主题、过期时间以及加密算法和密钥,然后将生成的token写出到客户端。
如果校验失败就会来到unsuccessfulAuthentication方法中,在这个方法中返回一个错误提示给客户端即可。
public class JwtLoginFilter extends AbstractAuthenticationProcessingFilter {
    public JwtLoginFilter(String defaultFilterProcessesUrl, AuthenticationManager authenticationManager) {
        super(new AntPathRequestMatcher(defaultFilterProcessesUrl));
        setAuthenticationManager(authenticationManager);
    }

    @Override
    public Authentication attemptAuthentication(HttpServletRequest req, HttpServletResponse resp) throws AuthenticationException, IOException, ServletException {
        User user = new ObjectMapper().readValue(req.getInputStream(),User.class);
        return getAuthenticationManager().authenticate(new UsernamePasswordAuthenticationToken(user.getUsername(),user.getPassword()));
    }

    @Override
    protected void successfulAuthentication(HttpServletRequest req, HttpServletResponse resp, FilterChain chain, Authentication authResult) throws IOException, ServletException {
        Collection<? extends GrantedAuthority> authorities = authResult.getAuthorities();//获取登录用户角色
        StringBuffer sb = new StringBuffer();
        for (GrantedAuthority authority : authorities) {
            sb.append(authority.getAuthority()).append(",");
        }
        String jwt = Jwts.builder()
                .claim("authorities", sb)
                .setSubject(authResult.getName())
                .setExpiration(new Date(System.currentTimeMillis() + 60 * 60 * 1000))
                .signWith(SignatureAlgorithm.HS512, "zby@123")
                .compact();//生成JWT的Token
        Map<String,String> map = new HashMap<>();
        map.put("token",jwt);
        map.put("msg","登录成功");
        resp.setContentType("application/json:charset=utf-8");
        PrintWriter out = resp.getWriter();
        out.write(new ObjectMapper().writeValueAsString(map));
        out.flush();
        out.close();
    }

    @Override
    protected void unsuccessfulAuthentication(HttpServletRequest req, HttpServletResponse resp, AuthenticationException failed) throws IOException, ServletException {
        Map<String,String> map = new HashMap<>();
        map.put("msg","登录失败");
        resp.setContentType("application/json:charset=utf-8");
        PrintWriter out = resp.getWriter();
        out.write(new ObjectMapper().writeValueAsString(map));
        out.flush();
        out.close();
    }
}
第二个过滤器则是当其他请求发送来,校验token的过滤器,如果校验成功,就让请求继续执行。首先从请求头中提取出authorization字段,这个字段对应的value就是用户的token。将提取出来的token字符串转换为一个Claims对象,再从Claims对象中提取出当前用户名和用户角色,创建一个UsernamePasswordAuthenticationToken放到当前的Context中,然后执行过滤链使请求继续执行下去。
public class JwtFilter extends GenericFilterBean {
    @Override
    public void doFilter(ServletRequest servletRequest, ServletResponse servletResponse, FilterChain filterChain) throws IOException, ServletException {
        HttpServletRequest req = (HttpServletRequest) servletRequest;
        String jwtToken = req.getHeader("authorization");
        Jws<Claims> jws = Jwts.parser().setSigningKey("zby@123")
                .parseClaimsJws(jwtToken.replace("Bearer", ""));
        Claims claims = jws.getBody();
        String username = claims.getSubject();
        List<GrantedAuthority> authorities = AuthorityUtils.commaSeparatedStringToAuthorityList(((String) claims.get("authorities")));
        UsernamePasswordAuthenticationToken token = new UsernamePasswordAuthenticationToken(username, null, authorities);
        SecurityContextHolder.getContext().setAuthentication(token);
        filterChain.doFilter(servletRequest,servletResponse);
    }
}
两个过滤器配置好后,在Security配置类中添加两个过滤器
@Override
protected void configure(HttpSecurity http) throws Exception {
    http.authorizeRequests()
        .antMatchers("/hello")
        .hasRole("user")
        .antMatchers("/admin")
        .hasRole("admin")
        .antMatchers(HttpMethod.POST,"/login")
        .permitAll()
        .anyRequest().authenticated()
        .and()
        .addFilterBefore(new JwtLoginFilter("/login",authenticationManager()), UsernamePasswordAuthenticationFilter.class)
         .addFilterBefore(new JwtFilter(),UsernamePasswordAuthenticationFilter.class)
         .csrf().disable();
    }
配置路径规则时, /hello 接口必须要具备 user 角色才能访问, /admin 接口必须要具备 admin 角色才能访问,POST 请求并且是 /login 接口则可以直接通过,其他接口必须认证后才能访问。
登陆成功,返回一个Json
{
"msg": "登录成功",
"token": "eyJhbGciOiJIUzUxMiJ9.eyJhdXRob3JpdGllcyI6IlJPTEVfYWRtaW4sIiwic3ViIjoiYWRtaW4iLCJleHAiOjE1ODI3OTM0NjR9.4cTTZpjl1j2YxldmTHWbK6oN0htJn-kW9V2p6Nj7jc26znegUmtrXohy0dgH4uDH053UL4-IICSo_ETzJJtmeQ"
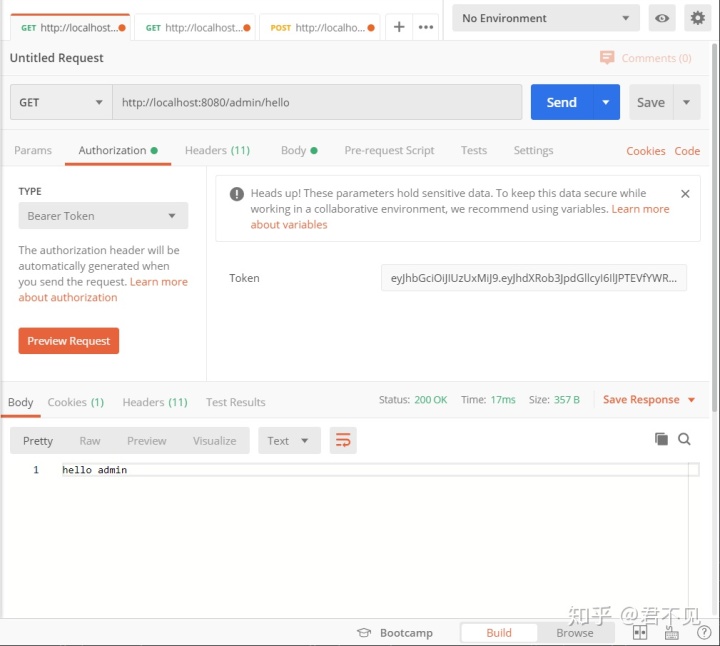
}登录成功后返回一个token,请求资源时需要提供token才能正常访问


 557
557

 被折叠的 条评论
为什么被折叠?
被折叠的 条评论
为什么被折叠?
 到【灌水乐园】发言


