


爬虫
一、爬虫的介绍

1. 什么是爬虫?
网络爬虫也叫网络蜘蛛,如果把互联网比喻成一个蜘蛛网,那么蜘蛛就是在网上爬来爬去的蜘蛛,爬虫程序通过请求url地址,根据响应的内容进行解析采集数据, 比如:如果响应内容是html,分析dom结构,进行dom解析、或者正则匹配,如果响应内容是xml/json数据,就可以转数据对象,然后对数据进行解析。
2. 有什么作用?
通过有效的爬虫手段批量采集数据,可以降低人工成本,提高有效数据量,给予运营/销售的数据支撑,加快产品发展。

2.1 应用领域
- 批量采集某个领域的招聘数据,对某个行业的招聘情况进行分析
- 批量采集某个行业的电商数据,以分析出具体热销商品,进行商业决策 • 采集目标客户数据,以进行后续营销
- 批量爬取腾讯动漫的漫画,以实现脱网本地集中浏览
- 开发一款火车票抢票程序,以实现自动抢票 ...
3. 业界的情况
目前互联网产品竞争激烈,业界大部分都会使用爬虫技术对竞品产品的数据进行挖掘、采集、大数据分析,这是必备手段,并且很多公司都设立了爬虫工程师的岗位
4. 合法性
爬虫是利用程序进行批量爬取网页上的公开信息,也就是前端显示的数据信息。因为信息是完全公开的,所以是合法的。其实就像浏览器一样,浏览器解析响应内容并渲染为页面,而爬虫解析响应内容采集想要的数据进行存储。
5. 反爬虫
爬虫很难完全的制止,道高一尺魔高一丈,这是一场没有硝烟的战争,码农VS码农
反爬虫一些手段:
- 合法检测:请求校验(useragent,referer,接口加签名,等)
- 小黑屋:IP/用户限制请求频率,或者直接拦截
- 投毒:反爬虫高境界可以不用拦截,拦截是一时的,投毒返回虚假数据,可以误导竞品决策
- ... ...
6. 选择一门语言
爬虫可以用各种语言写, C++, Java都可以, 为什么要Python?
首先用C++搞网络开发的例子不多(可能是我见得太少) 然后由于Oracle收购了Sun, Java目前虽然在Android开发上很重要, 但是如果Google官司进展不顺利, 那么很有可能用Go语言替代掉Java来做Android开发. 在这计算机速度高速增长的年代里, 选语言都要看他爹的业绩, 真是稍不注意就落后于时代. 随着计算机速度的高速发展, 某种语言开发的软件运行的时间复杂度的常数系数已经不像以前那么重要, 我们可以越来越偏爱为程序员打造的而不是为计算机打造的语言. 比如Ruby这种传说中的纯种而又飘逸的的OOP语言, 或者Python这种稍严谨而流行库又非常多的语言, 都大大弱化了针对计算机运行速度而打造的特性, 强化了为程序员容易思考而打造的特性. 所以我选择Python
7. 选择Python版本
有2和3两个版本, 3比较新, 听说改动大. 根据我在知乎上搜集的观点来看, 我还是倾向于使用”在趋势中将会越来越火”的版本, 而非”目前已经很稳定而且很成熟”的版本. 这是个人喜好, 而且预测不一定准确. 但是如果Python3无法像Python2那么火, 那么整个Python语言就不可避免的随着时间的推移越来越落后, 因此我想其实选哪个的最坏风险都一样, 但是最好回报却是Python3的大. 其实两者区别也可以说大也可以说不大, 最终都不是什么大问题. 我选择的是Python 3
8. 爬虫基本套路
- 基本流程
- 目标数据
- 来源地址
- 结构分析
- 实现构思
- 操刀编码
- 基本手段
- 破解请求限制
- 请求头设置,如:useragant为有效客户端
- 控制请求频率(根据实际情景)
- IP代理
- 签名/加密参数从html/cookie/js分析
- 破解登录授权
- 请求带上用户cookie信息
- 破解验证码
- 简单的验证码可以使用识图读验证码第三方库
- 解析数据
- HTML Dom解析
- 正则匹配,通过的正则表达式来匹配想要爬取的数据,如:有些数据不是在html 标签里,而是在html的script 标签的js变量中
- 使用第三方库解析html dom,比较喜欢类jquery的库
- 数据字符串
- 正则匹配(根据情景使用)
- 转 JSON/XML 对象进行解析
9. python爬虫
- python写爬虫的优势
- python语法易学,容易上手
- 社区活跃,实现方案多可参考
- 各种功能包丰富
- 少量代码即可完成强大功能
- 涉及模块包
- 请求
urllibrequests
- 多线程
threading
- 正则
re
- json解析
json
- html dom解析
beautiful soup
- lxml
- xpath
- 操作浏览器
selenium
二、工具的使用
1. 常用的工具
- python
- pycharm
- 浏览器
- chrome
- 火狐
- fiddler
2 fiddler的使用
2.1 操作界面
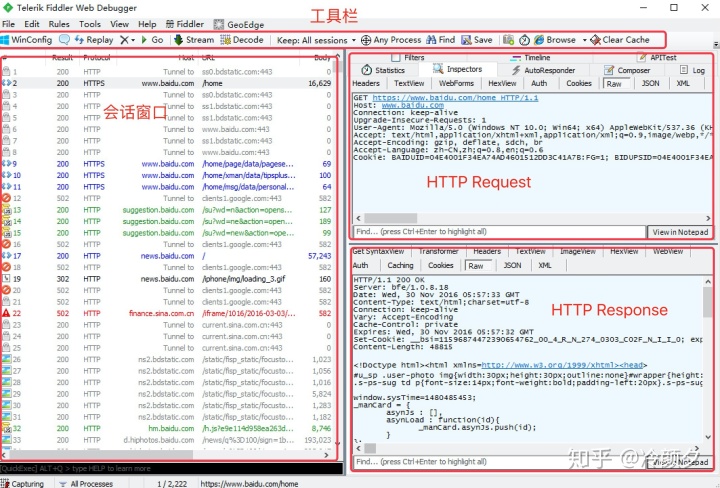
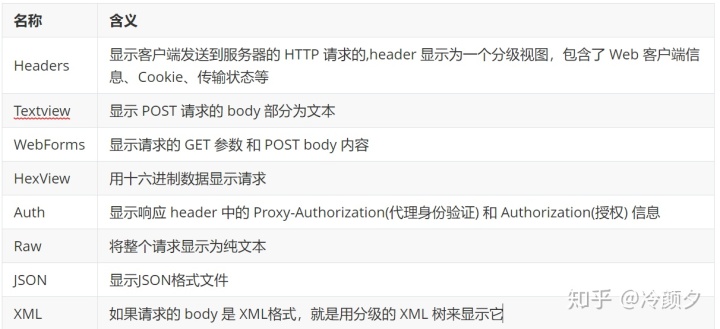
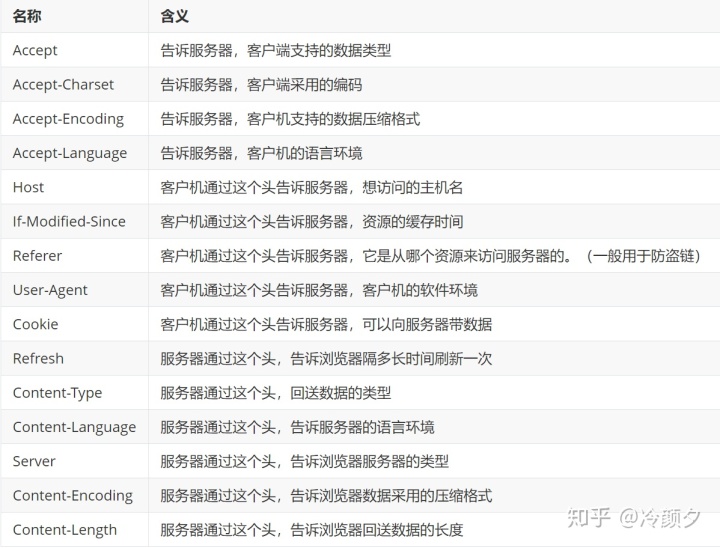
2.2 界面含义
请求 (Request) 部分详解

2.3 设置
2.3.1 如何打开
启动Fiddler,打开菜单栏中的 Tools >Options,打开“Fiddler Options”对话框

2.3.2 设置
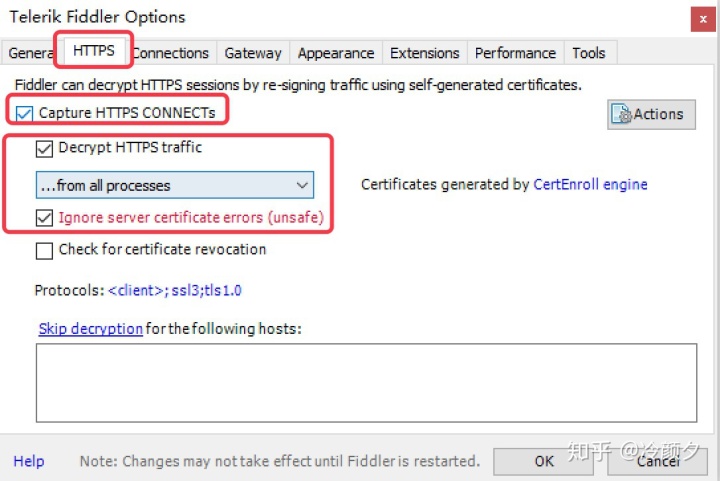
- Capture HTTPS CONNECTs 捕捉HTTPS连接
- Decrypt HTTPS traffic 解密HTTPS通信
- Ignore server certificate errors 忽略服务器证书错误
- all processes 所有进程
- browsers onlye 仅浏览器
- nono- browsers only 仅非浏览器
- remote clients only 仅远程链接
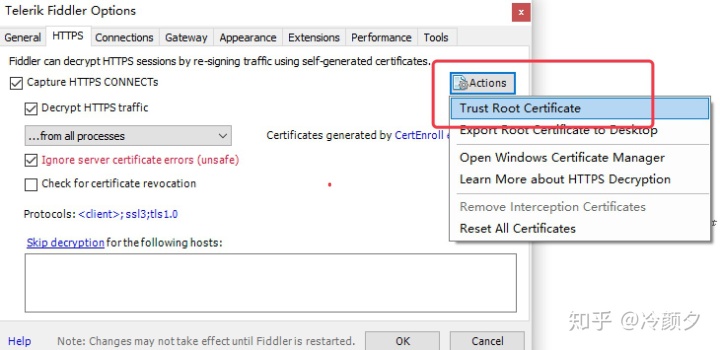
- Trust Root Certificate(受信任的根证书) 配置Windows信任这个根证书解决安全警告
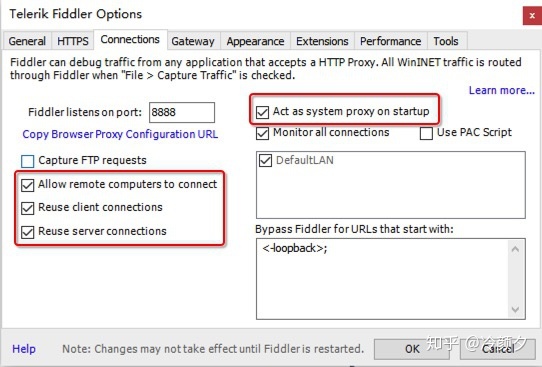
- Allow remote computers to connect 允许远程连接
- Act as system proxy on startup 作为系统启动代理
- resuse client connections 重用客户端链接
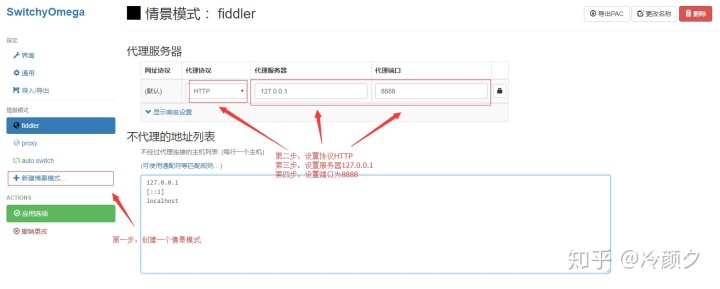
2.4 捕获链接(抓包)
- 安装SwitchyOmega 代理管理 Chrome 浏览器插件
- 设置代理
三、爬取数据-urllib库
1. 小试牛刀
怎样扒网页呢?
其实就是根据URL来获取它的网页信息,虽然我们在浏览器中看到的是一幅幅优美的画面,但是其实是由浏览器解释才呈现出来的,实质它是一段HTML代码,加 JS、CSS,如果把网页比作一个人,那么HTML便是他的骨架,JS便是他的肌肉,CSS便是它的衣服。所以最重要的部分是存在于HTML中的,下面我们就写个例子来扒一个网页下来
from urllib.request import urlopen

response = urlopen("http://www.baidu.com")
print(response.read().decode())
真正的程序就两行,执行如下命令查看运行结果,感受一下
看,这个网页的源码已经被我们扒下来了,是不是很酸爽?
- 代码:01_第一个爬虫.py
from urllib.request import urlopen

# 要访问的地址
url = "http://www.baidu.com"
# 发送请求
re = urlopen(url)
# 读取内容
info = re.read()
# 打印内容
# print(info)
# 打印转码(utf-8)后的内容
# print(info.decode())
# 返回 HTTP  的响应码
print(re.getcode())
# 返回实际访问的url
print(re.geturl())
# 返回HTTP响应头
print(re.info())
2. 常见到的方法
- requset.urlopen(url,data,timeout)
- 第一个参数url即为URL,第二个参数data是访问URL时要传送的数据,第三个timeout是设置超时时间。
- 第二三个参数是可以不传送的,data默认为空None,timeout默认为 socket._GLOBAL_DEFAULT_TIMEOUT
- 第一个参数URL是必须要传送的,在这个例子里面我们传送了百度的URL,执行urlopen方法之后,返回一个response对象,返回信息便保存在这里面。
- response.read()
- read()方法就是读取文件里的全部内容,返回bytes类型
- response.getcode()
- 返回 HTTP的响应码,成功返回200,4服务器页面出错,5服务器问题
- response.geturl()
- 返回 返回实际数据的实际URL,防止重定向问题
- http://response.info()
- 返回 服务器响应的HTTP报头
3. Request对象
其实上面的urlopen参数可以传入一个request请求,它其实就是一个Request类的实例,构造时需要传入Url,Data等等的内容。比如上面的两行代码,我们可以这么改写
from urllib.request import urlopen
from urllib.request import Request

request = Request("http://www.baidu.com")
response = urlopen(requst)
print response.read().decode()
运行结果是完全一样的,只不过中间多了一个request对象,推荐大家这么写,因为在构建请求时还需要加入好多内容,通过构建一个request,服务器响应请求得到应答,这样显得逻辑上清晰明确
- 代码:02_Request对象.py
from urllib.request import urlopen,Request
from random import choice

url = "http://www.baidu.com"
# User-Agent 列表
user_agents = [
    "ua1",
    "ua2",
    "ua3"
]
# print(choice(user_agents))
# 定义 User-Agent 变量
headers = {
    "User-Agent": choice(user_agents)
}
# 封装 request 对象
req = Request(url, headers=headers)
print(req.get_header("User-agent"))
# 发送请求
resp = urlopen(req)
print(resp.read().decode())
4. Get 请求
大部分被传输到浏览器的html,images,js,css, … 都是通过GET方法发出请求的。它是获取数据的主要方法
例如:http://www.baidu.com 搜索
Get请求的参数都是在Url中体现的,如果有中文,需要转码,这时我们可使用
- urllib.parse.urlencode()
- urllib.parse. quote()
5. Post 请求
我们说了Request请求对象的里有data参数,它就是用在POST里的,我们要传送的数据就是这个参数data,data是一个字典,里面要匹配键值对
发送请求/响应header头的含义:
- 代码:05_post请求.py
from urllib.request import Request,urlopen
from urllib.parse import urlencode

url = "http://www..sxt.cn/index/login/login.html"
args = {
    "user": "17703181473",
    "password": "123456"
}
f_data = urlencode(args)
print(f_data)
headers ={
    "Usre-Agent": "Mozilla/5.0 (Windows NT 10.0; Win64; x64) AppleWebKit/537.36 (KHTML, like Gecko) Chrome/68.0.3440.106 Safari/537.36"
}
# post 请求需要在请求的时候传递参数  data=
request = Request(url, headers=headers, data=f_data.encode())   # encode() 编码
resp = urlopen(request)
print(resp.read().decode())      # decode() 解码
6. 响应的编码
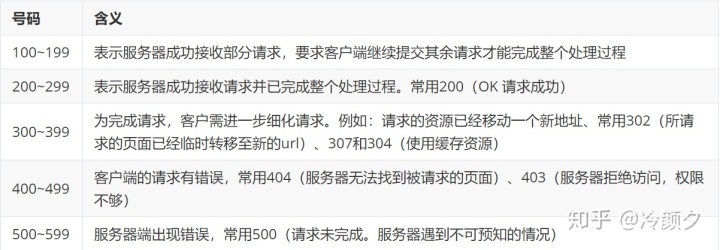
响应状态码
响应状态代码有三位数字组成,第一个数字定义了响应的类别,且有五种可能取值。 常见状态码:
7. Ajax的请求获取数据
有些网页内容使用AJAX加载,而AJAX一般返回的是JSON,直接对AJAX地址进行post或get,就返回JSON数据了
- 代码:07_ajax请求.py
from urllib.request import Request, urlopen
from time import sleep

url = "https://movie.douban.com/j/new_search_subjects?sort=U&range=0,10&tags=%E5%8A%A8%E6%BC%AB&start=20"
headers = {
    "User-Agent": "Mozilla/5.0 (Windows NT 10.0; Win64; x64) AppleWebKit/537.36 (KHTML, like Gecko) Chrome/76.0.3809.100 Safari/537.36"
}
i = 0
base_url = "https://movie.douban.com/j/new_search_subjects?sort=U&range=0,10&tags=%E5%8A%A8%E6%BC%AB&start={}&limit=40"

while True:
    req = Request(base_url.format(i * 40), headers=headers)
    resp = urlopen(req)
    info = resp.read().decode()
    if info == "[]":
        break
    else:
        i += 1
    print("第{}页".format(i))
    print(info)
    sleep(3)
8. 请求 SSL证书验证
现在随处可见 https 开头的网站,urllib可以为 HTTPS 请求验证SSL证书,就像web浏览器一样,如果网站的SSL证书是经过CA认证的,则能够正常访问,如:https://www.baidu.com/
如果SSL证书验证不通过,或者操作系统不信任服务器的安全证书,比如浏览器在访问12306网站如:https://www.12306.cn/mormhweb/的时候,会警告用户证书不受信任。(据说 12306 网站证书是自己做的,没有通过CA认证)
# 忽略SSL安全认证
context = ssl._create_unverified_context()
# 添加到context参数里
response = urllib.request.urlopen(request, context = context)- 代码:08_https请求.py
from urllib.request import Request, urlopen
import ssl

url = "https://www.12306.cn/index/index.html"
headers = {
    "User-Agent": "Mozilla/5.0 (Windows NT 10.0; Win64; x64) AppleWebKit/537.36 (KHTML, like Gecko) Chrome/76.0.3809.100 Safari/537.36"
}
req = Request(url, headers=headers)
# 忽略证书
context = ssl._create_unverified_context()
resp = urlopen(req, context=context)
print(resp.read().decode())
四、urllib库的高级用法
1. 伪装自己
有些网站不会同意程序直接用上面的方式进行访问,如果识别有问题,那么站点根本不会响应,所以为了完全模拟浏览器的工作
1.1 设置请求头
其中User-Agent代表用的哪个请求的浏览器
代码如下:
from urllib.request import urlopen
from urllib.request import Request

url = 'http://www.server.com/login'
user_agent = 'Mozilla/4.0 (compatible; MSIE 5.5; Windows NT)'
headers = { 'User-Agent' : user_agent }

request = Request(url, headers=headers)
response = urlopen(request)
page = response.read()
对付防盗链,服务器会识别headers中的referer是不是它自己,如果不是,有的服务器不会响应,所以我们还可以在headers中加入referer
代码如下:
headers = {
         'User-Agent' : 'Mozilla/4.0 (compatible; MSIE 5.5; Windows NT)',
         'Referer':'http://www.zhihu.com/articles'
          }
提示
在此可以使用多个User_Agent:然后随即选择
import urllib.request
import random
ua_list = [
    "Mozilla/4.0 (compatible; MSIE 8.0; Windows NT 6.0)",
    "Mozilla/5.0 (Windows; U; Windows NT 5.2) Gecko/2008070208 Firefox/3.0.1",
    "Mozilla/5.0 (Windows; U; Windows NT 5.2) AppleWebKit/525.13 (KHTML, like Gecko) Version/3.1",
    "Mozilla/5.0 (Windows; U; Windows NT 5.2) AppleWebKit/525.13 (KHTML, like Gecko) Chrome/0.2.149.27",
    "Mozilla/4.0 (compatible; MSIE 8.0; Windows NT 5.1; Trident/4.0; Mozilla/4.0 (compatible; MSIE 6.0; Windows NT 5.1; SV1) ;  QIHU 360EE)"
]
user_agent = random.choice(ua_list)
request = urllib.request.Request("http://www.baidu.com")
request.add_header("User-Agent",user_agent)
#区分大小写
print(request.get_header("User-agent"))
对于随机UserAgent,PYthon有提供一个模块库fake-useragent,安装如下:
pip3 install fake-useragent- 代码:09_UserAgent.py
from urllib.request import Request, urlopen
from fake_useragent import UserAgent

# from random import choice
url = "http://httpbin.org/get"

# 手写一个 user_agents 列表
# user_agents = [
#     "Mozilla/5.0 (Windows NT 10.0; Win64; x64)1",
#     "Mozilla/5.0 (Windows NT 10.0; Win64; x64)2",
#     "Mozilla/5.0 (Windows NT 10.0; Win64; x64)3"
# ]

ua = UserAgent()    # 创建一个 UserAgent(用户请求头)对象 ua
# print(ua.ie)      # ua.ie  可以随机生成一个 ie 浏览器的请求头信息
# print(ua.chrome)      # ua.chrome  可以随机生成一个 chrome 浏览器的请求头信息
# print(ua.firefox)     # ua.firefox  可以随机生成一个 firefox 浏览器的请求头信息

# print(ua.random)      # 可以随机生成一个 ie,chrome, firefox 等浏览器的请求头信息

headers = {
    "User-Agent": ua.random
}
req = Request(url, headers=headers)
resp = urlopen(req)
print(resp.read().decode())
1.2 设置代理Proxy
假如一个网站它会检测某一段时间某个IP 的访问次数,如果访问次数过多,它会禁止你的访问。所以你可以设置一些代理服务器来帮助你做工作,每隔一段时间换一个代理,网站君都不知道是谁在捣鬼了,这酸爽!
分类:
透明代理:目标网站知道你使用了代理并且知道你的源IP地址,这种代理显然不符合我们这里使用代理的初衷
匿名代理:匿名程度比较低,也就是网站知道你使用了代理,但是并不知道你的源IP地址
高匿代理:这是最保险的方式,目标网站既不知道你使用的代理更不知道你的源IP
代码如下:
from urllib.request import ProxyHandler
from urllib.request import build_opener

proxy = ProxyHandler({"http": "119.109.197.195:80"})
opener = build_opener(proxy)
url = "http://www.baidu.com"
response = opener.open(url)
print(response.read().decode("utf-8"))- 代码:10_opener的使用1.py
from urllib.request import Request
from fake_useragent import UserAgent
from urllib.request import build_opener

url = "http://httpbin.org/get"
headers = {
    "User-Agent": UserAgent().chrome
}
req = Request(url, headers=headers)
# 默认的 urlopen()不支持发送和使用代理,在 使用代理 的时候需要自定义opener
opener = build_opener()
resp = opener.open(req)
print(resp.read().decode())
11_opener的使用2.py
from urllib.request import Request, build_opener
from fake_useragent import UserAgent
from urllib.request import HTTPHandler

url = "http://httpbin.org/get"
headers = {
    "User-Agent": UserAgent().chrome
}
req = Request(url, headers=headers)
handler = HTTPHandler(debuglevel=1)     # 参数debuglevel=1,是调试程序时使用的。没有打印语句也会在控制台返回一些请求信息
opener = build_opener(handler)
resp = opener.open(req)
# print(resp.read().decode())
12_Proxy的使用.py
from urllib.request import Request, build_opener
from fake_useragent import UserAgent
from urllib.request import ProxyHandler

url = "http://httpbin.org/get"
headers = {"User-Agent": UserAgent().chrom}
rep = Request(url, headers=headers)

# 代理的两种使用方式
# handler = ProxyHandler({"http": "ip:port"})
# handler = ProxyHandler({"http": "name:password@ip:port"})

handler = ProxyHandler({"http": "219.141.153.41:80"})
# handler = ProxyHandler({"http": "398707160:j8inhg2g@39.105.117.225:16818"})
opener = build_opener(handler)
resp = opener.open(rep)
print(resp.read().decode())
2 使用DebugLog
可以通过下面的方法把 Debug Log 打开,这样收发包的内容就会在屏幕上打印出来,方便调试,这个也不太常用,仅提一下
from urllib.request import HTTPHandler
from urllib.request import build_opener
from urllib.request import Request

handler = HTTPHandler(debuglevel=1)
opener = build_opener(handler)
url = "http://www.sohu.com"
request = Request(url)
response = opener.open(request)
五、URLError 与 Cookie
1. Cookie
为什么要使用Cookie呢?
Cookie,指某些网站为了辨别用户身份、进行session跟踪而储存在用户本地终端上的数据(通常经过加密)
比如说有些网站需要登录后才能访问某个页面,在登录之前,你想抓取某个页面内容是不允许的。那么我们可以利用Urllib库保存我们登录的Cookie,然后再抓取其他页面就达到目的了。
1.1 Opener
当你获取一个URL你使用一个opener(一个urllib.OpenerDirector的实例)。在前面,我们都是使用的默认的opener,也就是urlopen。它是一个特殊的opener,可以理解成opener的一个特殊实例,传入的参数仅仅是url,data,timeout。
如果我们需要用到Cookie,只用这个opener是不能达到目的的,所以我们需要创建更一般的opener来实现对Cookie的设置
1.2 Cookielib
cookielib模块的主要作用是提供可存储cookie的对象,以便于与urllib模块配合使用来访问Internet资源。Cookielib模块非常强大,我们可以利用本模块的CookieJar类的对象来捕获cookie并在后续连接请求时重新发送,比如可以实现模拟登录功能。该模块主要的对象有CookieJar、FileCookieJar、MozillaCookieJar、LWPCookieJar
案例1:获取Cookie保存到变量
from urllib.request import HTTPCookieProcessor
from urllib.request import build_opener
from urllib.request import Request
from http.cookiejar import CookieJar
from urllib.parse import urlencode

#声明一个CookieJar对象实例来保存cookie
cookie = CookieJar()
#利用HTTPCookieProcessor对象来创建cookie处理器
cookiePro = HTTPCookieProcessor(cookie)
#通过handler来构建opener
opener = build_opener(cookiePro)
login_url = "http://www.sxt.cn/index/login/login"
header = {"User-Agent": "Mozilla/5.0 (Windows NT 10.0; Win64; x64) AppleWebKit/537.36 (KHTML, like Gecko) Chrome/61.0.3163.79 Safari/537.36"}
fromdata = {
    "user": "17703181473",
    "password": "123456"
}
data = urlencode(fromdata).encode()
request = Request(login_url, headers=header, data=data)
response = opener.open(request)
info_url = 'http://www.sxt.cn/index/user.html'
request_info = Request(info_url)
response = opener.open(request_info)
html = response.read()
print(html.decode())
我们使用以上方法将cookie保存到变量中,然后打印出了cookie中的值,运行结果如下
以上程序的原理如下
创建一个带有cookie的opener,在访问登录的URL时,将登录后的cookie保存下来,然后利用这个cookie来访问其他网址。
案例2:cookie保存文件的读取
from urllib.request import build_opener, Request
from urllib.request import HTTPCookieProcessor
from http.cookiejar import MozillaCookieJar
from urllib.parse import urlencode


def get_cookie():
    # 请求头
    headers = {
        "User-Agent": "Mozilla/5.0 (Windows NT 10.0; Win64; x64) AppleWebKit/537.36 (KHTML, like Gecko) Chrome/65.0.3325.181 Safari/537.36"}
    login_url = "http://www.sxt.cn/index/login/login.html"
    form_data = {
        "user": "17703181473",
        "password": "123456"
    }
    # 转换编码
    f_data = urlencode(form_data)
    req = Request(login_url, headers=headers, data=f_data.encode())
    # 创建保存可以序列化cookie的文件对象
    cookie = MozillaCookieJar("cookie.txt")
    # 构造可保存cookie的控制器
    c_handler = HTTPCookieProcessor(cookie)
    # 构造opener
    opener = build_opener(c_handler)
    # 发送请求 -- 登录成功 (用户名和密码 正确)
    opener.open(req)
    cookie.save(ignore_discard=True, ignore_expires=True)


def use_cookie():
    # 请求头
    headers = {
        "User-Agent": "Mozilla/5.0 (Windows NT 10.0; Win64; x64) AppleWebKit/537.36 (KHTML, like Gecko) Chrome/65.0.3325.181 Safari/537.36"}

    info_url = "http://www.sxt.cn/index/user.html"
    # 创建保存可以序列化cookie的文件对象
    cookie = MozillaCookieJar()
    # 加载cookie文件
    cookie.load("cookie.txt", ignore_discard=True, ignore_expires=True)
    # 构造可保存cookie的控制器
    c_handler = HTTPCookieProcessor(cookie)
    # 构造opener
    opener = build_opener(c_handler)
    # 构造访问个人页面请求
    req1 = Request(info_url, headers=headers)
    # 发送请求
    resp2 = opener.open(req1)
    # 打印信息
    print(resp2.read().decode())


if __name__ == '__main__':
    # get_cookie()
    use_cookie()
2. URLError
首先解释下URLError可能产生的原因:
- 网络无连接,即本机无法上网
- 连接不到特定的服务器
- 服务器不存在
在代码中,我们需要用try-except语句来包围并捕获相应的异常,代码如下:
from urllib.request import Request, urlopen
from urllib.error import URLError

url = "http://www.sx435334t.cn/index/us3er.html"
try:
    headers = {
        "User-Agent": "Mozilla/5.0 (Windows NT 10.0; Win64; x64) AppleWebKit/537.36 (KHTML, like Gecko) Chrome/65.0.3325.181 Safari/537.36"
    }
    req = Request(url, headers=headers)

    resp = urlopen(url, timeout=1)

    print(resp.read().decode())
except URLError as e:
    if len(e.args) == 0:
        print(e.code)
    else:
        print(e.args[0])

print("获取数据完毕")
我们利用了 urlopen方法访问了一个不存在的网址,运行结果如下:
[Errno 11004] getaddrinfo failed六、 Requests库的用法
1. 介绍
对了解一些爬虫的基本理念,掌握爬虫爬取的流程有所帮助。入门之后,我们就需要学习一些更加高级的内容和工具来方便我们的爬取。那么这一节来简单介绍一下 requests 库的基本用法
2. 安装
利用 pip 安装
pip install requests3. 基本请求
req = requests.get("http://www.baidu.com")
req = requests.post("http://www.baidu.com")
req = requests.put("http://www.baidu.com")
req = requests.delete("http://www.baidu.com")
req = requests.head("http://www.baidu.com")
req = requests.options("http://www.baidu.com")
3.1 get请求
参数是字典,我们也可以传递json类型的参数:
import requests

url = "http://www.baidu.com/s"
params = {'wd': '尚学堂'}
response = requests.get(url, params=params)
print(response.url)
response.encoding = 'utf-8'
html = response.text
# print(html)
3.2 post请求
参数是字典,我们也可以传递json类型的参数:
url = "http://www.sxt.cn/index/login/login.html"
formdata = {
    "user": "17703181473",
    "password": "123456"
}
response = requests.post(url, data=formdata)
response.encoding = 'utf-8'
html = response.text
# print(html)
3.3 自定义请求头部
伪装请求头部是采集时经常用的,我们可以用这个方法来隐藏:
headers = {'User-Agent': 'python'}
r = requests.get('http://www.zhidaow.com', headers = headers)
print(r.request.headers['User-Agent'])
3.4 设置超时时间
可以通过timeout属性设置超时时间,一旦超过这个时间还没获得响应内容,就会提示错误
requests.get('http://github.com', timeout=0.001)3.5 代理访问
采集时为避免被封IP,经常会使用代理。requests也有相应的proxies属性
import requests

proxies = {
  "http": "http://10.10.1.10:3128",
  "https": "https://10.10.1.10:1080",
}

requests.get("http://www.zhidaow.com", proxies=proxies)
如果代理需要账户和密码,则需这样
proxies = {
    "http": "http://user:pass@10.10.1.10:3128/",
}
3.6 session自动保存cookies
seesion的意思是保持一个会话,比如 登陆后继续操作(记录身份信息) 而requests是单次请求的请求,身份信息不会被记录
# 创建一个session对象
s = requests.Session()
# 用session对象发出get请求,设置cookies
s.get('http://httpbin.org/cookies/set/sessioncookie/123456789')
3.7 ssl验证
# 禁用安全请求警告
requests.packages.urllib3.disable_warnings()
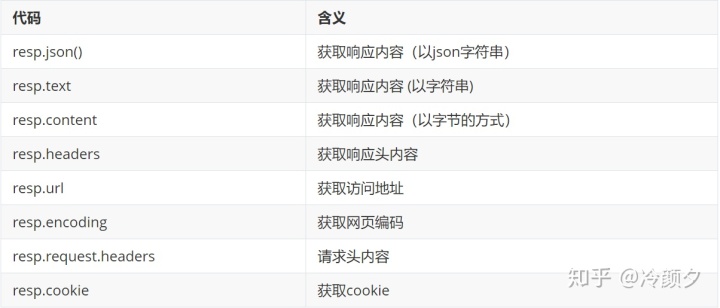
resp = requests.get(url, verify=False, headers=headers)4 获取响应信息


 264
264


 被折叠的 条评论
为什么被折叠?
被折叠的 条评论
为什么被折叠?
 到【灌水乐园】发言


