


在编写文本着色之前,先小范围重构。
旧的成员变量 JTextArea textArea 自由引用,而着色文本要升级为 JTextPane 类,所以之前的自由引用要封装起来。大约有如下几处:
- 打开文本文档中的清空文本和尾部追加字符串
textArea.setText("");
...
textArea.append(new String(buffer, 0, count));- 保存和另存为文本文档中的获取文本框的字符串
StringReader stringReader = new StringReader(textArea.getText());- 绑定行号栏中的获取文本框的字体实例和侦听文本框内容改变后的行数
listLineNum.setFont(textArea.getFont());
...
if (listLineNum != null && textArea != null) {
	textArea.getDocument().addDocumentListener(new DocumentListener() {
		@Override
		public void removeUpdate(DocumentEvent e) {
			int lines = textArea.getLineCount();
			listModelLineNum.setSize(lines);
		}

		@Override
		public void insertUpdate(DocumentEvent e) {
			int lines = textArea.getLineCount();
			listModelLineNum.setSize(lines);
		}

		@Override
		public void changedUpdate(DocumentEvent e) {
			int lines = textArea.getLineCount();
			listModelLineNum.setSize(lines);
		}
	});
	return true;
} else {
	return false;
}
重构的思路不是写成一个类或教材里讲的封装设计原则。目的不是为了封装而封装。我想把引用的行距离尽量减小。
打个比喻。有两个好朋友租的房子距离太远又要常常见面,所以要把距离拉近,但又不能太近,因为双方的工作地点在北边和南边,要考虑到工作日的通勤时间。
所以要找一个合适的封装呈度,无脑地写成类或是全用方法封装都是不合适的。另外还要考虑到未知的需求变更。
我选择的合适呈度:把eclipse中变量直接引用的行范围缩小为一个屏幕左右。超出一个屏幕的不能直接引用对象,要改为调用封装的方法。
为此,新增3个方法
private String getText() {
	return textArea.getText();
}

private void clearText() {
	textArea.setText("");
}

private void append(String text) {
	textArea.append(text);
}
选中 textArea 变量,可以看到重构后的 textArea 的引用所有行都“很近”(右边栏的灰色矩形都很集中),重构目的就达到了。
看看当前总行数,继续。

在第一篇说到java的单文档最大行是65535,所以按这个速度,写到100篇时,可能会遇到超行数的问题,这里先不关心,还早得很。
升级改造文本框为富文本框
由于文本框不支持文本着色等效果,所以改为更强大的富本文框。在swing中对应 JTextPane类。有了前面的重构基础,现在改写就很方便。
有几处实现要重写
- 获得文本的行数
private int getLineCount() {
	return textPane.getDocument().getDefaultRootElement().getElementCount();
}- 在文本尾添加字符串
private void append(String text) {
	try {
		textPane.getDocument().insertString(textPane.getDocument().getLength(), text, null);
	} catch (BadLocationException e) {
		e.printStackTrace();
	}
}
写完后就升成为了富文本框,添加一个着色效果看看。
临时测试代码
private SimpleAttributeSet simpleAttributeSet;
private void append(String text) {
// test code, when open a file.
if (simpleAttributeSet == null) {
simpleAttributeSet = new SimpleAttributeSet();
simpleAttributeSet.addAttribute(StyleConstants.CharacterConstants.Foreground, Color.yellow);
simpleAttributeSet.addAttribute(StyleConstants.CharacterConstants.Background, Color.black);
} // end if
try {
styledDocument.insertString(styledDocument.getLength(), text, simpleAttributeSet);
} catch (BadLocationException e) {
e.printStackTrace();
}
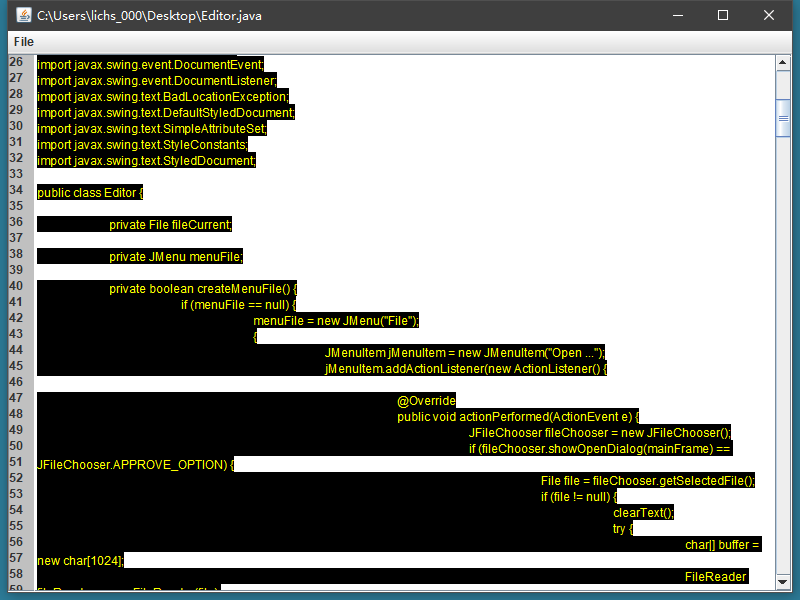
}打开一个java文档看到效果

现在已经支持文本着色,接下来写代码解析逻辑。
参考
- SimpleAttributeSet Example


 3047
3047


 被折叠的 条评论
为什么被折叠?
被折叠的 条评论
为什么被折叠?
 到【灌水乐园】发言


