redis作用_SpringBoot利用spring-boot-starter-data-redis整合Redis

Redis是一种高性能的非关系型数据库。redis作用在内存,性能极高。SpringBoot同样可以把Redis整合到项目里。

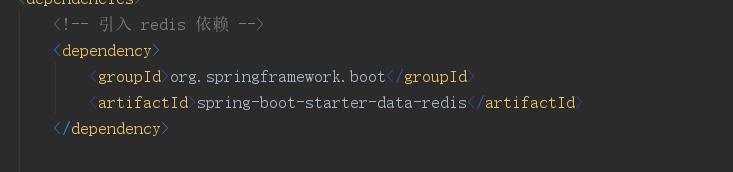
首先,第一步就是为项目添加Redis依赖。在SpringBoot下有spring-boot-starter-data-redis,使用Redis就相当的简单。

fa1eeeae2951861e10673bc7c0de497b.png

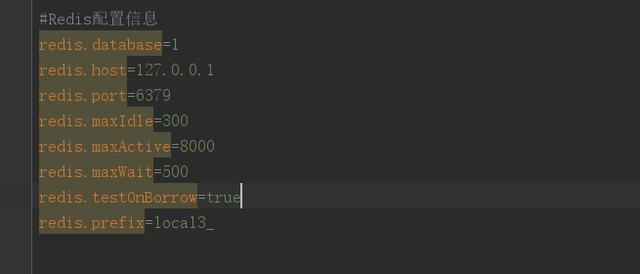
第二步添加上Redis配置信息。包括Redis服务器的IP、端口、密码等信息,前提是已经安装好Redis服务,密码等信息必须和服务器一致。

5bb953d89af042109e8f30865732c3ba.png

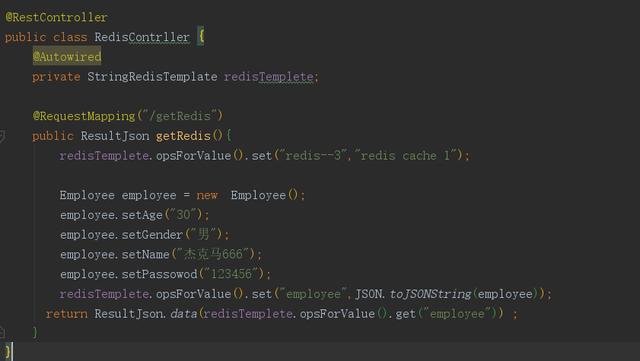
第三步,接下来就要写例子来使用使用Redis,在这个例子中使用的是框架封装Redis的类StringRedisTemplate。为啥用这个呢?,因为例子设计的k-v都是String类型,官方建议符合这种格式的推荐使用 StringRedisTemplate。当k-v是非String类型的object时,推荐使用RedisTemplate。

376cd7267bb1a7ea888514ea730c997a.png

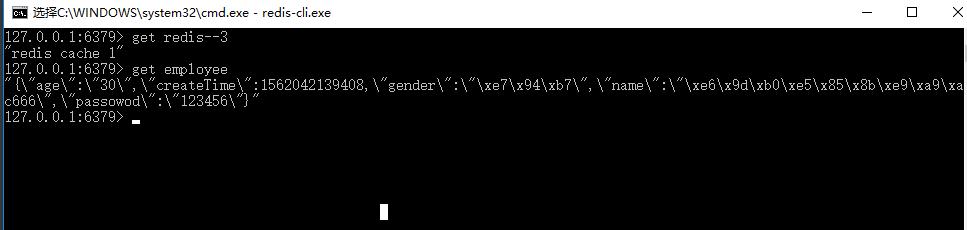
第四步测试下结果,按照controller里写的路径请求下得到employee里设置的参数。

2fe0edcc8874652c4ec07f4ffc19adbe.png

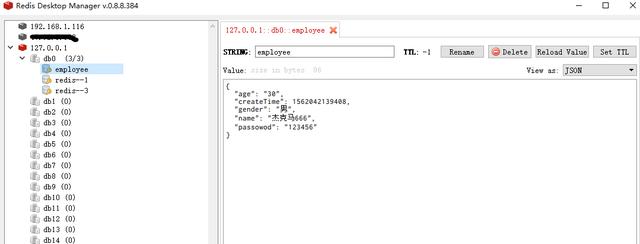
这样看不出redis有没有写入内存,使用redis下的redis-cli可以访问redis数据。这种方式访问数据的时候展示不是很友好。推荐使用RedisDesktopManager,这个图形界面工具可是比命令行好使。

93d52a1f29830381d2bdf0dc146b590d.png

这个工具看上去就友好多了,这里面包含了所有写入的值。里面的json字符串也自动转了。

afcd230e2f2735c9178d94fde2e070a7.png

这个controller里的redisTemplete.opsForValue().set("redis--3

  • 0
    点赞
  • 1
    收藏
    觉得还不错? 一键收藏
  • 0
    评论
spring-boot-starter-data-redis是Spring Boot提供的用于集成Redis的starter包。它简化了在Spring Boot项目中集成Redis的配置和使用过程。下面是一个简单的演示: 1. 首先,在pom.xml文件中添加spring-boot-starter-data-redis依赖: ```xml <dependency> <groupId>org.springframework.boot</groupId> <artifactId>spring-boot-starter-data-redis</artifactId> </dependency> ``` 2. 在application.properties或application.yml文件中配置Redis连接信息: ```yaml spring.redis.host=127.0.0.1 spring.redis.port=6379 ``` 3. 创建一个RedisTemplate bean来操作Redis: ```java import org.springframework.beans.factory.annotation.Autowired; import org.springframework.data.redis.core.RedisTemplate; import org.springframework.stereotype.Component; @Component public class RedisExample { @Autowired private RedisTemplate<String, String> redisTemplate; public void setValue(String key, String value) { redisTemplate.opsForValue().set(key, value); } public String getValue(String key) { return redisTemplate.opsForValue().get(key); } } ``` 4. 在需要使用Redis的地方注入RedisExample bean,并使用它来操作Redis: ```java import org.springframework.beans.factory.annotation.Autowired; import org.springframework.web.bind.annotation.GetMapping; import org.springframework.web.bind.annotation.PathVariable; import org.springframework.web.bind.annotation.RestController; @RestController public class ExampleController { @Autowired private RedisExample redisExample; @GetMapping("/redis/{key}") public String getValue(@PathVariable String key) { return redisExample.getValue(key); } @GetMapping("/redis/{key}/{value}") public void setValue(@PathVariable String key, @PathVariable String value) { redisExample.setValue(key, value); } } ``` 以上演示了如何在Spring Boot项目中集成spring-boot-starter-data-redis,并使用RedisTemplate来操作Redis。你可以根据自己的需求进行进一步的配置和使用。

“相关推荐”对你有帮助么?

  • 非常没帮助
  • 没帮助
  • 一般
  • 有帮助
  • 非常有帮助
提交
评论
添加红包

请填写红包祝福语或标题

红包个数最小为10个

红包金额最低5元

当前余额3.43前往充值 >
需支付:10.00
成就一亿技术人!
领取后你会自动成为博主和红包主的粉丝 规则
hope_wisdom
发出的红包
实付
使用余额支付
点击重新获取
扫码支付
钱包余额 0

抵扣说明:

1.余额是钱包充值的虚拟货币,按照1:1的比例进行支付金额的抵扣。
2.余额无法直接购买下载,可以购买VIP、付费专栏及课程。

余额充值