


”功能开发篇“系列文章记录了我在平时工作中遇到的问题以及一些和游戏功能相关的项目经验。
目录
[1. 插件介绍]
[2. 核心类功能拆解]
[3. Timeline深入]
[修改Rigidbody的运行速度]
[修改NavMeshAgent的运行速度
[修改AudioSource的运行速度]
[修改Animator的运行速度]
[修改Animation的运行速度]
[修改ParticleSystem的运行速度]
插件介绍
时间系统,是几乎每个游戏都会有的一个功能。水鸡今天带大家学习的是 Chronos这个时间控制插件【下载地址】。它包含时间加速、减速、暂停、回溯四大功能,并且有 全局对象控制、单组对象控制、单体对象控制、区域对象控制 四种控制方式。能够满足游戏里的各种关于时间的复杂需求。
这篇文章会介绍插件里的功能,但是不会面面俱到,只是单纯讲插件怎么用对个人能力的提升并没有用,所以本文还会花相当的篇幅分析这个插件是如何实现这些复杂功能的。最终目的是改造这个插件或者根据自己的项目需求做一套时间控制系统。其实这个插件功能有点过于复杂,如果项目没有用到这么复杂的功能,把整个插件放进去反而过于累赘。

打开插件里的案例场景是这样子的,Root滑动条影响全局对象,每个颜色的方框是影响一组对象的,两个移动的半球也会影响范围内的对象。拖动滑动条可以调整速度。

核心类功能拆解
接下来介绍Chronos插件里几个重要的类,分别是:
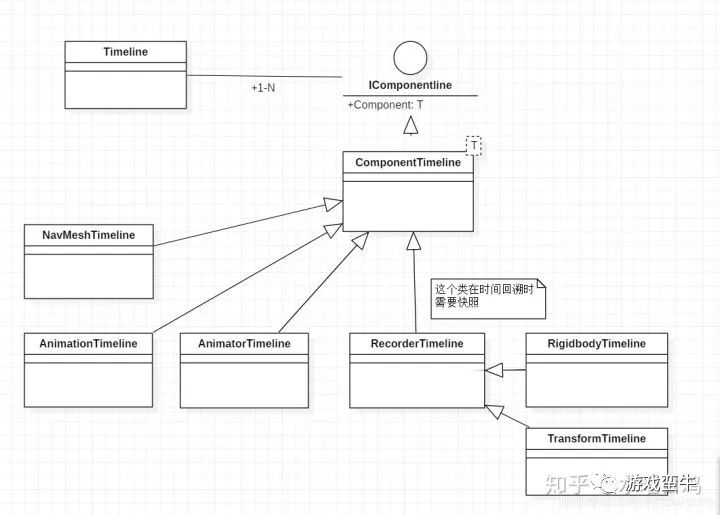
Timeline,继承Monobehavior,所有受这套时间系统控制的对象身上会挂一个这个组件。内部会修改unity自带组件Rigidbody、Animator、Animation等组件的速度。至于如何修改后面会讲。 Timeline上可以配置一个string表示它是属于哪个GlobalClock。或者是LocalClock。

Clock,时钟,抽象类,提供了deltaTime和timescale等属性,Timeline上会存储一个时钟。根据时钟提供的timeScale和deltaTime来修改其它组件的速度。而Clock类还有几个子类,分别是:
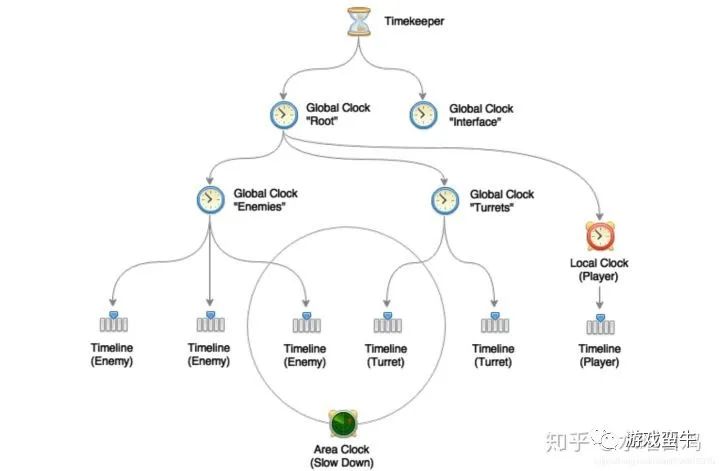
GlobalClock,全局时钟,内部有一个string作为key,区分不同的时钟。当GlobalClock的timeScale发生改变时,所有存储该时钟的Timeline都会受影响。应用场合举例:敌人、炮弹等。
LocalClock,局部时钟,会挂在单个对象上,该时钟只影响它挂的那个GameObject。应用场合举例:玩家。
AreaClock,是一个包含泛型的抽象类。需要指定使用哪种Trigger,以及2D还是3D。作用是影响范围内的Timeline对象。插件内部实现了AreaClock3D和AreaClock2D两种类型。并且使用了OnTriggerEnter这个untiy自带的方法来检测进入的对象。如果你的项目不是使用这种方法来通知碰撞检测的消息的话,这部分的代码需要进行修改。应用场合举例:减速炸弹。
public abstract class AreaClock : Clock, IAreaClockClock是一个 单向链表结构,内部会记录一个GlobalClock,表示自己的parent是谁。如下面这张图所示。Enemies这个时钟的父亲就是Root。在计算timeScale时,会把父亲的timeScale和自己的timeScale进行加法或乘法的计算。
TimeKeeper,单例类,使用了字典来存储了所有的全局时钟GlobalClock,key就是GlobalClock身上那个string的key。
经过上面的介绍,我们知道了这个插件在设计思路上可以借鉴的点即:抽象出了Clock时钟这个类并且用链表的结构来管理。
Timeline深入
接下来看Timeline类是如何通过一个timeScale来实现修改unity各个组件的参数。首先先来看Timeline的结构。Timeline存储了多个IComponentline,每种Componentline都是对Component的封装。同时由于有时间回溯功能,一些Componentline需要保存读取,因此有了RecorderTimeline。
修改Rigidbody的运行速度
首先对rigidbody进行了封装成了一个新的类RigidbodyTimeline。外部需要修改rigidbody时只能通过这个类进行修改。这样的目的是为了外部修改rigidbody的参数时能够不考虑timeScale。
比如我设置刚体速度是10,我希望的结果是在1倍速情况下刚体速度是10,在0.5倍速下刚体能自动调整速度为0.5。反过来也一样,我获取速度的时候也不需要考虑当前倍速是多少。
要想实现这样的效果就需要对rigidbody进行封装,并且约定修改刚体速度时不能直接通过rigidbody进行修改。这就是代理模式的应用。(以后面试如果问起设计模式在游戏中的具体应用场景,就可以答这个。)
//Snapshot用于组件时间回溯,具体后面会讲public class RigidbodyTimeline3D : RigidbodyTimeline
{
    ...protected override Vector3 bodyVelocity
    {get { return component.velocity; }set { component.velocity = value; }
    }protected override Vector3 bodyAngularVelocity
    {get { return component.angularVelocity; }set { component.angularVelocity = value; }
    }protected override float bodyDrag
    {get { return component.drag; }set { component.drag = value; }
    }protected override float bodyAngularDrag
    {get { return component.angularDrag; }set { component.angularDrag = value; }
    }public Vector3 velocity
    {get { return bodyVelocity / timeline.timeScale; }set {  bodyVelocity = value * timeline.timeScale; }
    }public Vector3 angularVelocity
    {get { return bodyAngularVelocity / timeline.timeScale; }set { bodyAngularVelocity = value * timeline.timeScale; }
    }
    ...
}
修改力和修改速度同理:
protected virtual float AdjustForce(float force)
    {
return force * timeline.timeScale;
    }
那么如何实现timeScale变化时刚体自动变化速度呢?这个插件的做法是在记录上一帧的timeScale并且实时进行比较。
如果发现当前timeScale和上一帧的timeScale不同,则把上一帧的速度 x(当前timeScale / 上一帧的timeScale)得到当前的速度。
比如上一帧速度是10,上一帧的timeScale是2,现在突然timeScale变成0.5了,那速度就要乘以四分之一。代码如下:
public void Update()
{
    ...
if (timeScale > 0 && timeScale != lastTimeScale && !bodyIsKinematic)
    {
float modifier = timeScale / lastPositiveTimeScale;

        bodyVelocity *= modifier;
        bodyAngularVelocity *= modifier;
        bodyDrag *= modifier;
        bodyAngularDrag *= modifier;
    }
    ...
}
跟速度相关的参数全部使用上面这种方法,接下来讲重力gravity。首先把刚体的重力关掉:
rigidbody.useGravity = false;
然后再由我们自己管理重力,并且在FixedUpdated根据重力方向来对速度进行修正:
public bool useGravity { get; set; }

public override void FixedUpdate()
{
if (useGravity && !component.isKinematic && timeline.timeScale > 0)
    {
        velocity += (Physics.gravity * timeline.fixedDeltaTime);
    }
}
关于rigidbody的回放,代码比较复杂就不全部贴出来了,这里说下思路:
要想实现回放,需要在rigidbody正常运行的时候以一定的时间间隔进行快照,也就是记录数据,并且将这些数据统统存储起来。然后倒放的时候,记录倒放那一时刻的数据,并找到离当前时间点最近的快照,进行插值从而得到当前的状态。
假设从0秒开始正常运行,每隔1秒进行快照,在第4.5秒进行倒放,首先需要记录下第4.5秒的数据,然后找到离4.5秒最近的那次快照数据,也就是第4秒的数据。这两个数据都有了之后就好办了,第4秒到第4.5秒之间的数据都能插值得到了。当我回放到第3秒到第4秒之间,同理,找到第3秒的数据,和第4秒的数据进行插值。
代码如下:(这部分代码在RigidbodyTimeline的基类RecorderTimeline里面。)
//得到插值时间float t = (laterTime - timeline.time) / (laterTime - earlierTime);
//根据插值得到一个新的快照interpolatedSnapshot = LerpSnapshots(laterSnapshot, earlierSnapshot, t);
//应用快照ApplySnapshot(interpolatedSnapshot);
这里面有几个核心变量:
laterTime:在当前时间之后的,离当前时间最近的快照时间。比如当前时间3.5秒,laterTime为4。
earlierTime:在当前时间之前的,离当前时间最近的快照时间。比如当前时间3.5秒,earlierTime为3。
laterSnapshot:在当前时间之后的,离当前时间最近的快照。比如当前时间3.5秒,laterSnapshot为第4秒的快照。
earlierSnapshot:在当前时间之前的,离当前时间最近的快照。比如当前时间3.5秒,earlierSnapshot为第3秒的快照。
timeline.time:当前时间。不断累加unscaleDeltaTime * timeScale。注意timeScale可能会是负数或0。
Lerp部分代码如下:
public static Snapshot Lerp(Snapshot from, Snapshot to, float t)
{
return new Snapshot()
    {
        position = Vector3.Lerp(from.position, to.position, t),
        rotation = Quaternion.Lerp(from.rotation, to.rotation, t),
// scale = Vector3.Lerp(from.scale, to.scale, t),        velocity = Vector3.Lerp(from.velocity, to.velocity, t),
        angularVelocity = Vector3.Lerp(from.angularVelocity, to.angularVelocity, t),
        lastPositiveTimeScale = Mathf.Lerp(from.lastPositiveTimeScale, to.lastPositiveTimeScale, t),
    };
}
rigidbody的这个倒放思路其实就是双指针的应用。两个快照数据就是左右两端指针,当前时间发生变化时,需要插值的两端数据也会发生变化。
修改NavMeshAgent的运行速度
NavMeshAgentTimeline在写法上比RigidbodyTimeline简单了不少。插件这里没有使用上一帧的速度 x(当前timeScale / 上一帧的timeScale)得到当前的速度的方法来计算。而是另外保存了一个速度 _speed ,这个速度表示的1倍速下的速度。在构造函数里进行记录。当timeScale发生变化时,navMeshAgent.speed = _speed * timeScale。两种方法都可以实现当timeScale变化时,组件运行速度可以随时变化。
代码如下:
private float _speed;

public float speed
{
get { return _speed; }
set
    {
        _speed = value;
        AdjustProperties();
    }
}
...
public override void CopyProperties(UnityEngine.AI.NavMeshAgent source)
{
    _speed = source.speed;
    _angularSpeed = source.angularSpeed;
}

public override void AdjustProperties(float timeScale)
{
    component.speed = speed * timeScale;
    component.angularSpeed = angularSpeed * timeScale;
}
AdjustProperties 和 CopyProperties 是Componentline的虚方法,由Timeline内部统一调用:当上一帧的timeScale和当前帧的timeScale 不一样时 AdjustProperties 就会调用。
public abstract class ComponentTimeline : IComponentTimelinewhere T : Component
{public ComponentTimeline(Timeline timeline, T component)
    {this.timeline = timeline;this.component = component;
        CopyProperties(component);
    }
    ...public virtual void CopyProperties(T source) { }public virtual void AdjustProperties(float timeScale) { }public void AdjustProperties()
    {
        AdjustProperties(timeline.timeScale);
    }
}
Timeline的部分代码,其中TimelineEffector是基类
public class Timeline : TimelineEffector
{
internal List components;
    ...protected override void Update()
    {
        ...if (timeScale != lastTimeScale)
        {for (int i = 0; i < components.Count; i++)
            {
                components[i].AdjustProperties();
            }
        }
        ...
    }
}
修改AudioSource的运行速度
注意调整AudioSource的pitch虽然能让音频播放速度发生变化,但是声音会失真。一般来说是不需要修改音频播放速度的。如果你的项目不需要这个功能,同时又用到了AudioSource,请自行修改AudioSourceTimeline里面的源码,或者把这个类从Timeline内部删掉。
public override void AdjustProperties(float timeScale)
{
    component.pitch = pitch * timeScale;
}
修改Animator的运行速度
Animator的加速、变慢没什么好说的,改变Animator.speed即可。但是它的倒放功能就有的讲了。如果想要倒放Animator,直接将speed修改为负数是无效的。在将倒放之前,我们需要深入的了解Animator的功能。
首先Animator里有个叫AnimatorRecorderMode的枚举类型表示Animator当前的模式:
Offline离线模式可以理解为默认模式
Playback倒放模式
Record记录模式

要想进入倒放模式首先需要进入记录模式,调用Animator.StartRecording(int frameCount) 进入记录模式。参数是需要记录多少帧,最大不能超过10000,这是unity本身的限制。设置这个参数后,Animator内部会分配一个大小为frameCount的缓冲区用于记录动画信息。调用Animator.StopRecording( ) 退出记录模式。
除了两个函数外,还有两个变量我们会用到:recorderStartTime和recorderStopTime。
recorderStartTime:缓冲区开始记录动画的时间。如果没有调用StartRecording,这个值为-1。调用之后在当前帧也为-1。之后一直为0,当缓冲区记录不下当前已经播放的动画信息时,这个值会逐渐增大。
recorderEndTime:调用StopRecording和调用StartRecording之间的间隔时间。
我画了两张图说明这两个值的机制。注意:记录了多少帧和记录了多少秒是不一样的。有的机器600帧跑了10秒,有的机器600帧5秒就跑完了。
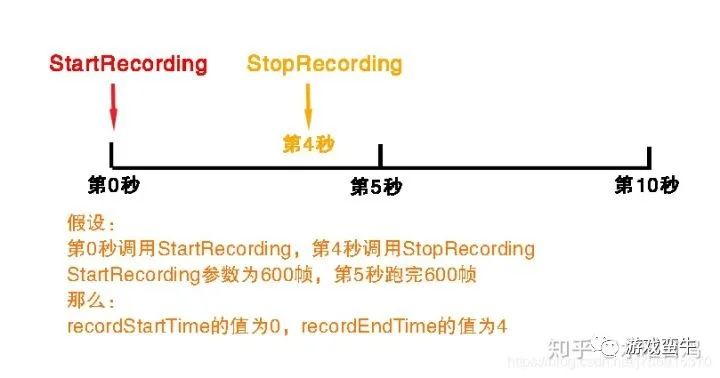
第二张图的情况是调用StopRecording和StartRecording之间间隔了8秒,但是600帧只够记录5秒。这时缓冲区就会放不下从0到8的动画数据,此时存放的是第3秒和第8秒的数据。

进入记录模式并且退出记录模式后,才能使用StartPlayback进入倒放模式。在此模式下Animator不会更新动画,需要给Animator.playbackTime赋值来告诉Animator播放动画的位置。比如上图的情况,第8秒 进入了倒放模式,那么应该在代码里的update里不停地调用Animator.playbackTime = recordEndTime - deltaTime才能实现动画倒放的功能。当然playbackTime不能小于缓冲区的起始时间即 recordStartTime。
OK,上面弄懂之后再来看插件里的代码就一目了然,相关的类是AnimatorTimeline。首先,在Start时就进入记录模式:
public override void Start()
{
    component.StartRecording(recordedFrames);
}
退出记录模式并进入倒放模式的时机:上一帧timeScale大于0当前帧小于0
退出倒放模式并进入记录模式的时机:上一帧timeScale小于0当前帧大于0
为何这里是playbackTime + deltaTime?因为这里的deltaTime = Time.unscaledDeltaTime * timeScale。而倒放模式下说明此时timeScale必定为负数,所以使用加号。
public override void Update()
{
float timeScale = timeline.timeScale;
float lastTimeScale = timeline.lastTimeScale;

if (lastTimeScale >= 0 && timeScale < 0) // Started rewind    {
        component.StopRecording();
if (component.recorderStartTime >= 0)
        {
            component.StartPlayback();
            component.playbackTime = component.recorderStopTime;
        }
    }
else if (lastTimeScale <= 0 && timeScale > 0) // Stopped pause or rewind    {
        component.StopPlayback();
        component.StartRecording(recordedFrames);
    }

if (timeScale < 0 && component.recorderMode == AnimatorRecorderMode.Playback)
    {
float playbackTime = Mathf.Max(component.recorderStartTime, component.playbackTime + timeline.deltaTime);
        component.playbackTime = playbackTime;
    }
}

图文无关
修改Animation的运行速度
修改Animation的运行速度非常简单,对Animation遍历,修改AnimationState的speed即可。
注意 Chronos这个插件并不支持多个AnimationState的原始速度不同的情况。所以我加入了一个Dictionary来存储多个AnimationState的原始速度。注释掉的都是原始代码。
public class AnimationTimeline : ComponentTimeline
{public AnimationTimeline(Timeline timeline) : base(timeline) { }private Dictionary<string, float> speedDict = new Dictionary<string, float>();private float _speed;public float speed
    {get { return _speed; }set
        {
            _speed = value;
            AdjustProperties();
        }
    }public override void CopyProperties(Animation source)
    {//float firstAnimationStateSpeed = 1;        //bool found = false;        //foreach (AnimationState animationState in source)        //{        //  if (found && firstAnimationStateSpeed != animationState.speed)        //  {        //      Debug.LogWarning("Different animation speeds per state are not supported.");        //  }        //  firstAnimationStateSpeed = animationState.speed;        //  found = true;        //}        //speed = firstAnimationStateSpeed;       foreach(AnimationState animationState in source)
       {
           speedDict.Add(animationState.name, animationState.speed);
       }
    }public override void AdjustProperties(float timeScale)
    {foreach (AnimationState state in component)
        {//state.speed = speed * timeScale;            state.speed = speedDict.TryGet(state.name) * timeScale;
        }
    }
}
修改ParticleSystem的运行速度
在这个插件里粒子系统相关的有两个类。一个是NonRewindableParticleSystemTimeline,另一个是RewindableParticleSystemTimeline。前者是不考虑回放的情况,部分代码如下:
public class NonRewindableParticleSystemTimeline : ComponentTimeline, IParticleSystemTimeline
{public NonRewindableParticleSystemTimeline(Timeline timeline, ParticleSystem component) : base(timeline, component) { }private float _playbackSpeed;public float playbackSpeed
{get { return _playbackSpeed; }set
{
_playbackSpeed = value;
AdjustProperties();
}
}
...public override void CopyProperties(ParticleSystem source)
{
_playbackSpeed = source.playbackSpeed;
}public override void AdjustProperties(float timeScale)
{//component.playbackSpeed = playbackSpeed * timeScale; var main = component.main;
main.simulationSpeed = playbackSpeed * timeScale;
}
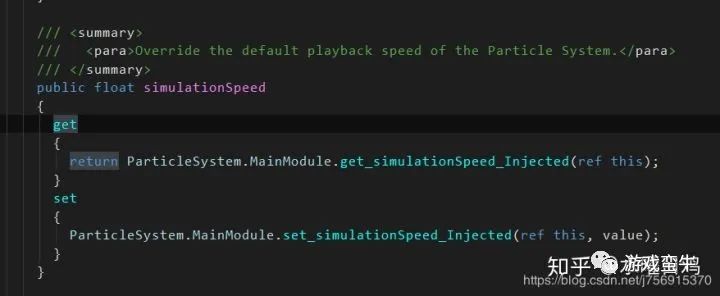
}只需要修改playbackSpeed即可。注意插件里用的playbackSpeed会提示已经过时,建议使用main.simulationSpeed来修改粒子系统的播放速度。particleSystem.main是一个结构体get属性,所以需要先拿出来,再修改,修改之后并不需要set也能生效,这点和我们平常使用的结构体属性不太一样。查看unity源码,可以看到内部并没有缓存一个struct,而是每次调用get时都会new一个结构体。而每次修改main.simulationSpeed时会调用MainModule的get、set函数。

main.simulationSpeed内部代码
关于粒子系统的回放,这个插件里的功能有异常,粒子系统的播放速度会极其鬼畜,所以请不要使用RewindableParticleSystemTimeline这个类。粒子系统如何做回放,在unity官方发的一篇文章有提到过,这里我就不多讲了,【Unity:如何倒放粒子系统】。
核心思想就是调用ParticleSystem.Stop() 把粒子系统停下来,并调用ParticleSystem.Simulate( float t, bool withChildren, bool restart ) 来控制粒子系统播放动画的位置。
以上就是关于游戏中的时间系统如何去实现的内容了,以我的经验来说,在运行时需要倒放的需求比较少见。如果真的需要倒放,可能整个项目架构都要重新设计,不是单靠一个插件能解决的。在编辑器里倒放动画倒是很常见的,因为编辑器下经常需要让策划或者美术能够预览动画,所以本次内容关于动画的部分也讲得比较细。
来源知乎专栏:水鸡的游戏编程博客
作者: 水曜日鸡,简称水鸡,ACG宅。曾参与索尼中国之星项目研发,具有2D联网多人动作游戏开发经验。


 被折叠的 条评论
为什么被折叠?
被折叠的 条评论
为什么被折叠?
 到【灌水乐园】发言


