


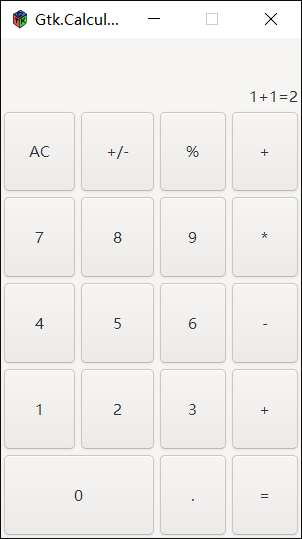
除了使用 HBox 和 VBox 进行布局外,还可以使用 Table 对象进行布局。这个有点像 html 的 table,适合方方正正大小差不多的空间集合。本篇将会对 Table 布局进行讲解,利用 Table 做出一个计算器的界面并使其可以响应按钮点击并将点击的按钮内容展示在界面上。在 Windows 系统中效果如下:
源码地址: https://gitee.com/coderbusy/gtk-sharp-demo
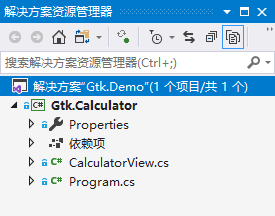
1、准备项目
我们需要新建一个 .NET Core 控制台项目,在编写本篇博文时 .NET Core 3.1 LTS 版本已经发布了,所以大可以直接使用 .NET Core 3.1 版本。在引用完 GtkSharp 之后,新建一个名为 CalculatorView.cs 的类文件并使其从 Gtk.Window 中派生:
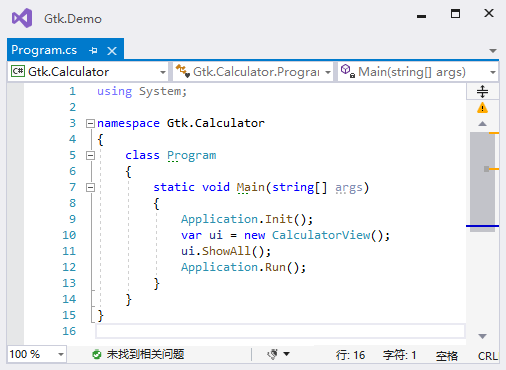
在 Programe.cs 文件中键入以下代码,用于启动窗体和运行程序:
2、Table 简介
Table 对象的构造函数需要 3 个参数,具体签名如下:
Table table1 = new Table(int rows, int columns, bool homogeneous);rows、columns 分别指要创建的行和列。homogeneous 为 true 表示所有的表框大小设置为大小最大那个控件,为 false 则各行和列的大小根据各行列中大小最大那个控件决定 。
行和列的布局从0到n,其中 n 是在对 Table 的调用中指定的数字。因此,如果指定 rows = 2,columns = 2,则布局将如下所示:
0 1 20+----------+----------+| | |1+----------+----------+| | |2+----------+----------+注意,坐标系始于左上角。如果想把 Widgt 放入 Table 中,可以使用下面的代码:
table1.Attach ( Widget child,int leftAttach,int rightAttach,int topAttach,int bottomAttach);leftAttach,rightAttach,topAttach,bottomAttach 分别代表表中控件的左右上下边所在位置。这似乎和已有的 WinForm 编程经验不符,在 WinForm 下我们通过指定控件的位置来对其定位,指定其大小来决定其占用的空间。在 Gtk# 的世界中你仍可以将 WinForm 的思想带入,只不过,在指定了坐标 (x,y) 对应 (left,top) 之后,(right,bottom) 对应的值为 (x+width,y+height) 。
3、代码实现
遵循 Gtk# 开发的最佳实践,我们会在窗体关闭后进行应用程序退出操作。因为我们的 CalculatorView 直接从 Gtk.Window 派生,所以我们可以在构造函数中做这件事,同时对窗体进行一些细节上的调整,让他启动时出现在屏幕中央,并且不可以通过鼠标调整大小:
using System;using System.Collections.Generic;using System.Text;using Pango;namespace Gtk.Calculator{class CalculatorView : Window{public CalculatorView() : base("Gtk.Calculator"){//在窗体关闭时,退出应用程序this.DeleteEvent += CalculatorView_DeleteEvent;//设置窗体大小this.SetSizeRequest(300, 500);//设置窗体位置this.SetPosition(WindowPosition.Center);//去掉最大化按钮,不可以调整大小。this.Resizable = false;}private void CalculatorView_DeleteEvent(object o, DeleteEventArgs args){Application.Quit();}}}计算器需要一个 Label 来显示结果,因为要对这个 Label 进行更新,所以我们将其定义为 CalculatorView 的字段:
private readonly Label _lblDisplay;添加一个 DefaultMargin 属性,用来表示按钮之间的间距:
/// /// 获取或设置 按钮之间的间距/// public int DefaultMargin { get; set; } = 3;我们需要一个 6 行 4 列的表格来进行布局,创建表格后,将其添加到视图中,然后把显示结果的 Lable 也进行初始化,添加到 Table 的第一行并占满它。该 Label 中的文字在水平方向上居右,在垂直方向上在底部:
//创建一个 6 行 4 列的表格var table = new Table(6, 4, false);this.Add(table);//创建一个标签,用来显示结果
_lblDisplay = new Label { Halign = Align.End, Margin = this.DefaultMargin, Valign = Align.End };
table.Attach(_lblDisplay, 0, 4, 0, 1);
接下来就是填充按钮了。新建一个 CreateButton 方法用于创建按钮,该方法接收一个字符串参数作为按钮上显示的文字,并注册按钮的 Clicked 方法。在按钮被 Click 后,将按钮上的文字附加到 Label 中:
private Button CreateButton(String text){var btn = new Button(text) { Margin = DefaultMargin };
    btn.Clicked += Btn_Clicked;return btn;}private void Btn_Clicked(object sender, EventArgs e){if (sender is Button btn){this._lblDisplay.Text += btn.Label;}}
下面就是略微烧脑的代码了,补充计算器所需的按钮。一堆参数,写起来还是需要小心翼翼:
//补充计算器的按钮//leftAttach,rightAttach,topAttach,bottomAttach 分别代表表中控件的左右上下边所在位置
table.Attach(CreateButton("AC"), 0, 1, 1, 2);
table.Attach(CreateButton("+/-"), 1, 2, 1, 2);
table.Attach(CreateButton("%"), 2, 3, 1, 2);
table.Attach(CreateButton("+"), 3, 4, 1, 2);
table.Attach(CreateButton("7"), 0, 1, 2, 3);
table.Attach(CreateButton("8"), 1, 2, 2, 3);
table.Attach(CreateButton("9"), 2, 3, 2, 3);
table.Attach(CreateButton("*"), 3, 4, 2, 3);
table.Attach(CreateButton("4"), 0, 1, 3, 4);
table.Attach(CreateButton("5"), 1, 2, 3, 4);
table.Attach(CreateButton("6"), 2, 3, 3, 4);
table.Attach(CreateButton("-"), 3, 4, 3, 4);
table.Attach(CreateButton("1"), 0, 1, 4, 5);
table.Attach(CreateButton("2"), 1, 2, 4, 5);
table.Attach(CreateButton("3"), 2, 3, 4, 5);
table.Attach(CreateButton("+"), 3, 4, 4, 5);
table.Attach(CreateButton("0"), 0, 2, 5, 6);
table.Attach(CreateButton("."), 2, 3, 5, 6);
table.Attach(CreateButton("="), 3, 4, 5, 6);
至此,我们的计算器界面就做好了。完整代码可以查看:CalculatorView.cs
关于 Table 的官方介绍,可以参看这里:GtkSharp: Packing with Tables
4、事件处理
与 WinForm 中的 Button 类似,Gtk# 中的 Button 也拥有点击事件,这点上文已经实践过。在 Gtk# 的世界中,所有从 Widget 派生的挂件均含有以下事件:
ButtonPressEventButtonReleaseEventScrollEventMotionNotifyEventDeleteEventDestroyEventExposeEventKeyPressEventKeyReleaseEventEnterNotifyEventLeaveNotifyEventConfigureEventFocusInEventFocusOutEventMapEventUnmapEventPropertyNotifyEventSelectionClearEventSelectionRequestEventSelectionNotifyEventProximityInEventProximityOutEventVisibilityNotifyEventClientEventNoExposeEventWindowStateEvent但事实上,当我们尝试订阅 Label 的 ButtonPressEvent 时就会发现预期的事件处理器并没有被执行:
using System;namespace Gtk.EventDemo{class Program{static void Main(string[] args){Application.Init();var win = new Window("Gtk.EventDemo");
            win.SetDefaultSize(250, 100);
            win.SetPosition(WindowPosition.Center);
            win.DeleteEvent += (s, e) =>{Application.Quit();};var lbl = new Label("标签内容");
            lbl.ButtonPressEvent += (s, e) => { Console.WriteLine("标签被点击:" + e); };
            win.Add(lbl);
            win.ShowAll();Application.Run();}}}
上述代码在被运行后,即使使用鼠标点击了 Label ,因为 Label 没有关联的窗体所以对应的事件处理器不会被调用。这样的部件有许多,常见的有以下几个:
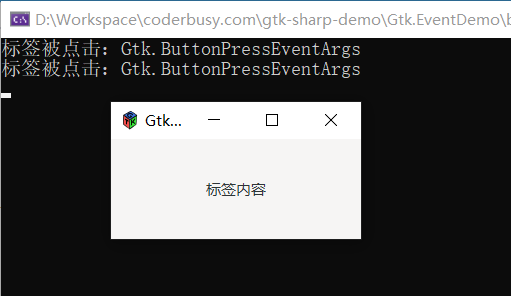
Gtk.Alignment Gtk.Arrow Gtk.BinGtk.Box Gtk.Button Gtk.CheckButtonGtk.Fixed Gtk.Image Gtk.LabelGtk.MenuItem Gtk.Notebook Gtk.PanedGtk.RadioButton Gtk.Range Gtk.ScrolledWindowGtk.Separator Gtk.Table Gtk.ToolbarGtk.AspectFrame Gtk.Frame Gtk.VBoxGtk.HBox Gtk.VSeparator Gtk.HSeparator即便 Label 控件无法直接响应事件,但是我们仍旧可以通过 EventBox 对象来实现捕获 Label 事件的功能。具体来说,将 EventBox 嵌套在 Label 外即可:
using System;namespace Gtk.EventDemo{class Program{static void Main(string[] args){Application.Init();var win = new Window("Gtk.EventDemo");
            win.SetDefaultSize(250, 100);
            win.SetPosition(WindowPosition.Center);
            win.DeleteEvent += (s, e) =>{Application.Quit();};var lbl = new Label("标签内容");var box = new EventBox();
            box.Add(lbl);
            box.ButtonPressEvent += (s, e) => { Console.WriteLine("标签被点击:" + e); };
            win.Add(box);
            win.ShowAll();Application.Run();}}}
启动程序后,可以看到点击事件被成功捕获:


 被折叠的 条评论
为什么被折叠?
被折叠的 条评论
为什么被折叠?
 到【灌水乐园】发言


