


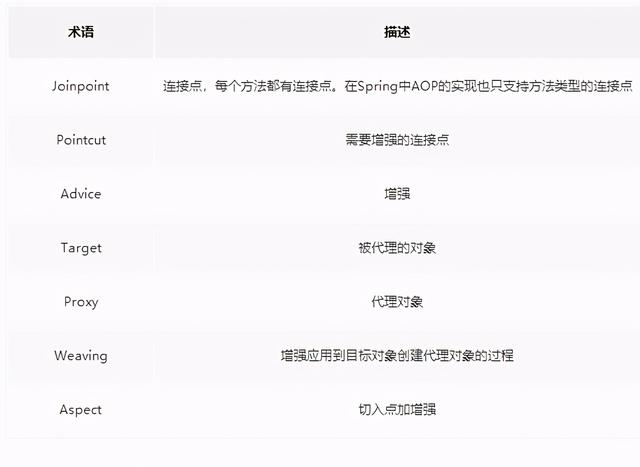
前言
在使用Spring声明式事物使用注解开发,十分的方便之前大概知道使用的是动态代理来实现的,今天来具体分析一下底层的实现细节。
环境准备
简单的搭建了一个SpirngBoot工程,加入了Spring Data Jpa作为数据访问层的框架。并在添加了一个简单的查询方法加上了事物注解。
@Servicepublic class UserServiceImpl implements UserService { @Autowired private UserRepository userRepository; @Override @Transactional(rollbackFor = Exception.class) public List findAll() { return userRepository.findAll(); }}复制代码基础知识
@EnableTransactionManagement背后的原理
@Target(ElementType.TYPE)@Retention(RetentionPolicy.RUNTIME)@Documented@Import(TransactionManagementConfigurationSelector.class)public @interface EnableTransactionManagement { boolean proxyTargetClass() default false; AdviceMode mode() default AdviceMode.PROXY; int order() default Ordered.LOWEST_PRECEDENCE;}复制代码该注解import了TransactionManagementConfigurationSelector
public class TransactionManagementConfigurationSelector extends AdviceModeImportSelector { /** * Returns {@link ProxyTransactionManagementConfiguration} or * {@code AspectJ(Jta)TransactionManagementConfiguration} for {@code PROXY} * and {@code ASPECTJ} values of {@link EnableTransactionManagement#mode()}, * respectively. */ @Override protected String[] selectImports(AdviceMode adviceMode) { switch (adviceMode) { case PROXY: return new String[] {AutoProxyRegistrar.class.getName(), ProxyTransactionManagementConfiguration.class.getName()}; case ASPECTJ: return new String[] {determineTransactionAspectClass()}; default: return null; } } private String determineTransactionAspectClass() { return (ClassUtils.isPresent("javax.transaction.Transactional", getClass().getClassLoader()) ? TransactionManagementConfigUtils.JTA_TRANSACTION_ASPECT_CONFIGURATION_CLASS_NAME : TransactionManagementConfigUtils.TRANSACTION_ASPECT_CONFIGURATION_CLASS_NAME); }}复制代码在org.springframework.transaction.annotation.TransactionManagementConfigurationSelector#selectImports方法中引入了两个重要的组件
- AutoProxyRegistrar
- ProxyTransactionManagementConfiguration
AutoProxyRegistrar
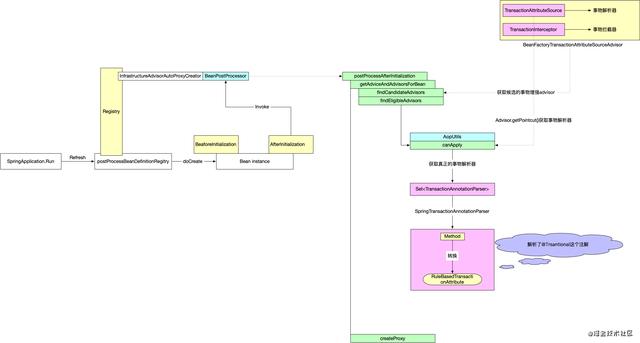
org.springframework.context.annotation.AutoProxyRegistrar#registerBeanDefinitions方法中调用了一个重要的方法AopConfigUtils.registerAutoProxyCreatorIfNecessary(registry)最终注册了InfrastructureAdvisorAutoProxyCreator。
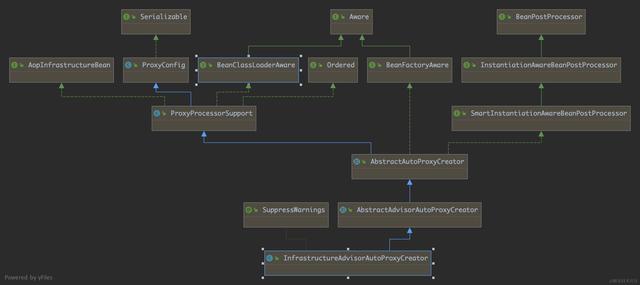
从继承图可以看出来InfrastructureAdvisorAutoProxyCreator是一个SmartInstantiationAwareBeanPostProcessor。需要重点关注AbstractAutoProxyCreator抽象类中的postProcessAfterInitialization
public abstract class AbstractAutoProxyCreator extends ProxyProcessorSupport implements SmartInstantiationAwareBeanPostProcessor, BeanFactoryAware { @Override public Object postProcessAfterInitialization(@Nullable Object bean, String beanName) { if (bean != null) { Object cacheKey = getCacheKey(bean.getClass(), beanName); if (this.earlyProxyReferences.remove(cacheKey) != bean) { return wrapIfNecessary(bean, beanName, cacheKey); } } return bean; } protected Object wrapIfNecessary(Object bean, String beanName, Object cacheKey) { if (StringUtils.hasLength(beanName) && this.targetSourcedBeans.contains(beanName)) { return bean; } if (Boolean.FALSE.equals(this.advisedBeans.get(cacheKey))) { return bean; } if (isInfrastructureClass(bean.getClass()) || shouldSkip(bean.getClass(), beanName)) { this.advisedBeans.put(cacheKey, Boolean.FALSE); return bean; } // Create proxy if we have advice. Object[] specificInterceptors = getAdvicesAndAdvisorsForBean(bean.getClass(), beanName, null); if (specificInterceptors != DO_NOT_PROXY) { this.advisedBeans.put(cacheKey, Boolean.TRUE); Object proxy = createProxy( bean.getClass(), beanName, specificInterceptors, new SingletonTargetSource(bean)); this.proxyTypes.put(cacheKey, proxy.getClass()); return proxy; } this.advisedBeans.put(cacheKey, Boolean.FALSE); return bean; }}复制代码从上面的代码可以看出主要的功能是在bean实例化后创建了目标bean的代理对象,通过对目标对象的增强来达到对事物控制的目的。也就在controller层注入的userServiceImpl是Spring帮我们创建的代理对象。
ProxyTransactionManagementConfiguration
@Configurationpublic class ProxyTransactionManagementConfiguration extends AbstractTransactionManagementConfiguration { @Bean(name = TransactionManagementConfigUtils.TRANSACTION_ADVISOR_BEAN_NAME) @Role(BeanDefinition.ROLE_INFRASTRUCTURE) public BeanFactoryTransactionAttributeSourceAdvisor transactionAdvisor() { BeanFactoryTransactionAttributeSourceAdvisor advisor = new BeanFactoryTransactionAttributeSourceAdvisor(); advisor.setTransactionAttributeSource(transactionAttributeSource()); advisor.setAdvice(transactionInterceptor()); if (this.enableTx != null) { advisor.setOrder(this.enableTx.getNumber("order")); } return advisor; } @Bean @Role(BeanDefinition.ROLE_INFRASTRUCTURE) public TransactionAttributeSource transactionAttributeSource() { return new AnnotationTransactionAttributeSource(); } @Bean @Role(BeanDefinition.ROLE_INFRASTRUCTURE) public TransactionInterceptor transactionInterceptor() { TransactionInterceptor interceptor = new TransactionInterceptor(); interceptor.setTransactionAttributeSource(transactionAttributeSource()); if (this.txManager != null) { interceptor.setTransactionManager(this.txManager); } return interceptor; }}复制代码该配置类配置了三个java bean
- BeanFactoryTransactionAttributeSourceAdvisor
- TransactionAttributeSource
- TransactionInterceptor
在初始化ProxyTransactionManagementConfiguration的时候设置了TransactionAttributeSource事物解析器和TransactionInterceptor事物拦截器两个组件。上文提到的InfrastructureAdvisorAutoProxyCreator将两个组件串联了起来。
作者:cdtft
链接:https://juejin.im/post/6883776334590394376


 3万+
3万+


 被折叠的 条评论
为什么被折叠?
被折叠的 条评论
为什么被折叠?
 到【灌水乐园】发言


