


linux内核启动过程:
启动Linux内核的最终目的是使用Linux上的应用程序,这些应用程序可以是纯软件的,也可以是硬件相关的。
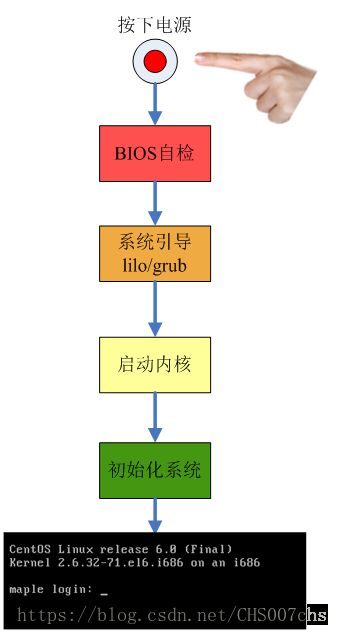
1.BIOS自检
BIOS(Basic Input/Output System)又称基本输入输出系统,现在的主板都使用一种叫Flash EPROM的芯片来存储系统BIOS,里面的内容可通过使用主板厂商提供的擦写程序擦除后重新写入,这样就给用户升级BIOS提供了极大的方便。
(1)上电自检POST(Power-on self test), 主要负责检测系统外围关键设备是否正常,例如,最常见的是内存松动的情况,BIOS自检阶段报错,系统就无法启动起来。
(2)步骤1成功后,便会执行一段小程序用来枚举本地设备并对其初始化。这一步主要是根据我们在BIOS中设置的系统启动顺序来搜索启动系统的驱动器,我们以硬盘为例,BIOS此时去读取硬盘驱动器的第一个扇区(MBR,512字节),然后执行里面的代码。至此,BIOS的任务就完成了,此后系统启动的控制权移交到MBR部分的代码。
在个人电脑中,Linux的启动是从0xFFFF0地址开始的。
2.系统引导
MBR是Master Boot Record的缩写,硬盘的0柱面、0磁头、1扇区称为主引导扇区。它由三部分组成:主引导程序(BootLoader)、硬盘分区表DPT(Disk Partition table)和硬盘有效标志(55AA)。
通常情况下,诸如lilo、grub这些常见的引导程序都直接安装在MBR中,我们以grub为例分析
(1)stage1:当控制权交给GRUB的代码,也就是MBR中446个字节空间中存放的代码,此时代码已被BIOS载入0x7c00处。这段代码的任务只是将硬盘0头0道2扇区读入内存。
(2)0头0道2扇区存放的代码的主要作用就是负责将stage2或stage1.5从硬盘中读到内存中。
stage1_5作为stage1和stage2中间的桥梁,stage1_5有识别文件系统的能力,此后grub才有能力云访问/boot分区/boot/grub目录下的stage2文件,将stage2载入内存并执行。
如果没有stage1_5,这里读取的是是/boot分区Boot Sector的stage2。这种情况下就有一个限制,因为这时是通过BIOS中断方式直接对硬盘寻址(而不是通过具体的文件系统),其寻址范围有限。
3.启动内核
当stage2被加载入内存执行后,它首先会云解析grub配置文件/boot/grub/grub.conf,然后加载内核镜像到内存中,并将控制权转交给内核。
关于Linux的设备驱动程序的加载,有一部分驱动程序直接被编译进内核镜像中,另一部分驱动程序则是以模块的形式放在initrd(ramdisk)中。
实际上Linux的内核镜像仅是包含了基本的硬件驱动,在系统安装过程中会检测系统硬件信息,根据安装信息和系统硬件信息将一部分设备驱动写入initrd。这样在以后启动系统时,一部分设备驱动就放在initrd中加载。
initrd的英文含义是bootloader initialized RAM disk,就是由boot loader初始化的内存盘。内核启动前,boot loader针将存储介质中的initrd文件加载到内存,内核启动时会在访问真正的根文件系统前先访问内存的initrd文件系统,在boot loader配置了initrd的情况下,内核启动被分成两个阶段,第一阶段先执行initrd文件系统中的init,完成加载驱动模块等任务,第二阶段才会执行真正的根文件系统中的/sbin/init进程。
另一个概念:initramfs
initramfs是在kernel 2.5中引入的技术,实际上它的含义就是:在内核镜像中附加一个cpio包,这个cpio包中包含了一个小型的文件系统,当内核启动时,内核将这个cpio包解开,并且将其中包含的文件系统释放到rootfs中,内核中的一部分初始化代码会放到这个文件系统中,作为用启层进程执行。这样带来的好处是精简了内核的初始化代码,而且使用得内核初始化过程更容易定制。
grub的stage2将initrd加载到内存里,然后将其中的内容释放到内容中,内核便去执行initrd中的init脚本,这时内核将控制权交给了init文件处理。我们简单浏览一下init脚本的内容,发现它也主要是加载各种存储介质相关的设备驱动程序。当所需的驱动程序加载完后,会创建一个根设备,然后将根文件系统rootfs以只读的方式挂载。这一步结束后,释放未使用的内存,转换到真正的根文件系统上面去,同时运行/sbin/init程序,执行系统的1号进程。此后系统的控制权就全权交给/sbin/init进程了。
1)执行系统初始化脚本(/etc/rc.d/rc.sysinit),对系统进行基本的配置,以读写方式挂载根文件系统及其它文件系统,到此系统算是基本运行起来了,后面需要进行运行级别的确定及相应服务的启动。
(1)获取网络环境与主机类型。首先会读取网络环境设置文件“/etc/sysconfig/network”,获取主机名称与默认网关等网格环境。
(2)测试与载入内存设备/proc及usb设备/sys。除了/proc外,系统会主动检测是否有usb设备,并主动加载usb驱动,尝试载入usb文件系统。
(3)决定是否启动SELinux。
(4)接口设备的检测与即插即用(pnp)参数的测试。
(5)用户自定义模块的加载。用户可以在/etc/sysconfig/modules/*.modules加入自定义模块,此时会加载到系统中。
(6)加载核心的相关设置。按/etc/sysctl.conf这个文件的设置值配置功能
(7)设置系统时间(clock)
(8)设置终端的控制台的字形
(9)设置raid及LVM等硬盘功能
(10)查看检验磁盘文件系统
(11)进行磁盘配额的quota的转换
(12)重新以读取模式载入系统磁盘
(13)启动quota功能
(14)启动系统随机设备(产生随机数功能)
(15)清理启动过程中的临时文件
(16)将启动信息加载到/var/log/dmesg文件中
当/etc/rc.d/rc.sysinit执行完后,系统就可以顺利工作了,只是还需要启动系统所需要的各种服务,这样主机才可以提供相关的网格和主机功能。
2)执行/etc/rc.d/rc脚本。该文件定义了服务启动的顺序是先k后s,而具体的每个运行级别的服务状态是放在/etc/rc.d/rc*.d(*=0~6)目录下,所有的文件均是指向/etc/init.d下相应文件的符号链接。rc.sysinit通过分析/etc/inittab文件来确定系统的启动级别,然后才去执行/etc/rc.d/rc*.d下的文件。
/etc/init.d-> /etc/rc.d/init.d
/etc/rc ->/etc/rc.d/rc
/etc/rc*.d ->/etc/rc.d/rc*.d
/etc/rc.local-> /etc/rc.d/rc.local
/etc/rc.sysinit-> /etc/rc.d/rc.sysinit
我们以启动级别3为例,/etc/rc.d/rc3.d目录,该目录下的内容全部是以S或K开头的链接文件,都链接到/etc/rc.d/init.d目录下的各种shell脚本。S表示的是启动时需要start的服务内容,K表示关机 时需要关闭的服务内容。/etc/rc.d/rc*.d中的系统服务会在系统后台启动,如果需要对某个运行级别的服务进行更具体的定制,通过chkconfig命令来操作,或者通过setup、ntsys、system-config-services来进行定制。如查我们需要自已增加启动的内容,可以在init.d目录中增加相磁的shell脚本,然后在rc*.d目录中建立链接文件指向该shell脚本。这样sehll脚本的启动或结束顺序是由S或K字母后面数字决定,数字越小越先执行。
3)执行用户自定义引导程序/etc/rc.d/rc.local。其实当执行/etc/rc.d/rc3.d/S99local时,它就是在执行/etc/rc.d/rc.local。S99local是指向rc.local的符号链接,就是一般来说,自定义的程序不需要执行上面所说的的繁琐的建立shell增加链接文件的步骤,保需要将命令放在rc.local里面就可以了,这个shell脚本就是保留给用户自定义启动内容。
4)完成了系统所有的启动任务后,linux会启动终端或X-Window来等待用户登录,tty1, tty2, tty3...这表示运行等级1,2,3,4的时候,都会执行/sbin/mingetty,而且执行了6个,所以linux会有6个纯文本终端。
linux的内核启动的入口文件:
#define DEBUG/* Enable initcall_debug */
#include #include //exception table?
#include //动态添加和卸载模块
#include //proc 文件系统的常量的结构
#include //二进制格式
#include //内核头文件,含有一些内核常用的原形定义
#include //系统调用接口
#include //栈保护
#include //字符串头文件
#include //字符类型头文件,定义了一些有关字符类型判断和转换的宏
#include //延时函数
#include //检测,保留,分配系统资源
#include //包含模块初始化宏
#include //initial ram disk,初始化内存盘
#include //启动时对内存的一种简单页面管理方式
#include //ACPI接口
#include //跟控制台有关的定义
#include //Non Maskable Interrupt,不可屏蔽中断
#include //per_cpu机制
#include //kmod是一个用于处理内核模块中一般任务的工具集
#include //申请连续的虚拟地址空间
#include //内核统计
#include //start_kernle函数原型的定义
#include //linux security
#include //Symmetrical Multi-Processing,对称多处理
#include #include //Read-Copy Update mechanism
#include //内核模块参数传递
#include //kallsyms机制
#include //writeback机制
#include //通用的cpu机制
#include //cpu分组机制
#include //cgroup本身提供将进程进行分组化管理的功能和接口的基础结构
#include //Extensible Firmware Interface
#include //Tick related global functions
#include //
#include //中断
#include //kernel header for per-task statistics interface
#include //per-task delay accounting
#include //Linux标准头文件
#include //UTS:Unix Timesharing System
#include //Reverse Mapping functions
#include //numa memory policy
#include //Authentication token and access key management
#include //Everything to do with buffer_heads.
#include //page extension
#include //死锁调试
#include //
#include //Runtime locking correctness validator
#include //内存泄露检测
#include //pid命名空间
#include //generic, centralized driver model
#include //Simple interface for creating and stopping kernel threads without mess
#include //内核等待队列中要使用的TASK_NORMAL,TASK_INTERRUPTIBLE包含在这个头文件
#include //Scheduler init related prototypes:
#include //信号头文件,定义信号符号常量,信号结构以及信号操作函数原型
#include //idr机制
#include //This provides the callbacks and functions that KGDB needs to share between the core, I/O and arch-specific portions.
#include //ftrace,内核的追踪工具
#include //Asynchronous function calls for boot performance
#include //Simple Firmware Interface
#include //共享内存文件系统
#include //slab机制
#include //Performance events
#include //ptrace,主要用于实现断点调试和跟踪系统调用
#include //Page Table Isolation
#include //block device,块设备
#include //电梯算法
#include //support for extending counters to full 64-bit ns counter
#include //Interface between the scheduler and various task lifetime (fork()/exit())
#include //task->stack (kernel stack) handling interfaces
#include //
#include // random number generator
#include //Simple doubly linked list implementation
#include //完整性度量
#include // procfs namespace
#include //内核访问IO内存等函数的定义
#include //cache机制
#include //functional test for mark_rodata_ro function
#include //Jump label support
//这些头文件主要定义了一些与CPU体系结构密切相关的
#include //以宏的嵌入汇编形式定义对IO端口操作的函数
#include //to check for architecture-dependent bugs.
#include //structure passed to kernel to tell it about the hardware it's running on
#include //section boundaries
#include //cache flush
#define CREATE_TRACE_POINTS
#include
static int kernel_init(void *);//函数声明
extern void init_IRQ(void);
extern void fork_init(void);
extern void radix_tree_init(void);
extern说明函数定义在其他文件中,这三个extern函数分别是中断初始化、fork功能初始化、基数树初始化。
/*
* Debug helper: via this flag we know that we are in 'early bootup code'
* where only the boot processor is running with IRQ disabled. This means
* two things - IRQ must not be enabled before the flag is cleared and some
* operations which are not allowed with IRQ disabled are allowed while the
* flag is set.
*/
bool early_boot_irqs_disabled __read_mostly;
__read_mostly是一个宏,这个宏定义在include/asm/cache.h中,它标记了前面这个变量是经常读取的,这样如果在缓存平台上,它就能把这个变量存放到cache中,以保证后续读取的速度。
#define __read_mostly __attribute__((__section__(".data..read_mostly")))
enum system_states system_state __read_mostly;
EXPORT_SYMBOL(system_state);
EXPORT_SYMBOL标签内定义的函数或者符号对全部内核代码公开,你可以直接在你的内核模块直接调用。宏定义在include\linux\export.h中。
(1)#运算符,##运算符
通常在宏定义中使用#来创建字符串,#abc就表示字符串“abc”等。
##运算符称为预处理器的粘合剂,用来替换粘合两个不同的符号。
如:#define xName (n) x##n
则xName(4) 则变为x4
(2)gcc的__attribute__属性
__attribute__((section("section_name)))的作用是将指定的函数或变量放入到名为“section_name”的段中。
__attribute__属性添加可以在函数或变量定义的时候直接加入定义语句中。
如:int myvar__attribute__((section("mydata"))) = 0;
表示定义了整形变量myvar=0;并且将该变量存放到名为”mydata”的section中
/* For every exported symbol, place a struct in the __ksymtab section */
#define ___EXPORT_SYMBOL(sym, sec)\
extern typeof(sym) sym;\
__CRC_SYMBOL(sym, sec)\
static const char __kstrtab_##sym[] //用于存放导出的符号名
__attribute__((section("__ksymtab_strings"), aligned(1)))//放置到__ksymtabl_strings的section中
= VMLINUX_SYMBOL_STR(sym);\
static const struct kernel_symbol __ksymtab_##sym //存放导出符号在内存的地址和名称
__used\
__attribute__((section("___ksymtab" sec "+" #sym), used))//放置到__ksymatab的section中
= { (unsigned long)&sym, __kstrtab_##sym }
/*
* Boot command-line arguments
*/
#define MAX_INIT_ARGS CONFIG_INIT_ENV_ARG_LIMIT
#define MAX_INIT_ENVS CONFIG_INIT_ENV_ARG_LIMIT
extern void time_init(void);
/* Default late time init is NULL. archs can override this later. */
void (*__initdata late_time_init)(void);
/*
* Used to generate warnings if static_key manipulation functions are used
* before jump_label_init is called.
*/
bool static_key_initialized __read_mostly;
EXPORT_SYMBOL_GPL(static_key_initialized);//只对GPL协议的模块开放
/*
* If set, this is an indication to the drivers that reset the underlying
* device before going ahead with the initialization otherwise driver might
* rely on the BIOS and skip the reset operation.
*
* This is useful if kernel is booting in an unreliable environment.
* For ex. kdump situation where previous kernel has crashed, BIOS has been
* skipped and devices will be in unknown state.
*/
unsigned int reset_devices;
EXPORT_SYMBOL(reset_devices);
/* __init标识的代码存在特殊的内存段中,初始化结束后就释放这段内存*/
static int __init set_reset_devices(char *str)
{
reset_devices = 1;
return 1;
}
__setup("reset_devices", set_reset_devices);
在kernel中有很多__init,其定义在/include/linux/init.h
#define __init __attribute__ ((__section__ (".init.text"))) __cold
#define __initdata __attribute__ ((__section__ (".init.data")))
#define __exitdata __attribute__ ((__section__(".exit.data")))
#define __exit_call __attribute_used__ __attribute__ ((__section__ (".exitcall.exit")))
section("SECTION-NAME"),正常情况下编译器会它的生成的objects放在像“data”和“bss”段中,但是有时候,你需要额外的section或你需要把特定的数据放在特定的section中。比如,为了映射特定的硬件,就需要把一个变量或函数放在一个特殊的段中。下面是一个例子:
struct duart a __attribute__ ((section ("DUART_A"))) = { 0 };
struct duart b __attribute__ ((section ("DUART_B"))) = { 0 };
char stack[10000] __attribute__ ((section ("STACK"))) = { 0 };
int init_data __attribute__ ((section ("INITDATA"))) = 0;
main()
{
/* Initialize stack pointer */
init_sp (stack + sizeof (stack));
/* Initialize initialized data */
memcpy (&init_data, &data, &edata - &data);
/* Turn on the serial ports */
init_duart (&a);
init_duart (&b);
}
linux中把一些启动及初始化时候用的数据用__init标识,然后在适当的时候把它们释放,回收内存。
说到这个__init,就不能不说module_init,subsys_initcall。
在init.h中我们能够找到
#define subsys_initcall(fn) __define_initcall("4",fn,4)
#define __define_initcall(level,fn,id) \
static initcall_t __initcall_##fn##id __attribute_used__ \
__attribute__((__section__(".initcall" level ".init"))) = fn
subsys_initcall(usb_init)转换后就变成了
static initcall_t __initcall_usbinit4 __attribute_used__ \
__attribute__((__section__(".initcall4.init"))) = usb_init
就是把usb_init的函数入口指针存放在.initcall4.init中。
在/include/asm-generic/vmlinux.lds.h
#define INITCALLS \
*(.initcall0.init) \
*(.initcall0s.init) \
*(.initcall1.init) \
*(.initcall1s.init) \
*(.initcall2.init) \
*(.initcall2s.init) \
*(.initcall3.init) \
*(.initcall3s.init) \
*(.initcall4.init) \
*(.initcall4s.init) \
*(.initcall5.init) \
*(.initcall5s.init) \
*(.initcallrootfs.init) \
*(.initcall6.init) \
*(.initcall6s.init) \
*(.initcall7.init) \
*(.initcall7s.init)
文件/arch/kernel/vmlinux_32.lds.S
.initcall.init : AT(ADDR(.initcall.init) - LOAD_OFFSET) {
__initcall_start = .;
INITCALLS
__initcall_end = .;
}
那么系统是如何执行这些函数呢?
main.c中
start_kernel->reset_init()->kernel_init()->do_basic_setup()->do_initcalls()
而__setup()这个宏定义,在include/linux/init.h文件中。
#define __setup(str, fn) \
static char __setup_str_##fn[] __initdata = str; \
static struct kernel_param __setup_##fn __attribute__((unused)) __initsetup = { __setup_str_##fn, fn }
vmlinux.lds这个关于ld链接器的脚本文件有这样的一段
.init.data : {
*(.init.data) .=ALIGN(8);
//输入段为.init.data 8字节对齐
*(.init.rodata);
//输入段为.init.rodata
__setup_start = .;
//.表示当前的offset,相当于该变量在vmlix镜像中的文件偏移
*(.setup.init)
__setup_end = .;
……
}
这里的意思就是__setup_start一个节的开始,而__setup_end是一个节的结束,这个节的名称是.init.setup,这个你可以用readelf -a这个来看一下你的vmlinux这个文件,可以看到.init.setup就在.init.data的节中。
最后欢迎大家访问我的个人网站:1024s


 1190
1190


 被折叠的 条评论
为什么被折叠?
被折叠的 条评论
为什么被折叠?
 到【灌水乐园】发言


