


Linux系统安装进阶系列二GentooLinux

Gentoo Linux是一种可以针对任何应用和需要而自动优化和自定义的特殊的Linux发行版。Gentoo拥有优秀的性能、高度的可配置性和一流的用户及开发社区。上一篇文章介绍了怎么安装ArchLinux,而Gentoo Linux系统的安装,同样需要从手工磁盘分区开始,而且还需要自己配置编译系统内核。在安装步骤上比Archlinux更加繁琐,时间而长、
先在gentoo 官网下载一个系统安装光盘和一个基础压缩包的系统

No Multilib:纯64位系统;Multilib:为32和64位相兼容系统;Hardened:高级版本
X32:纯32位系统;Uclibc :面向嵌入式Linux系统;Systemed:
先择一个合适的一个基础压缩包的系统,非常重要,
- 设置网卡
livecd ~ # net-setup
- 设置密码
livecd ~ # passwd
- 启动SSH服务
livecd ~ # /etc/init.d/sshdstart
- 硬盘分区
livecd ~ #Parted
mklabelgpt # 创建新的磁盘标签 (分区表)
unit mib # 设置单位
mkpartprimary ext4 1 100 #创建bios-grub分区
set 1 bios_grub on
mkpartprimary ext4 100500 #创建启动分区
mkpartprimary ext4 500150000#创建根分区
mkpartprimaryext4 15000 19000#创建SWAP交换分区
我的笔记本硬盘是500G的,这里只分了三个分区,如果有需要的话,可以多划分几个分区出来,分别将/usr /opt /var /home等分区独立挂载。
- 格式化磁盘
livecd ~ # mkfs.ext4 /dev/sda2
livecd ~ # mkfs.ext4 /dev/sda3
livecd ~ # mkswap /dev/sda4
livecd ~ # swapon /dev/sda4
- 加载分区
livecd ~ # mount /dev/sda3/mnt/gentoo
livecd ~ # mkdir /mnt/gentoo/boot
livecd ~ # mount /dev/sda2/mnt/gentoo/boot
- 使用filezilla client 上传stage 基础压缩包的系统(推荐使用,在PC端使用下载工具然后再上传,速度比较快)或直接在终端使用下载

livecd ~ # wgethttp://distfiles.gentoo.org/releases/amd64/autobuilds/20190118
/systemd/stage3-amd64-systemd-20190118.tar.bz2
- 解压stage基础压缩包的系统
livecd ~ # tar-jxvf stage3-amd64-systemd-20190118.tar.bz2 -C/mnt/gentoo
- 复制DNS信息
livecd ~ # cp-L /etc/resolv.conf /mnt/gentoo/etc
- Gentoo ebuild 软件仓库
livecd ~ # mkdir/mnt/gentoo/etc/portage/repos.conf
livecd ~ # cp/mnt/gentoo/usr/share/portage/config/repos.conf /mnt/gentoo/
etc/portage/repos.conf/gentoo.conf
- 添加线程到make.conf
livecd ~ #echo'MAKEOPTS="-j5"'>>/mnt/gentoo/etc/portage/make.conf
"-j5" //四核,数字=cpu核心数+1
- 选择最快的镜像站点
livecd ~ # mirrorselect -i -o>>/mnt/gentoo/etc/portage/make.conf
- 挂载必要的文件系统
livecd ~ # mount -t proc proc /mnt/gentoo/proc
livecd ~ # mount --rbind/dev /mnt/gentoo/dev
livecd ~ # mount --make-rslave /mnt/gentoo/dev
livecd ~ # mount --rbind /sys /mnt/gentoo/sys
livecd ~ # mount --make-rslave /mnt/gentoo/sys
- 进入新环境(因为目前只有各种Linux目录及文件,还没安装基本系统和内核,只是一个空壳,接下来才是真正赋予这个系统的灵魂)
livecd ~ # chroot /mnt/gentoo
(chroot) livecd / # source /etc/profile &&PS1="(chroot) $PS1"
- 从网站安装ebuild 数据库快照
(chroot) livecd / # emerge-webrsync
- 更新Portage ebuild 数据库
(chroot) livecd / # emerge--sync
- 选择正确的配置文件
(chroot) livecd / # eselect profile list
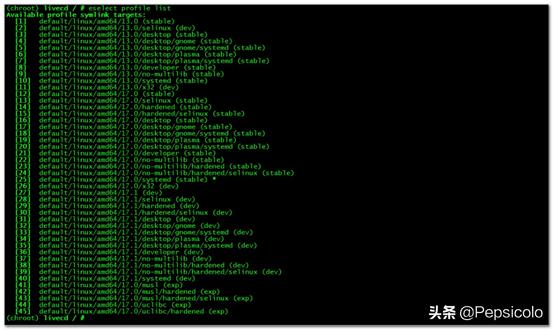
(chroot) livecd / # eselect profile set 16
(在这选择字数越多的选项,装的软件会越多,时间会更久,这里我选择安装支持桌面环境的17.0稳定版,大约需要安装279个软件,为后面安装桌面系统先做准备)
- 安装基本系统
(chroot) livecd / # emerge--ask--newuse --update --deep @world
(执行完这条命令之后,可以喝杯茶休息下,可以睡觉,可以看电影听歌,逛街,可以吃喝玩乐,可以做各种爱做的事,唯一不可以的就是关机。)
(chroot) livecd / # emerge--asksys-kernel/genkernel-next
(执行完这条命令之后,可以继续喝杯茶休息下)
- 安装lspci工具
(chroot) livecd / # emerge --ask sys-apps/pciutils
- 列出电脑硬件信息
(chroot) livecd / # lspci
- 下载内核
(chroot) livecd / # emerge --ask sys-kernel/gentoo-sources
- 复制内核配置文件
(chroot) livecd / # zcat /proc/config.gz > /usr/src/linux/.config
- 生成一个initramfs
(chroot) livecd / # genkernel --install initramfs
- 编辑内核配置
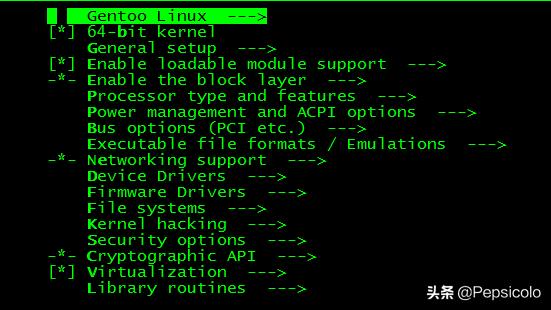
(chroot) livecd / # cd /usr/src/linux
(chroot) livecd /usr/src/linux # make menuconfig
(请根据自己硬件配置选择相应的的配置)
- 编译及安装内核
(chroot) livecd /usr/src/linux # make && make modules_install && make install
(如果有更改选项后,重启之后提示进不了系统,基本上都是因为磁盘选择有错误,建议新手把磁盘选项保持默认,直接编译安装内核)
- 安装VIM编辑器(可选操作,个人比较喜欢使用vim,如果不装的话,可以使用nano)
(chroot) livecd / # emerge --ask app-editors/vim
- 本地化配置
(chroot) livecd / # cat>>/etc/locale.gen<
en_US.UTF-8 UTF-8
zh_CN.UTF-8 UTF-8
EOF
(chroot) livecd / # locale.gen
(chroot) livecd / # echo"LANG=en_US.UTF-8" > /etc/locale.conf
- 编辑磁盘分区配置文件
(chroot) livecd / # vi/etc/fstab
/dev/sda2boot ext4 defaults 0 0
/dev/sda3 / ext4 noatime 0 1
/dev/sda4 none swap sw 0 0
- 安装固件
(chroot) livecd / # emerge --ask sys-kernel/linux-firmware
- 安装网络管理软件
(chroot) livecd / # emerge --ask net-misc/netifrc sys-apps/net-tools
- 安装无线网卡管理软件
(chroot) livecd / # emerge --ask net-wireless/iw net-wireless/wpa_supplicant net-wireless/wireless-tools
- 安装定时工具
(chroot) livecd / # emerge –ask sys-process/cronie
- 随机启动定时服务
(chroot) livecd / # rc-update add cronie default
- 安装日志工具
(chroot) livecd / # emerge sysklogd
- 随机启动日志服务
(chroot) livecd / # rc-update add sysklogd default
- 随机启动SSH服务
(chroot) livecd / # rc-update add sshd default
- 安装grub2 启动器
(chroot) livecd / # emerge --ask sys-boot/grub:2
(chroot) livecd / # grub-install /dev/sda
(chroot) livecd / # grub-mkconfig -o /boot/grub/grub.cfg
- 设置密码
(chroot) livecd / #passwd
- 添加用户
(chroot) livecd / # useradd -m -G users,wheel,audio -s /bin/bash mzh
(chroot) livecd / # password mzh
- 退出重启
(chroot) livecd / # exit
livecd ~ # umount-l /mnt/gentoo/proc
livecd ~ # umount -l /mnt/gentoo/sys
livecd ~ # umount -l /mnt/gentoo/dev
livecd ~ # umount -l /mnt/gentoo/
livecd ~ # reboot
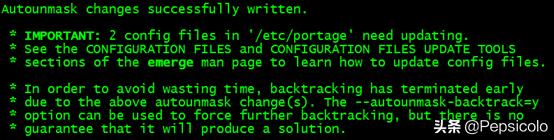
如果在安装软件时,提示上图错误时,请执行etc-update 重新更新一下配置文件。


 3170
3170

 被折叠的 条评论
为什么被折叠?
被折叠的 条评论
为什么被折叠?
 到【灌水乐园】发言


