


作者:宋者为王
连接:https://cnblogs.com/andy-songwei/p/10955062.html
前言
自定义 View、多线程、网络,被认为是 Android 开发者必须牢固掌握的最基础的三大基本功。Android View 的绘制流程原理又是学好自定义 View 的理论基础,所以掌握好 View 的绘制原理是 Android 开发进阶中无法绕过的一道坎。而关乎到原理性的东西往往又让很多初学者感到难以下手,所以真正掌握的人并不多。本文采用非常浅显的语言,从顺着 Android 源码的思路,对 View 的整个绘制流程进行近乎“地毯式搜索”般的方式,对其中的关键流程和知识点进行查证和分析,以图让初级程序员都能轻松读懂。本文最大的特点,就是最大限度地向源码要答案,从源码中追流程的来龙去脉,在注释中查功能的点点滴滴,所有的结论都尽量在源码和注释中找根据。
为了能对其中的重难点分析透彻,文中贴出了大量的源码依据以及源码中的注释,并对重要的注释进行了翻译和讲解,所以文章会比较长。讲解该知识点的文章普遍都非常长,所以希望读者能够秉承程序员吃苦耐劳的精神,攻克这个难关。本文中的源码是基于 API26 的,即 Android8.0 系统版本,主要内容大致如下:
一、View 绘制的三个流程
我们知道,在自定义 View 的时候一般需要重写父类的 onMeasure()、onLayout()、onDraw()三个方法,来完成视图的展示过程。当然,这三个暴露给开发者重写的方法只不过是整个绘制流程的冰山一角,更多复杂的幕后工作,都让系统给代劳了。一个完整的绘制流程包括 measure、layout、draw 三个步骤,其中:
measure:测量。系统会先根据 xml 布局文件和代码中对控件属性的设置,来获取或者计算出每个 View 和 ViewGrop 的尺寸,并将这些尺寸保存下来。
layout:布局。根据测量出的结果以及对应的参数,来确定每一个控件应该显示的位置。
draw:绘制。确定好位置后,就将这些控件绘制到屏幕上。
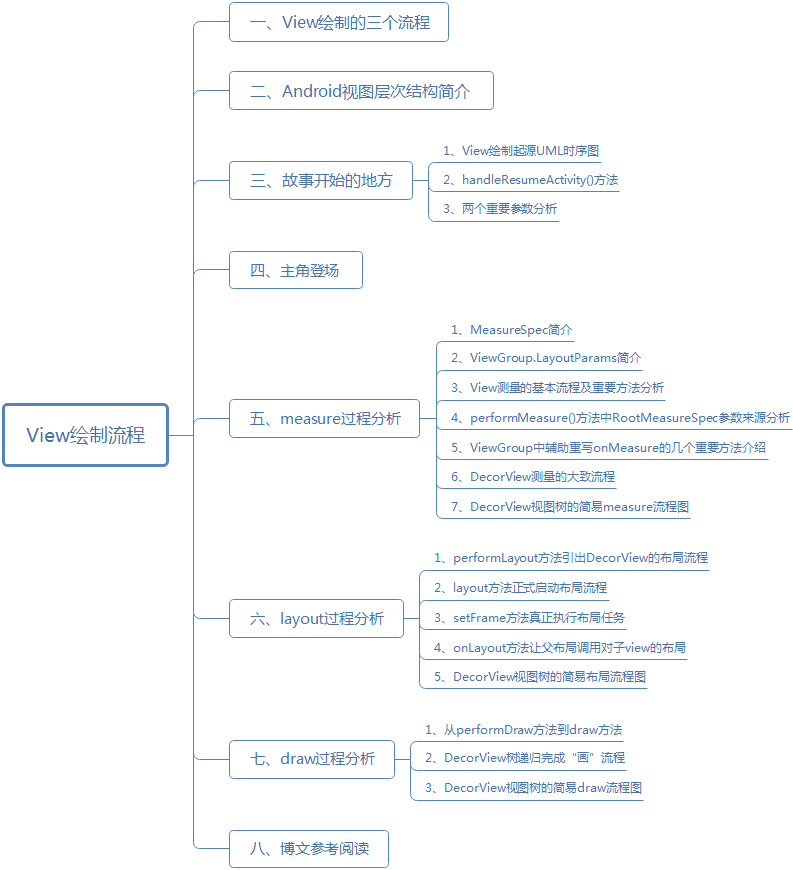
二、Android 视图层次结构简介
在介绍 View 绘制流程之前,咱们先简单介绍一下 Android 视图层次结构以及 DecorView,因为 View 的绘制流程的入口和 DecorView 有着密切的联系。
咱们平时看到的视图,其实存在如上的嵌套关系。上图是针对比较老的 Android 系统版本中制作的,新的版本中会略有出入,还有一个状态栏,但整体上没变。我们平时在 Activity 中 setContentView(...)中对应的 layout 内容,对应的是上图中 ViewGrop 的树状结构,实际上添加到系统中时,会再裹上一层 FrameLayout,就是上图中最里面的浅蓝色部分了。
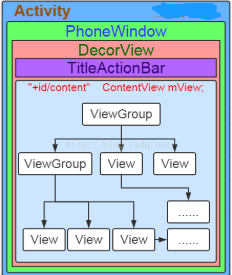
这里咱们再通过一个实例来继续查看。AndroidStudio 工具中提供了一个布局视察器工具,通过 Tools > Android > Layout Inspector 可以查看具体某个 Activity 的布局情况。下图中,左边树状结构对应了右边的可视图,可见 DecorView 是整个界面的根视图,对应右边的红色框,是整个屏幕的大小。黄色边框为状态栏部分;那个绿色边框中有两个部分,一个是白框中的 ActionBar,对应了上图中紫色部分的 TitleActionBar 部分,即标题栏,平时咱们可以在 Activity 中将其隐藏掉;另外一个蓝色边框部分,对应上图中最里面的蓝色部分,即 ContentView 部分。下图中左边有两个蓝色框,上面那个中有个“contain_layout”,这个就是 Activity 中 setContentView 中设置的 layout.xml 布局文件中的最外层父布局,咱们能通过 layout 布局文件直接完全操控的也就是这一块,当其被 add 到视图系统中时,会被系统裹上 ContentFrameLayout(显然是 FrameLayout 的子类),这也就是为什么添加 layout.xml 视图的方法叫 setContentView(...)而不叫 setView(...)的原因。
三、故事开始的地方
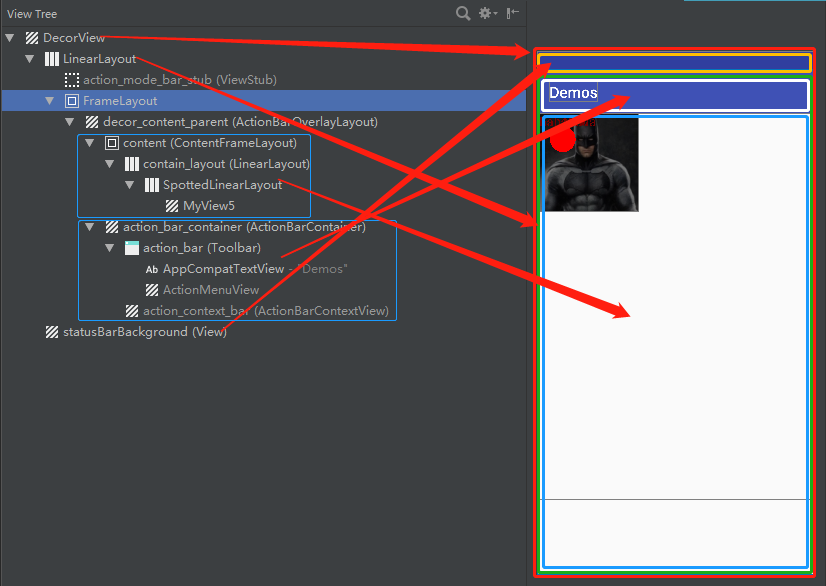
如果对 Activity 的启动流程有一定了解的话,应该知道这个启动过程会在 ActivityThread.java 类中完成,在启动 Activity 的过程中,会调用到 handleResumeActivity(...)方法,关于视图的绘制过程最初就是从这个方法开始的。
1、View 绘制起源 UML 时序图
整个调用链如下图所示,直到 ViewRootImpl 类中的 performTraversals()中,才正式开始绘制流程了,所以一般都是以该方法作为正式绘制的源头。
2、handleResumeActivity()方法
在这咱们先大致看看 ActivityThread 类中的 handleResumeActivity 方法,咱们这里只贴出关键代码:
//===========ActivityThread.java==========final void handleResumeActivity(...) { ...... //跟踪代码后发现其初始赋值为mWindow = new PhoneWindow(this,window, activityConfigCallback); r.window = r.activity.getWindow(); //从PhoneWindow实例中获取DecorView View decor = r.window.getDecorView(); ...... //跟踪代码后发现,vm值为上述PhoneWindow实例中获取WindowManager。 ViewManager wm = a.getWindowManager(); ...... //当前window的属性,从代码跟踪来看是PhoneWindow窗口的属性 WindowManager.LayoutParams l = r.window.getAttributes(); ...... wm.addView(decor, l); ......}上述代码第 9 行中,ViewManager 是一个接口,addView 是其中定义个一个空方法,WindowManager 是其子类,WindowManagerImpl 是 WindowManager 的实现类(顺便啰嗦一句,这种方式叫做面向接口编程,在父类中定义,在子类中实现,在 Java 中很常见)。第 5 行代码中的 r.window 的值可以根据 Activity.java 的如下代码得知,其值为 PhoneWindow 实例。
//===============Activity.java=============private Window mWindow;public Window getWindow() { return mWindow;}final void attach(...){ ...... mWindow = new PhoneWindow(this, window, activityConfigCallback); ......}3、两个重要参数分析
之所以要在这里特意分析 handleResumeActivity()方法,除了因为它是整个绘制流程的最初源头外,还有就是 addView 的两个参数比较重要,它们经过一层一层传递后进入到 ViewRootImpl 中,在后面分析绘制中要用到。这里再看看这两个参数的相关信息:
(1)参数 decor
//==========PhoneWindow.java===========// This is the top-level view of the window, containing thewindow decor.private DecorView mDecor;......public PhoneWindow(...){ ...... mDecor = (DecorView) preservedWindow.getDecorView(); ......}@Overridepublic final View getDecorView() { ...... return mDecor;}可见 decor 参数表示的是 DecorView 实例。注释中也有说明:这是 window 的顶级视图,包含了 window 的 decor。
(2)参数
//===================Window.java===================//The current window attributes. private final WindowManager.LayoutParams mWindowAttributes = new WindowManager.LayoutParams();...... public final WindowManager.LayoutParams getAttributes() { return mWindowAttributes; }......//==========WindowManager.java的内部类LayoutParams extends ViewGroup.LayoutParams============= public LayoutParams() { super(LayoutParams.MATCH_PARENT, LayoutParams.MATCH_PARENT); ...... }//==============ViewGroup.java内部LayoutParams==================== public LayoutParams(int width, int height) { this.width = width; this.height = height; }该参数表示 l 的是 PhoneWindow 的 LayoutParams 属性,其 width 和 height 值均为 LayoutParams.MATCH_PARENT。
在源码中,WindowPhone 和 DecorView 通过组合方式联系在一起的,而 DecorView 是整个 View 体系的根 View。在前面 handleResumeActivity(...)方法代码片段中,当 Actiivity 启动后,就通过第 14 行的 addView 方法,来间接调用 ViewRootImpl 类中的 performTraversals(),从而实现视图的绘制。
四、主角登场
无疑,performTraversals()方法是整个过程的主角,它把控着整个绘制的流程。该方法的源码有大约 800 行,这里咱们仅贴出关键的流程代码,如下所示:
// =====================ViewRootImpl.java=================private void performTraversals() { ...... int childWidthMeasureSpec = getRootMeasureSpec(mWidth, lp.width); int childHeightMeasureSpec = getRootMeasureSpec(mHeight, lp.height); ...... // Ask host how big it wants to be performMeasure(childWidthMeasureSpec, childHeightMeasureSpec); ...... performLayout(lp, mWidth, mHeight); ...... performDraw();}上述代码中就是一个完成的绘制流程,对应上了第一节中提到的三个步骤:
performMeasure():从根节点向下遍历 View 树,完成所有 ViewGroup 和 View 的测量工作,计算出所有 ViewGroup 和 View 显示出来需要的高度和宽度;
performLayout():从根节点向下遍历 View 树,完成所有 ViewGroup 和 View 的布局计算工作,根据测量出来的宽高及自身属性,计算出所有 ViewGroup 和 View 显示在屏幕上的区域;
performDraw():从根节点向下遍历 View 树,完成所有 ViewGroup 和 View 的绘制工作,根据布局过程计算出的显示区域,将所有 View 的当前需显示的内容画到屏幕上。
咱们后续就是通过对这三个方法来展开研究整个绘制过程。
五、measure 过程分析
这三个绘制流程中,measure 是最复杂的,这里会花较长的篇幅来分析它。本节会先介绍整个流程中很重要的两个类 MeasureSpec 和 ViewGroup.LayoutParams 类,然后介绍 ViewRootImpl、View 及 ViewGroup 中测量流程涉及到的重要方法,最后简单梳理 DecorView 测量的整个流程并链接一个测量实例分析整个测量过程。
1、MeasureSpec 简介
这里咱们直接上源码吧,先直接通过源码和注释认识一下它,如果看不懂也没关系,在后面使用的时候再回头来看看。
/** * A MeasureSpec encapsulates the layout requirements passed from parent to child. * Each MeasureSpec represents a requirement for either the width or the height. * A MeasureSpec is comprised of a size and a mode. There are three possible * modes: * * UNSPECIFIED * * The parent has not imposed any constraint on the child. It can be whatever size * it wants. * * * EXACTLY * * The parent has determined an exact size for the child. The child is going to be * given those bounds regardless of how big it wants to be. * * * AT_MOST * * The child can be as large as it wants up to the specified size. * * * * MeasureSpecs are implemented as ints to reduce object allocation. This class * is provided to pack and unpack the tuple into the int. */ public static class MeasureSpec { private static final int MODE_SHIFT = 30; private static final int MODE_MASK = 0x3 << MODE_SHIFT; ...... /** * Measure specification mode: The parent has not imposed any constraint * on the child. It can be whatever size it wants. */ public static final int UNSPECIFIED = 0 << MODE_SHIFT; /** * Measure specification mode: The parent has determined an exact size * for the child. The child is going to be given those bounds regardless * of how big it wants to be. */ public static final int EXACTLY = 1 << MODE_SHIFT; /** * Measure specification mode: The child can be as large as it wants up * to the specified size. */ public static final int AT_MOST = 2 << MODE_SHIFT; ...... /** * Creates a measure specification based on the supplied size and mode. *...... *@return the measure specification based on size and mode */ public static int makeMeasureSpec(@IntRange(from = 0, to = (1 < - 1) int size, @MeasureSpecMode int mode) { if (sUseBrokenMakeMeasureSpec) { return size + mode; } else { return (size & ~MODE_MASK) | (mode & MODE_MASK); } ...... } ...... /** * Extracts the mode from the supplied measure specification. *...... */ @MeasureSpecMode public static int getMode(int measureSpec) { //noinspection ResourceType return (measureSpec & MODE_MASK); } /** * Extracts the size from the supplied measure specification. *...... * @return the size in pixels defined in the supplied measure specification */ public static int getSize(int measureSpec) { return (measureSpec & ~MODE_MASK); } ......}
从这段代码中,咱们可以得到如下的信息:
MeasureSpec 概括了从父布局传递给子 view 布局要求。每一个 MeasureSpec 代表了宽度或者高度要求,它由 size(尺寸)和 mode(模式)组成。
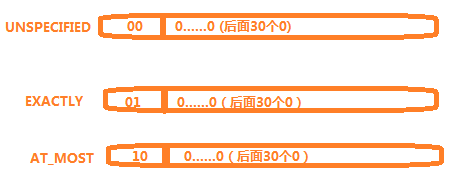
有三种可能的 mode:UNSPECIFIED、EXACTLY、AT_MOST
UNSPECIFIED:未指定尺寸模式。父布局没有对子 view 强加任何限制。它可以是任意想要的尺寸。(笔者注:这个在工作中极少碰到,据说一般在系统中才会用到,后续会讲得很少)
EXACTLY:精确值模式。父布局决定了子 view 的准确尺寸。子 view 无论想设置多大的值,都将限定在那个边界内。(笔者注:也就是 layout_width 属性和 layout_height 属性为具体的数值,如 50dp,或者设置为 match_parent,设置为 match_parent 时也就明确为和父布局有同样的尺寸,所以这里不要以为笔者搞错了。当明确为精确的尺寸后,其也就被给定了一个精确的边界)
AT_MOST:最大值模式。子 view 可以一直大到指定的值。(笔者注:也就是其宽高属性设置为 wrap_content,那么它的最大值也不会超过父布局给定的值,所以称为最大值模式)
MeasureSpec 被实现为 int 型来减少对象分配。该类用于将 size 和 mode 元组装包和拆包到 int 中。(笔者注:也就是将 size 和 mode 组合或者拆分为 int 型数据)
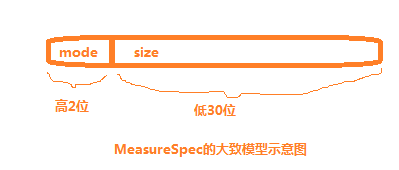
分析代码可知,一个 MeasureSpec 的模式如下所示,int 长度为 32 位置,高 2 位表示 mode,后 30 位用于表示 size
- UNSPECIFIED、EXACTLY、AT_MOST 这三个 mode 的示意图如下所示:
makeMeasureSpec(int mode,int size)用于将 mode 和 size 打包成一个 int 型的 MeasureSpec。
getSize(int measureSpec)方法用于从指定的 measureSpec 值中获取其 size。
getMode(int measureSpec)方法用户从指定的 measureSpec 值中获取其 mode。
2、ViewGroup.LayoutParams 简介
该类的源码及注释分析如下所示。
//============================ViewGroup.java==============================/** * LayoutParams are used by views to tell their parents how they want to be * laid out. *...... * * The base LayoutParams class just describes how big the view wants to be * for both width and height. For each dimension, it can specify one of: * * FILL_PARENT (renamed MATCH_PARENT in API Level 8 and higher), which * means that the view wants to be as big as its parent (minus padding) * WRAP_CONTENT, which means that the view wants to be just big enough * to enclose its content (plus padding) * an exact number * * There are subclasses of LayoutParams for different subclasses of * ViewGroup. For example, AbsoluteLayout has its own subclass of * LayoutParams which adds an X and Y value. * ...... * @attr ref android.R.styleable#ViewGroup_Layout_layout_height * @attr ref android.R.styleable#ViewGroup_Layout_layout_width */ public static class LayoutParams { ...... /** * Special value for the height or width requested by a View. * MATCH_PARENT means that the view wants to be as big as its parent, * minus the parent's padding, if any. Introduced in API Level 8. */ public static final int MATCH_PARENT = -1; /** * Special value for the height or width requested by a View. * WRAP_CONTENT means that the view wants to be just large enough to fit * its own internal content, taking its own padding into account. */ public static final int WRAP_CONTENT = -2; /** * Information about how wide the view wants to be. Can be one of the * constants FILL_PARENT (replaced by MATCH_PARENT * in API Level 8) or WRAP_CONTENT, or an exact size. */ public int width; /** * Information about how tall the view wants to be. Can be one of the * constants FILL_PARENT (replaced by MATCH_PARENT * in API Level 8) or WRAP_CONTENT, or an exact size. */ public int height; ......}这对其中重要的信息做一些翻译和整理:
LayoutParams 被 view 用于告诉它们的父布局它们想要怎样被布局。(笔者注:字面意思就是布局参数)
该 LayoutParams 基类仅仅描述了 view 希望宽高有多大。对于每一个宽或者高,可以指定为以下三种值中的一个:MATCH_PARENT,WRAP_CONTENT,an exact number。(笔者注:FILL_PARENT 从 API8 开始已经被 MATCH_PARENT 取代了,所以下文就只提 MATCH_PARENT)
MATCH_PARENT:意味着该 view 希望和父布局尺寸一样大,如果父布局有 padding,则要减去该 padding 值。
WRAP_CONTENT:意味着该 view 希望其大小为仅仅足够包裹住其内容即可,如果自己有 padding,则要加上该 padding 值。
对 ViewGroup 不同的子类,也有相应的 LayoutParams 子类。
其 width 和 height 属性对应着 layout_width 和 layout_height 属性。
3、View 测量的基本流程及重要方法分析
View 体系的测量是从 DecorView 这个根 view 开始递归遍历的,而这个 View 体系树中包含了众多的叶子 view 和 ViewGroup 的子类容器。这一小节中会从 ViewRootImpl.performMeasure()开始,分析测量的基本流程。
(1)ViewRootImpl.performMeasure()方法
跟踪源码,进入到 performMeasure 方法分析,这里仅贴出关键流程代码。
//=============ViewRootImpl.java==============private void performMeasure(int childWidthMeasureSpec, int childHeightMeasureSpec) { ...... mView.measure(childWidthMeasureSpec, childHeightMeasureSpec); ......}这个 mView 是谁呢?跟踪代码可以找到给它赋值的地方:
//========================ViewRootImpl.java======================public void setView(View view, WindowManager.LayoutParams attrs, View panelParentView) { ...... mView = view; ...... mWindowAttributes.copyFrom(attrs); ......}看到这里,是不是有些似曾相识呢?在第二节的绘制流程中提到过,这里 setView 的参数 view 和 attrs 是 ActivityThread 类中 addView 方法传递过来的,所以咱们这里可以确定 mView 指的是 DecorView 了。上述 performMeasure()中,其实就是 DecorView 在执行 measure()操作。如果您这存在“mView 不是 View 类型的吗,怎么会指代 DecorView 作为整个 View 体系的根 view 呢”这样的疑惑,那这里就啰嗦一下,DecorView extends FrameLayout extends ViewGroup extends View,通过这个继承链可以看到,DecorView 是一个容器,但 ViewGroup 也是 View 的子类,View 是所有控件的基类,所以这里 View 类型的 mView 指代 DecorView 是没毛病的。
(2)View.measure()方法
尽管 mView 就是 DecorView,但是由于 measure()方法是 final 型的,View 子类都不能重写该方法,所以这里追踪 measure()的时候就直接进入到 View 类中了,这里贴出关键流程代码:
//===========================View.java==============================/** * * This is called to find out how big a view should be. The parent * supplies constraint information in the width and height parameters. * * * * The actual measurement work of a view is performed in * {@link #onMeasure(int, int)}, called by this method. Therefore, only * {@link #onMeasure(int, int)} can and must be overridden by subclasses. * * * * @param widthMeasureSpec Horizontal space requirements as imposed by the * parent * @param heightMeasureSpec Vertical space requirements as imposed by the * parent * * @see #onMeasure(int, int) */public final void measure(int widthMeasureSpec, int heightMeasureSpec) { ...... // measure ourselves, this should set the measured dimension flag back onMeasure(widthMeasureSpec, heightMeasureSpec); ......}这里面注释提供了很多信息,这简单翻译并整理一下:
该方法被调用,用于找出 view 应该多大。父布局在 witdh 和 height 参数中提供了限制信息;
一个 view 的实际测量工作是在被本方法所调用的 onMeasure(int,int)方法中实现的。所以,只有 onMeasure(int,int)可以并且必须被子类重写(笔者注:这里应该指的是,ViewGroup 的子类必须重写该方法,才能绘制该容器的子 view。如果是自定义一个子控件,extends View,那么并不是必须重写该方法);
参数 widthMeasureSpec:父布局加入的水平空间要求;
参数 heightMeasureSpec:父布局加入的垂直空间要求。
系统将其定义为一个 final 方法,可见系统不希望整个测量流程框架被修改。
(3)View.onMeasure()方法
在上述方法体内看到 onMeasure(int,int)方法时,是否有一丝慰藉呢?终于看到咱们最熟悉的身影了,很亲切吧!咱们编写自定义 View 时,基本上都会重写的方法!咱们看看其源码:
//===========================View.java==============================/** * * Measure the view and its content to determine the measured width and the * measured height. This method is invoked by {@link #measure(int, int)} and * should be overridden by subclasses to provide accurate and efficient * measurement of their contents. * * * * CONTRACT: When overriding this method, you * must call {@link #setMeasuredDimension(int, int)} to store the * measured width and height of this view. Failure to do so will trigger an * IllegalStateException, thrown by * {@link #measure(int, int)}. Calling the superclass' * {@link #onMeasure(int, int)} is a valid use. * * * * The base class implementation of measure defaults to the background size, * unless a larger size is allowed by the MeasureSpec. Subclasses should * override {@link #onMeasure(int, int)} to provide better measurements of * their content. * * * * If this method is overridden, it is the subclass's responsibility to make * sure the measured height and width are at least the view's minimum height * and width ({@link #getSuggestedMinimumHeight()} and * {@link #getSuggestedMinimumWidth()}). * * * @param widthMeasureSpec horizontal space requirements as imposed by the parent. * The requirements are encoded with * {@link android.view.View.MeasureSpec}. * @param heightMeasureSpec vertical space requirements as imposed by the parent. * The requirements are encoded with * {@link android.view.View.MeasureSpec}. * * @see #getMeasuredWidth() * @see #getMeasuredHeight() * @see #setMeasuredDimension(int, int) * @see #getSuggestedMinimumHeight() * @see #getSuggestedMinimumWidth() * @see android.view.View.MeasureSpec#getMode(int) * @see android.view.View.MeasureSpec#getSize(int) */ protected void onMeasure(int widthMeasureSpec, int heightMeasureSpec) { setMeasuredDimension(getDefaultSize(getSuggestedMinimumWidth(), widthMeasureSpec), getDefaultSize(getSuggestedMinimumHeight(), heightMeasureSpec)); }函数体内也就一句代码而已,注释却写了这么一大堆,可见这个方法的重要性了。这里翻译和整理一下这些注释:
测量该 view 以及它的内容来决定测量的宽度和高度。该方法被 measure(int,int)(笔者注:就是前面提到过的那个方法)调用,并且应该被子类重写来提供准确而且有效的对它们的内容的测量。
当重写该方法时,您必须调用 setMeasuredDimension(int,int)来存储该 view 测量出的宽和高。如果不这样做将会触发 IllegalStateException,由 measure(int,int)抛出。调用基类的 onMeasure(int,int)方法是一个有效的方法。
测量的基类实现默认为背景的尺寸,除非更大的尺寸被 MeasureSpec 所允许。子类应该重写 onMeasure(int,int)方法来提供对内容更好的测量。
如果该方法被重写,子类负责确保测量的高和宽至少是该 view 的 mininum 高度和 mininum 宽度值(链接 getSuggestedMininumHeight()和 getSuggestedMininumWidth());
widthMeasureSpec:父布局加入的水平空间要求。该要求被编码到 android.view.View.MeasureSpec 中。
heightMeasureSpec:父布局加入的垂直空间要求。该要求被编码到 android.view.View.MeasureSpec 中。
注释中最后提到了 7 个方法,这些方法后面会再分析。注释中花了不少的篇幅对该方法进行说明,但读者恐怕对其中的一些信息表示有些懵吧,比如 MeasureSpec 是什么,mininum 高度和 mininum 宽度值是怎么回事等,MeasureSpec 在本节的开头介绍过,可以回头再看看,其它的后面会作进一步的阐述,到时候咱们再回头来看看这些注释。
注意:容器类控件都是 ViewGroup 的子类,如 FrameLayout、LinearLayout 等,都会重写 onMeasure 方法,根据自己的特性来进行测量;如果是叶子节点 view,即最里层的控件,如 TextView 等,也可能会重写 onMeasure 方法,所以当流程走到 onMeasure(...)时,流程可能就会切到那些重写的 onMeasure()方法中去。最后通过从根 View 到叶子节点的遍历和递归,最终还是会在叶子 view 中调用 setMeasuredDimension(...)来实现最终的测量。
(4)View.setMeasuredDimension()方法
继续看 setMeasuredDimension 方法:
/** * This method must be called by {@link #onMeasure(int,int)} to store the
* measured width and measured height. Failing to do so will trigger an * exception at measurement time. * * @param measuredWidth The measured width of this view. May be a complex * bit mask as defined by {@link #MEASURED_SIZE_MASK} and * {@link #MEASURED_STATE_TOO_SMALL}. * @param measuredHeight The measured height of this view. May be a complex * bit mask as defined by {@link #MEASURED_SIZE_MASK} and * {@link #MEASURED_STATE_TOO_SMALL}. */ protected final void setMeasuredDimension(int measuredWidth, int measuredHeight) { ...... setMeasuredDimensionRaw(measuredWidth, measuredHeight); }
这里需要重点关注注释中对参数的说明:
measuredWidth:该 view 被测量出宽度值。
measuredHeight:该 view 被测量出的高度值。
到这个时候才正式明确提到宽度和高度,通过 getDefaultSize(getSuggestedMinimumWidth(), widthMeasureSpec),参数由 widthMeasureSpec 变成了 measuredWidth,即由“父布局加入的水平空间要求”转变为了 view 的宽度,measuredHeigh 也是一样。咱们先继续追踪源码分析 width 的值:
/** * Returns the suggested minimum width that the view should use. This * returns the maximum of the view's minimum width * and the background's minimum width * ({@link android.graphics.drawable.Drawable#getMinimumWidth()}). * * When being used in {@link #onMeasure(int, int)}, the caller should still * ensure the returned width is within the requirements of the parent. * * @return The suggested minimum width of the view. */ protected int getSuggestedMinimumWidth() { return (mBackground == null) ? mMinWidth : max(mMinWidth, mBackground.getMinimumWidth()); }这个方法是干嘛用的呢?注释的翻译如下:
返回建议该 view 应该使用的最小宽度值。该方法返回了 view 的最小宽度值和背景的最小宽度值(链接 android.graphics.drawable.Drawable#getMinimumWidth())之间的最大值。
当在 onMeasure(int,int)使用时,调用者应该仍然确保返回的宽度值在父布局的要求之内。
返回值:view 的建议最小宽度值。
这其中提到的"mininum width“指的是在 xml 布局文件中该 view 的“android:minWidth"属性值,“background's minimum width”值是指“android:background”的宽度。该方法的返回值就是两者之间较大的那一个值,用来作为该 view 的最小宽度值,现在应该很容易理解了吧,当一个 view 在 layout 文件中同时设置了这两个属性时,为了两个条件都满足,自然要选择值大一点的那个了。
/** * Utility to return a default size. Uses the supplied size if the * MeasureSpec imposed no constraints. Will get larger if allowed * by the MeasureSpec. * * @param size Default size for this view * @param measureSpec Constraints imposed by the parent * @return The size this view should be. */ public static int getDefaultSize(int size, int measureSpec) { int result = size; int specMode = MeasureSpec.getMode(measureSpec); int specSize = MeasureSpec.getSize(measureSpec); switch (specMode) { case MeasureSpec.UNSPECIFIED: result = size; break; case MeasureSpec.AT_MOST: case MeasureSpec.EXACTLY: result = specSize; break; } return result; }通过本节开头的介绍,您应该对 MeasureSpec 有了一个比较明确的认识了,再看看 getDefaultSize(int size,int measureSpec)方法,就很容易理解了。正如其注释中所说,如果父布局没有施加任何限制,即 MeasureSpec 的 mode 为 UNSPECIFIED,那么返回值为参数中提供的 size 值。如果父布局施加了限制,则返回的默认尺寸为保存在参数 measureSpec 中的 specSize 值。所以到目前为止,需要绘制的宽和高值就被确定下来了。只是,我们还需要明确这两个值最初是从哪里传过来的,后面我们还会顺藤摸瓜,找到这两个尺寸的出处。
既然宽度值 measuredWidth 和高度值 measuredHeight 已经确定下来,我们继续追踪之前的 setMeasuredDimension(int measuredWidth, int measuredHeight)方法,其内部最后调用了如下的方法:
/** * ...... * @param measuredWidth The measured width of this view. May be a complex * bit mask as defined by {@link #MEASURED_SIZE_MASK} and * {@link #MEASURED_STATE_TOO_SMALL}. * @param measuredHeight The measured height of this view. May be a complex * bit mask as defined by {@link #MEASURED_SIZE_MASK} and * {@link #MEASURED_STATE_TOO_SMALL}. */ private void setMeasuredDimensionRaw(int measuredWidth, int measuredHeight) { mMeasuredWidth = measuredWidth; mMeasuredHeight = measuredHeight; ...... }到目前为止,View 中的成员变量 mMeasureWidth 和 mMeasureHeight 就被赋值了,这也就意味着,View 的测量就结束了。前面讲 onMeasure()方法时介绍过,View 子类(包括 ViewGroup 子类)通常会重写 onMeasure(),当阅读 FrameLayout、LinearLayout、TextView 等重写的 onMeasure()方法时,会发现它们最终都会调用 setMeasuredDimension() 方法,从而完成测量。这里可以对应上前面介绍 View.onMeasure()时,翻译注释的第 2)点以及 setMeasuredDimension()方法的注释说明。
(5)getMeasureWidth()方法
在 View 的 onMeasure()方法的注释中提到了该方法,这里顺便也介绍一下。
//==================View.java==============public static final int MEASURED_SIZE_MASK = 0x00ffffff;/** * ...... * @return The raw measured width of this view. */public final int getMeasuredWidth() { return mMeasuredWidth & MEASURED_SIZE_MASK;}获取原始的测量宽度值,一般会拿这个方法和 layout 执行后 getWidth()方法做比较。该方法需要在 setMeasuredDimension()方法执行后才有效,否则返回值为 0。
(6)getMeasureHeight()方法
在 View 的 onMeasure()方法的注释中提到了该方法,这里顺便也介绍一下。
//==================View.java==============/** * ...... * @return The raw measured height of this view. */public final int getMeasuredHeight() { return mMeasuredHeight & MEASURED_SIZE_MASK;}获取原始的测量高度值,一般会拿这个方法和 layout 执行后 getHeight()方法做比较。该方法需要在 setMeasuredDimension()方法执行后才有效,否则返回值为 0。
4、performMeasure()方法中 RootMeasureSpec 参数来源分析
前面讲到 getDefaultSize(int size,int measureSpec)方法时提到过,要找到其中 measureSpec 的来源。事实上,根据 View 体系的不断往下遍历和递归中,前面流程中传入 getDefaultSize()方法中的值是根据上一次的值变动的,所以咱们需要找到最初参数值。根据代码往回看,可以看到前文 performTraversals()源码部分第三行和第四行中,该参数的来源。咱们先看看传入 performMeasure(int,int)的 childWidthMeasureSpec 是怎么来的。
int childWidthMeasureSpec = getRootMeasureSpec(mWidth, lp.width);
getRootMeasureSpec(int,int)方法的完整源码如下所示:
/** * Figures out the measure spec for the root view in a window based on it's * layout params. * * @param windowSize * The available width or height of the window * * @param rootDimension * The layout params for one dimension (width or height) of the * window. * * @return The measure spec to use to measure the root view. */ private static int getRootMeasureSpec(int windowSize, int rootDimension) { int measureSpec; switch (rootDimension) { case ViewGroup.LayoutParams.MATCH_PARENT: // Window can't resize. Force root view to be windowSize. measureSpec = MeasureSpec.makeMeasureSpec(windowSize, MeasureSpec.EXACTLY); break; case ViewGroup.LayoutParams.WRAP_CONTENT: // Window can resize. Set max size for root view. measureSpec = MeasureSpec.makeMeasureSpec(windowSize, MeasureSpec.AT_MOST); break; default: // Window wants to be an exact size. Force root view to be that size. measureSpec = MeasureSpec.makeMeasureSpec(rootDimension, MeasureSpec.EXACTLY); break; } return measureSpec; }照例先翻译一下注释
基于 window 的 layout params,在 window 中为 root view 找出 measure spec。(笔者注:也就是找出 DecorView 的 MeasureSpec,这里的 window 也就是 PhoneWindow 了)
参数 windowSize:window 的可用宽度和高度值。
参数 rootDimension:window 的宽/高的 layout param 值。
返回值:返回用于测量 root view 的 MeasureSpec。
如果不清楚 LayoutParams 类,可以看看本节开头的介绍。在 getRootMeasureSpec(int,int)中,MeasureSpec.makeMeasureSpec 方法在前面介绍 MeasureSpec 类的时候提到过,就是将 size 和 mode 组合成一个 MeasureSpec 值。这里我们可以看到 ViewGroup.LayoutParam 的 width/height 值和 MeasureSpec 的 mode 值存在如下的对应关系:

我们再继续看看 windowSize 和 rootDimension 的实际参数 mWidth 和 lp.width 的来历。
//===========================ViewRootImpl.java=======================......final Rect mWinFrame; // frame given by window manager.......private void performTraversals() { ...... Rect frame = mWinFrame; ...... mWidth = frame.width(); ......}从源码中对 mWinFrame 的注释来看,是由 WindowManager 提供的,该矩形正好是整个屏幕(这里暂时还没有在源码中找到明确的证据,后续找到后再补上)
//=================================ViewRootImpl.java================================......final WindowManager.LayoutParams mWindowAttributes = new WindowManager.LayoutParams();......public void setView(View view, WindowManager.LayoutParams attrs, View panelParentView) { ...... mWindowAttributes.copyFrom(attrs); ......}private void performTraversals() { ...... WindowManager.LayoutParams lp = mWindowAttributes; ......}第 5 行 setView 方法,在上一节中讲过,其中的参数就是 ActivityThread 类中传过来的,attrs 是 PhoneWindow 的 LayoutParams 值,在第三节中就专门讲过这个参数,其 width 和 height 属性值均为 LayoutParams.MATCH_PARENT。结合 getRootMeasureSpec(int windowSize, int rootDimension)方法,可以得出如下结果:

此时,我们就得到了 DecorView 的 MeasureSpec 了,后面的递归操作就是在此基础上不断将测量要求从父布局传递到子 view。
5、ViewGroup 中辅助重写 onMeasure 的几个重要方法介绍
前面我们介绍的很多方法都是 View 类中提供的,ViewGroup 中也提供了一些方法用于辅助 ViewGroup 子类容器的测量。这里重点介绍三个方法:measureChild(...)、measureChildWithMargins(...)和 measureChildWithMargins(...)方法。
(1)measureChild()方法和 measureChildWithMargins()方法
//================ViewGroup.java===============/** * Ask one of the children of this view to measure itself, taking into * account both the MeasureSpec requirements for this view and its padding. * The heavy lifting is done in getChildMeasureSpec. * * @param child The child to measure * @param parentWidthMeasureSpec The width requirements for this view * @param parentHeightMeasureSpec The height requirements for this view */ protected void measureChild(View child, int parentWidthMeasureSpec, int parentHeightMeasureSpec) { final LayoutParams lp = child.getLayoutParams(); final int childWidthMeasureSpec = getChildMeasureSpec(parentWidthMeasureSpec, mPaddingLeft + mPaddingRight, lp.width); final int childHeightMeasureSpec = getChildMeasureSpec(parentHeightMeasureSpec, mPaddingTop + mPaddingBottom, lp.height); child.measure(childWidthMeasureSpec, childHeightMeasureSpec); }//===================ViewGroup.java===================/** * Ask one of the children of this view to measure itself, taking into * account both the MeasureSpec requirements for this view and its padding * and margins. The child must have MarginLayoutParams The heavy lifting is * done in getChildMeasureSpec. * * @param child The child to measure * @param parentWidthMeasureSpec The width requirements for this view * @param widthUsed Extra space that has been used up by the parent * horizontally (possibly by other children of the parent) * @param parentHeightMeasureSpec The height requirements for this view * @param heightUsed Extra space that has been used up by the parent * vertically (possibly by other children of the parent) */ protected void measureChildWithMargins(View child, int parentWidthMeasureSpec, int widthUsed, int parentHeightMeasureSpec, int heightUsed) { final MarginLayoutParams lp = (MarginLayoutParams) child.getLayoutParams(); final int childWidthMeasureSpec = getChildMeasureSpec(parentWidthMeasureSpec, mPaddingLeft + mPaddingRight + lp.leftMargin + lp.rightMargin + widthUsed, lp.width); final int childHeightMeasureSpec = getChildMeasureSpec(parentHeightMeasureSpec, mPaddingTop + mPaddingBottom + lp.topMargin + lp.bottomMargin + heightUsed, lp.height); child.measure(childWidthMeasureSpec, childHeightMeasureSpec); }对比这两个方法可以发现,它们非常相似,从注释上来看,后者在前者的基础上增加了已经使用的宽高和 margin 值。其实它们的功能都是一样的,最后都是生成子 View 的 MeasureSpec,并传递给子 View 继续测量,即最后一句代码 child.measure(childWidthMeasureSpec, childHeightMeasureSpec)。一般根据容器自身的需要来选择其中一个,比如,在 FrameLayout 和 LinearLayout 中重写的 onMeasure 方法中调用的就是后者,而 AbsoluteLayout 中就是间接地调用的前者。而 RelativeLayout 中,两者都没有调用,而是自己写了一套方法,不过该方法和后者方法仅略有差别,但基本功能还是一样,读者可以自己去看看它们的源码,这里就不贴出来了。
(2)getChildMeasureSpec()方法
前两个方法中都用到了这个方法,它很重要,它用于将父布局传递来的 MeasureSpec 和其子 view 的 LayoutParams,整合为一个最有可能的子 View 的 MeasureSpec。
//==================ViewGroup.java====================/** * Does the hard part of measureChildren: figuring out the MeasureSpec to * pass to a particular child. This method figures out the right MeasureSpec * for one dimension (height or width) of one child view. * * The goal is to combine information from our MeasureSpec with the * LayoutParams of the child to get the best possible results. For example, * if the this view knows its size (because its MeasureSpec has a mode of * EXACTLY), and the child has indicated in its LayoutParams that it wants * to be the same size as the parent, the parent should ask the child to * layout given an exact size. * * @param spec The requirements for this view * @param padding The padding of this view for the current dimension and * margins, if applicable * @param childDimension How big the child wants to be in the current * dimension * @return a MeasureSpec integer for the child */ public static int getChildMeasureSpec(int spec, int padding, int childDimension) { int specMode = MeasureSpec.getMode(spec); int specSize = MeasureSpec.getSize(spec); int size = Math.max(0, specSize - padding); int resultSize = 0; int resultMode = 0; switch (specMode) { // Parent has imposed an exact size on us case MeasureSpec.EXACTLY: if (childDimension >= 0) { resultSize = childDimension; resultMode = MeasureSpec.EXACTLY; } else if (childDimension == LayoutParams.MATCH_PARENT) { // Child wants to be our size. So be it. resultSize = size; resultMode = MeasureSpec.EXACTLY; } else if (childDimension == LayoutParams.WRAP_CONTENT) { // Child wants to determine its own size. It can't be // bigger than us. resultSize = size; resultMode = MeasureSpec.AT_MOST; } break; // Parent has imposed a maximum size on us case MeasureSpec.AT_MOST: if (childDimension >= 0) { // Child wants a specific size... so be it resultSize = childDimension; resultMode = MeasureSpec.EXACTLY; } else if (childDimension == LayoutParams.MATCH_PARENT) { // Child wants to be our size, but our size is not fixed. // Constrain child to not be bigger than us. resultSize = size; resultMode = MeasureSpec.AT_MOST; } else if (childDimension == LayoutParams.WRAP_CONTENT) { // Child wants to determine its own size. It can't be // bigger than us. resultSize = size; resultMode = MeasureSpec.AT_MOST; } break; // Parent asked to see how big we want to be case MeasureSpec.UNSPECIFIED: if (childDimension >= 0) { // Child wants a specific size... let him have it resultSize = childDimension; resultMode = MeasureSpec.EXACTLY; } else if (childDimension == LayoutParams.MATCH_PARENT) { // Child wants to be our size... find out how big it should // be resultSize = View.sUseZeroUnspecifiedMeasureSpec ? 0 : size; resultMode = MeasureSpec.UNSPECIFIED; } else if (childDimension == LayoutParams.WRAP_CONTENT) { // Child wants to determine its own size.... find out how // big it should be resultSize = View.sUseZeroUnspecifiedMeasureSpec ? 0 : size; resultMode = MeasureSpec.UNSPECIFIED; } break; } //noinspection ResourceType return MeasureSpec.makeMeasureSpec(resultSize, resultMode); }咱们依然先翻译和整理一下开头的注释:
处理 measureChildren 的困难部分:计算出 Measure 传递给指定的 child。该方法计算出一个子 view 的宽或高的正确 MeasureSpec。
其目的是组合来自我们 MeasureSpec 的信息和 child 的 LayoutParams 来得到最有可能的结果。比如:如果该 view 知道它的尺寸(因为它的 MeasureSpec 的 mode 为 EXACTLY),并且它的 child 在它的 LayoutParams 中表示它想和父布局有一样大,那么父布局应该要求该 child 按照精确的尺寸进行布局。
参数 spec:对该 view 的要求(笔者注:父布局对当前 child 的 MeasureSpec 要求)
参数 padding:该 view 宽/高的 padding 和 margins 值,如果可应用的话。
参数 childDimension:该 child 在宽/高上希望多大。
返回:返回该 child 的 MeasureSpec 整数。
如果明白了前文中对 MeasureSpec 的介绍后,这一部分的代码应该就容易理解了,specMode 的三种值,LayoutParams 的 width 和 height 的三种值,以及和 layout_width、layout_height 之间的关对应关系,在文章的开头已经介绍过了,不明白的可以再回头复习一下。specMode 和 specSize 分别是父布局传下来的要求,size 的值是父布局尺寸要求减去其 padding 值,最小不会小于 0。代码最后就是将重新得到的 mode 和 size 组合生成一个新的 MeasureSpec,传递给子 View,一直递归下去,该方法也在前面讲过。本段代码重难点就是这里新 mode 和新 size 值的确定,specMode 和 childDimension 各有 3 种值,所以最后会有 9 种组合。如果对这段代码看不明白的,可以看看笔者对这段代码的解释(width 和 height 同理,这里以 width 为例):
如果 specMode 的值为 MeasureSpec.EXACTLY,即父布局对子 view 的尺寸要求是一个精确值,这有两种情况,父布局中 layout_width 属性值被设置为具体值,或者 match_parent,它们都被定义为精确值。针对 childDimension 的值
i)childDimension 也为精确值时。它是 LayoutParams 中 width 属性,是一个具体值,不包括 match_parent 情况,这个一定要和 MeasureSpec 中的精确值 EXACTLY 区别开来。此时 resultSize 为 childDimension 的精确值,resultMode 理所当然为 MeasureSpec.EXACTLY。这里不知道读者会不会又疑问,如果子 View 的 layout_width 值比父布局的大,那这个结论还成立吗?按照我们的经验,似乎不太能理解,因为子 view 的宽度再怎么样也不会比父布局大。事实上,我们平时经验看到的,是最后布局后绘制出来的结果,而当前步骤为测量值,是有差别的。读者可以自定义一个 View,将父布局 layout_width 设置为 100px,该自定义的子 view 则设置为 200px,然后在子 view 中重写的 onMeasure 方法中打印出 getMeasuredWidth()值看看,其值一定是 200。甚至如果子 view 设置的值超过屏幕尺寸,其打印值也是设置的值。
ii)childDimension 值为 LayoutParams.MATCH_PARENT 时。这个容易理解,它的尺寸和父布局一样,也是个精确值,所以 resultSize 为前面求出的 size 值,由父布局决定,resultMode 为 MeasureSpec.EXACTLY。
iii)childDimension 值为 LayoutParams.WRAP_CONTENT 时。当子 view 的 layout_width 被设置为 wrap_content 时,即使最后我们肉眼看到屏幕上真正显示出来的控件很小,但在测量时和父布局一样的大小。这一点仍然可以通过打印 getMeasuredWidth 值来理解。所以一定不要被“经验”所误。所以 resultSize 值为 size 大小,resultMode 为 MeasureSpec.AT_MOST。
如果 specMode 值为 MeasureSpec.AT_MOST。其对应于 layout_width 为 wrap_content,此时,我们可以想象到,子 View 对结果的决定性很大。
i)childDimension 为精确值时。很容易明确 specSize 为自身的精确值,specMode 为 MeasureSpec.EXACTLY。
ii)childDimension 为 LayoutParams.MATCH_PARENT 时。specSize 由父布局决定,为 size;specMode 为 MeasureSpec.AT_MOST。iii)childDimension 为 LayoutParams.WRAP_CONTENT 时。specSize 由父布局决定,为 size;specMode 为 MeasureSpec.AT_MOST。
如果 specMode 值为 MeasureSpec.UNSPECIFIED。前面说过,平时很少用,一般用在系统中,不过这里还是简单说明一下。这一段有个变量 View.sUseZeroUnspecifiedMeasureSpec,它是用于表示当前的目标 api 是否低于 23(对应系统版本为 Android M)的,低于 23 则为 true,否则为 false。现在系统版本基本上都是 Android M 及以上的,所以这里该值我们当成 false 来处理。
i)childDimension 为精确值时。很容易明确 specSize 为自身的精确值,specMode 为 MeasureSpec.EXACTLY。
ii)childDimension 为 LayoutParams.MATCH_PARENT 时。specSize 由父布局决定,为 size;specMode 和父布局一样,为 MeasureSpec.UNSPECIFIED。
iii)childDimension 为 LayoutParams.WRAP_CONTENT 时。specSize 由父布局决定,为 size;specMode 和父布局一样,为 MeasureSpec.UNSPECIFIED。
这个方法对理解测量时 MeasureSpec 的传递过程非常重要,并且需要记忆和理解的内容也不少,所以这里花的篇幅比较多。
通过这一节,我们介绍了 ViewGroup 在测量过程中要用到的方法。通过这些方法,我们更加深入理解了测量过程中 ViewGroup 是如何测量子 View 的了。
6、DecorView 测量的大致流程
前面我们提到过 DecorView 的继承链:DecorView extends FrameLayout extends ViewGroup extends View。所以在这个继承过程中一定会有子类重写 onMeasure 方法,当 DecorView 第一次调用到 measure()方法后,流程就开始切换到重写的 onMeasure()中了。我们按照这个继承顺序看看 measure 流程的相关源码:
//=============DecorView.java=============@Overrideprotected void onMeasure(int widthMeasureSpec, int heightMeasureSpec) { ...... super.onMeasure(widthMeasureSpec, heightMeasureSpec); ......}//=============FrameLayout.java=============@Overrideprotected void onMeasure(int widthMeasureSpec, int heightMeasureSpec) { int count = getChildCount(); for (int i = 0; i < count; i++) { final View child = getChildAt(i); ...... measureChildWithMargins(child, widthMeasureSpec, 0, heightMeasureSpec, 0); ...... } ...... setMeasuredDimension(......) ...... }第 16 行中 measureChildWithMargins()方法是 ViewGroup 提供的方法,前面我们介绍过了。从上述 FrameLayout 中重写的 onMeasure 方法中可以看到,是先把子 view 测量完成后,最后才去调用 setMeasuredDimension(...)来测量自己的。事实上,整个测量过程就是从子 view 开始测量,然后一层层往上再测量父布局,直到 DecorView 为止的。
可能到这里有些读者会有个疑问,DecorView 中 onMeasure 方法的参数值是从哪里传过来的呢?呵呵,前面花了很大的篇幅,就在不断地讲它俩,这里再强调啰嗦一次:
//=====================ViewRootImpl.java=================private void performTraversals() { ...... int childWidthMeasureSpec = getRootMeasureSpec(mWidth, lp.width); int childHeightMeasureSpec = getRootMeasureSpec(mHeight, lp.height); ......}如果还是不明白,回过头去再看看这部分的说明吧,这里就不再赘述了。
7、DecorView 视图树的简易 measure 流程图
到目前为止,DecorView 的整个测量流程就接上了,从 ViewRootImpl 类的 performTraversals()开始,经过递归遍历,最后到叶子 view 测量结束,DecorView 视图树的测量就完成了。这里再用一个流程图简单描述一下整个流程:
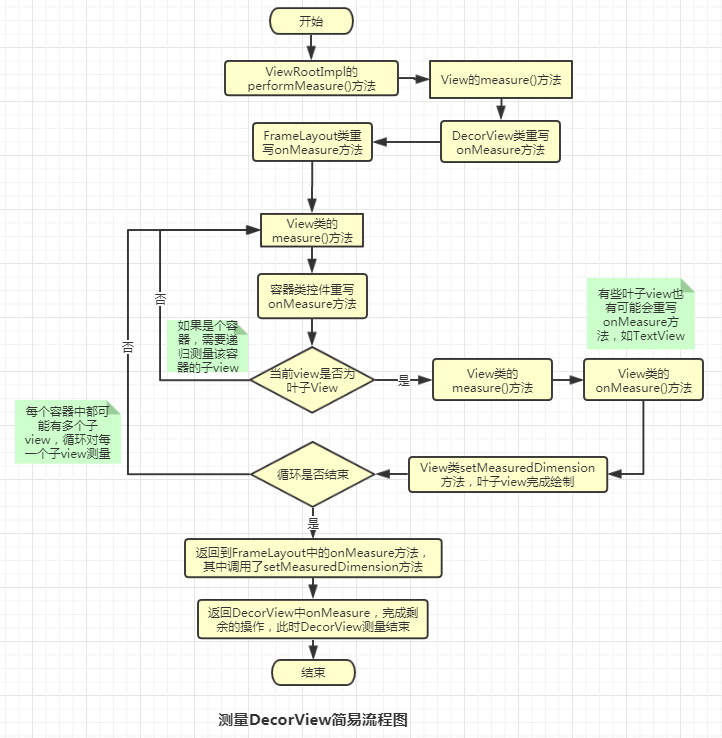
在这一节的最后,推荐一篇博文,这里面有个非常详细的案例分析,如何一步一步从 DecorView 开始遍历,到整个 View 树测量完成,以及如何测量出每个 view 的宽高值
六、layout 过程分析
当 measure 过程完成后,接下来就会进行 layout 阶段,即布局阶段。在前面 measure 的作用是测量每个 view 的尺寸,而 layout 的作用是根据前面测量的尺寸以及设置的其它属性值,共同来确定 View 的位置。
1、performLayout 方法引出 DecorView 的布局流程
测量完成后,会在 ViewRootImpl 类的 performTraverserals()方法中,开始调用 performLayout 方法:
performLayout(lp, mWidth, mHeight);
传入该方法的参数我们在上一节中已经分析过了,lp 中 width 和 height 均为 LayoutParams.MATCH_PARENT,mWidth 和 mHeight 分别为屏幕的宽高。
//=====================ViewRootImpl.java===================private void performLayout(WindowManager.LayoutParams lp, int desiredWindowWidth, int desiredWindowHeight) { ...... final View host = mView; ...... host.layout(0, 0, host.getMeasuredWidth(), host.getMeasuredHeight()); ......}mView 的值上一节也讲过,就是 DecorView,布局流程也是从 DecorView 开始遍历和递归。
2、layout 方法正式启动布局流程
由于 DecorView 是一个容器,是 ViewGroup 子类,所以跟踪代码的时候,实际上是先进入到 ViewGroup 类中的 layout 方法中。
//==================ViewGroup.java================ @Override public final void layout(int l, int t, int r, int b) { if (!mSuppressLayout && (mTransition == null || !mTransition.isChangingLayout())) { if (mTransition != null) { mTransition.layoutChange(this); } super.layout(l, t, r, b); } else { // record the fact that we noop'd it; request layout when transition finishes mLayoutCalledWhileSuppressed = true; } }这是一个 final 类型的方法,所以自定义 的 ViewGroup 子类无法重写该方法,可见系统不希望自定义的 ViewGroup 子类破坏 layout 流程。继续追踪 super.layout 方法,又跳转到了 View 中的 layout 方法。
/**==============View.java=============**//** * Assign a size and position to a view and all of its * descendants * * This is the second phase of the layout mechanism.
* (The first is measuring). In this phase, each parent calls * layout on all of its children to position them. * This is typically done using the child measurements * that were stored in the measure pass(). * *
Derived classes should not override this method.
* Derived classes with children should override * onLayout. In that method, they should * call layout on each of their children. * * @param l Left position, relative to parent * @param t Top position, relative to parent * @param r Right position, relative to parent * @param b Bottom position, relative to parent */ @SuppressWarnings({"unchecked"}) public void layout(int l, int t, int r, int b) { ...... boolean changed = isLayoutModeOptical(mParent) ? setOpticalFrame(l, t, r, b) : setFrame(l, t, r, b); if (changed || (mPrivateFlags & PFLAG_LAYOUT_REQUIRED) == PFLAG_LAYOUT_REQUIRED) { onLayout(changed, l, t, r, b); ...... } ...... }
先翻译一下注释中对该方法的描述:
给 view 和它的所有后代分配尺寸和位置。
这是布局机制的第二个阶段(第一个阶段是测量)。在这一阶段中,每一个父布局都会对它的子 view 进行布局来放置它们。一般来说,该过程会使用在测量阶段存储的 child 测量值。
派生类不应该重写该方法。有子 view 的派生类(笔者注:也就是容器类,父布局)应该重写 onLayout 方法。在重写的 onLayout 方法中,它们应该为每一子 view 调用 layout 方法进行布局。
参数依次为:Left、Top、Right、Bottom 四个点相对父布局的位置。
3、setFrame 方法真正执行布局任务
在上面的方法体中,我们先重点看看 setFrame 方法。至于 setOpticalFrame 方法,其中也是调用的 setFrame 方法。
//=================View.java================/** * Assign a size and position to this view. * * This is called from layout. * * @param left Left position, relative to parent * @param top Top position, relative to parent * @param right Right position, relative to parent * @param bottom Bottom position, relative to parent * @return true if the new size and position are different than the * previous ones * {@hide} */ protected boolean setFrame(int left, int top, int right, int bottom) { boolean changed = false; ...... if (mLeft != left || mRight != right || mTop != top || mBottom != bottom) { changed = true; ...... int oldWidth = mRight - mLeft; int oldHeight = mBottom - mTop; int newWidth = right - left; int newHeight = bottom - top; boolean sizeChanged = (newWidth != oldWidth) || (newHeight != oldHeight); // Invalidate our old position invalidate(sizeChanged); mLeft = left; mTop = top; mRight = right; mBottom = bottom; ...... } return changed; }注释中重要的信息有:
该方法用于给该 view 分配尺寸和位置。(笔者注:也就是实际的布局工作是在这里完成的)
返回值:如果新的尺寸和位置和之前的不同,返回 true。(笔者注:也就是该 view 的位置或大小发生了变化)
在方法体中,从第 27 行开始,对 view 的四个属性值进行了赋值,即 mLeft、mTop、mRight、mBottom 四条边界坐标被确定,表明这里完成了对该 View 的布局。
4、onLayout 方法让父布局调用对子 view 的布局
再返回到 layout 方法中,会看到如果 view 发生了改变,接下来会调用 onLayout 方法,这和 measure 调用 onMeasure 方法类似。
//============View.java============/** * Called from layout when this view should * assign a size and position to each of its children. * * Derived classes with children should override * this method and call layout on each of * their children. * @param changed This is a new size or position for this view * @param left Left position, relative to parent * @param top Top position, relative to parent * @param right Right position, relative to parent * @param bottom Bottom position, relative to parent */ protected void onLayout(boolean changed, int left, int top, int right, int bottom) { }先翻译一下关键注释:
当该 view 要分配尺寸和位置给它的每一个子 view 时,该方法会从 layout 方法中被调用。
有子 view 的派生类(笔者注:也就是容器,父布局)应该重写该方法并且为每一个子 view 调用 layout。
我们发现这是一个空方法,因为 layout 过程是父布局容器布局子 view 的过程,onLayout 方法叶子 view 没有意义,只有 ViewGroup 才有用。所以,如果当前 View 是一个容器,那么流程会切到被重写的 onLayout 方法中。我们先看 ViewGroup 类中的重写:
//=============ViewGroup.java=========== @Override protected abstract void onLayout(boolean changed,int l, int t, int r, int b);进入到 ViewGroup 类中发现,该方法被定义为了 abstract 方法,所以以后凡是直接继承自 ViewGroup 类的容器,就必须要重写 onLayout 方法。事实上,layout 流程是绘制流程中必需的过程,而前面讲过的 measure 流程,其实可以不要,这一点等会再说。
咱们先直接进入到 DecorView 中查看重写的 onLayout 方法。
//==============DecorView.java================@Overrideprotected void onLayout(boolean changed, int left, int top, int right, int bottom) { super.onLayout(changed, left, top, right, bottom); ......}DecerView 继承自 FrameLayout,咱们继续到 FrameLayout 类中重写的 onLayout 方法看看。
//================FrameLayout.java============== @Override protected void onLayout(boolean changed, int left, int top, int right, int bottom) { layoutChildren(left, top, right, bottom, false /* no force left gravity */); } void layoutChildren(int left, int top, int right, int bottom, boolean forceLeftGravity) { final int count = getChildCount(); ...... for (int i = 0; i < count; i++) { final View child = getChildAt(i); if (child.getVisibility() != GONE) { final LayoutParams lp = (LayoutParams) child.getLayoutParams(); final int width = child.getMeasuredWidth(); final int height = child.getMeasuredHeight(); ...... child.layout(childLeft, childTop, childLeft + width, childTop + height); } }这里仅贴出关键流程的代码,咱们可以看到,这里面也是对每一个 child 调用 layout 方法的。如果该 child 仍然是父布局,会继续递归下去;如果是叶子 view,则会走到 view 的 onLayout 空方法,该叶子 view 布局流程走完。另外,我们看到第 15 行和第 16 行中,width 和 height 分别来源于 measure 阶段存储的测量值,如果这里通过其它渠道赋给 width 和 height 值,那么 measure 阶段就不需要了,这也就是我前面提到的,onLayout 是必需要实现的(不仅会报错,更重要的是不对子 view 布局的话,这些 view 就不会显示了),而 measure 过程可以不要。当然,肯定是不建议这么做的,采用其它方式很实现我们要的结果。
5、DecorView 视图树的简易布局流程图
如果是前面搞清楚了 DecorView 视图树的测量流程,那这一节的布局流程也就非常好理解了,咱们这里再简单梳理一下:

七、draw 过程分析
当 layout 完成后,就进入到 draw 阶段了,在这个阶段,会根据 layout 中确定的各个 view 的位置将它们画出来。该过程的分析思路和前两个过程类似,如果前面读懂了,那这个流程也就很容易理解了。
1、从 performDraw 方法到 draw 方法
draw 过程,自然也是从 performTraversals()中的 performDraw()方法开始的,咱们从该方法追踪,咱们这里仅贴出关键流程代码,至于其它的逻辑,不是本文的重点,这里就先略过,有兴趣的可以自行研究。
//==================ViewRootImpl.java=================private void performDraw() { //...... boolean canUseAsync = draw(fullRedrawNeeded); //......}private boolean draw(boolean fullRedrawNeeded) { //...... if (!drawSoftware(surface, mAttachInfo, xOffset, yOffset, scalingRequired, dirty, surfaceInsets)) { return false; } //......}private boolean drawSoftware(......){ //...... mView.draw(canvas); //......}前面我们讲过了,这 mView 就是 DecorView,这样就开始了 DecorView 视图树的 draw 流程了。
2、DecorView 树递归完成“画”流程
DecorView 类中重写了 draw()方法,追踪源码后进入到该部分。
//================DecorView.java==============@Overridepublic void draw(Canvas canvas) { super.draw(canvas); if (mMenuBackground != null) { mMenuBackground.draw(canvas); }}从这段代码来看, 调用完 super.draw 后,还画了菜单背景,当然 super.draw 是咱们关注的重点,这里还做了啥咱们不用太关心。由于 FrameLayout 和 ViewGroup 都没有重写该方法,所以就直接进入都了 View 类中的 draw 方法了。
//====================View.java===================== /** * Manually render this view (and all of its children) to the given Canvas. * The view must have already done a full layout before this function is * called. When implementing a view, implement * {@link #onDraw(android.graphics.Canvas)} instead of overriding this method. * If you do need to override this method, call the superclass version. * * @param canvas The Canvas to which the View is rendered. */ @CallSuper public void draw(Canvas canvas) { ...... /* * Draw traversal performs several drawing steps which must be executed * in the appropriate order: * * 1. Draw the background * 2. If necessary, save the canvas' layers to prepare for fading * 3. Draw view's content * 4. Draw children * 5. If necessary, draw the fading edges and restore layers * 6. Draw decorations (scrollbars for instance) */ // Step 1, draw the background, if needed int saveCount; if (!dirtyOpaque) { drawBackground(canvas); } // skip step 2 & 5 if possible (common case) ...... // Step 3, draw the content if (!dirtyOpaque) onDraw(canvas); // Step 4, draw the children dispatchDraw(canvas); ...... // Step 6, draw decorations (foreground, scrollbars) onDrawForeground(canvas);45 ...... }这段代码描述了 draw 阶段完成的 7 个主要步骤,这里咱们先翻译一下其注释:
手动渲染该 view(以及它的所有子 view)到给定的画布上。
在该方法调用之前,该 view 必须已经完成了全面的布局。当正在实现一个 view 是,实现 onDraw(android.graphics.Cavas)而不是本方法。如果您确实需要重写该方法,调用超类版本。
参数 canvas:将 view 渲染到的画布。
从代码上看,这里做了很多工作,咱们简单说明一下,有助于理解这个“画”工作。
第一步:画背景。对应我我们在 xml 布局文件中设置的“android:background”属性,这是整个“画”过程的第一步,这一步是不重点,知道这里干了什么就行。
第二步:画内容(第 2 步和第 5 步只有有需要的时候才用到,这里就跳过)。比如 TextView 的文字等,这是重点,onDraw 方法,后面详细介绍。
第三步:画子 view。dispatchDraw 方法用于帮助 ViewGroup 来递归画它的子 view。这也是重点,后面也要详细讲到。
第四步:画装饰。这里指画滚动条和前景。其实平时的每一个 view 都有滚动条,只是没有显示而已。同样这也不是重点,知道做了这些事就行。
咱们进入 onDraw 方法看看
//=================View.java===============/** * Implement this to do your drawing. * * @param canvas the canvas on which the background will be drawn */ protected void onDraw(Canvas canvas) { }注释中说:实现该方法来做“画”工作。也就是说,具体的 view 需要重写该方法,来画自己想展示的东西,如文字,线条等。DecorView 中重写了该方法,所以流程会走到 DecorView 中重写的 onDraw 方法。
//===============DocerView.java==============@Override public void onDraw(Canvas c) { super.onDraw(c); mBackgroundFallback.draw(this, mContentRoot, c, mWindow.mContentParent, mStatusColorViewState.view, mNavigationColorViewState.view); }这里调用了 onDraw 的父类方法,同时第 4 行还画了自己特定的东西。由于 FrameLayout 和 ViewGroup 也没有重写该方法,且 View 中 onDraw 为空方法,所以 super.onDraw 方法其实是啥都没干的。DocerView 画完自己的东西,紧接着流程就又走到 dispatchDraw 方法了。
//================View.java===============/** * Called by draw to draw the child views. This may be overridden * by derived classes to gain control just before its children are drawn * (but after its own view has been drawn). * @param canvas the canvas on which to draw the view */ protected void dispatchDraw(Canvas canvas) { }先看看注释:被 draw 方法调用来画子 View。该方法可能会被派生类重写来获取控制,这个过程正好在该 view 的子 view 被画之前(但在它自己被画完成后)。
也就是说当本 view 被画完之后,就开始要画它的子 view 了。这个方法也是一个空方法,实际上对于叶子 view 来说,该方法没有什么意义,因为它没有子 view 需要画了,而对于 ViewGroup 来说,就需要重写该方法来画它的子 view。
在源码中发现,像平时常用的 LinearLayout、FrameLayout、RelativeLayout 等常用的布局控件,都没有再重写该方法,DecorView 中也一样,而是只在 ViewGroup 中实现了 dispatchDraw 方法的重写。所以当 DecorView 执行完 onDraw 方法后,流程就会切到 ViewGroup 中的 dispatchDraw 方法了。
//=============ViewGroup.java============ @Override protected void dispatchDraw(Canvas canvas) { final int childrenCount = mChildrenCount; final View[] children = mChildren; ...... for (int i = 0; i < childrenCount; i++) { more |= drawChild(canvas, child, drawingTime); ...... } ...... }从上述源码片段可以发现,这里其实就是对每一个 child 执行 drawChild 操作。
/** * Draw one child of this View Group. This method is responsible for getting * the canvas in the right state. This includes clipping,translating so * that the child's scrolled origin is at 0, 0, and applying any animation * transformations. * * @param canvas The canvas on which to draw the child * @param child Who to draw * @param drawingTime The time at which draw is occurring * @return True if an invalidate() was issued */ protected boolean drawChild(Canvas canvas, View child, long drawingTime) { return child.draw(canvas, this, drawingTime); }先翻译注释的内容:
画当前 ViewGroup 中的某一个子 view。该方法负责在正确的状态下获取画布。这包括了裁剪,移动,以便子 view 的滚动原点为 0、0,以及提供任何动画转换。
参数 drawingTime:“画”动作发生的时间点。
继续追踪源码,进入到如下流程。
//============View.java===========/** * This method is called by ViewGroup.drawChild() to have each child view draw itself. * * This is where the View specializes rendering behavior based on layer type, * and hardware acceleration. */ boolean draw(Canvas canvas, ViewGroup parent, longdrawingTime) { ...... draw(canvas); ......}注释中说:该方法被 ViewGroup.drawChild()方法调用,来让每一个子 view 画它自己。
该方法中,又回到了 draw(canvas)方法中了,然后再开始画其子 view,这样不断递归下去,直到画完整棵 DecorView 树。
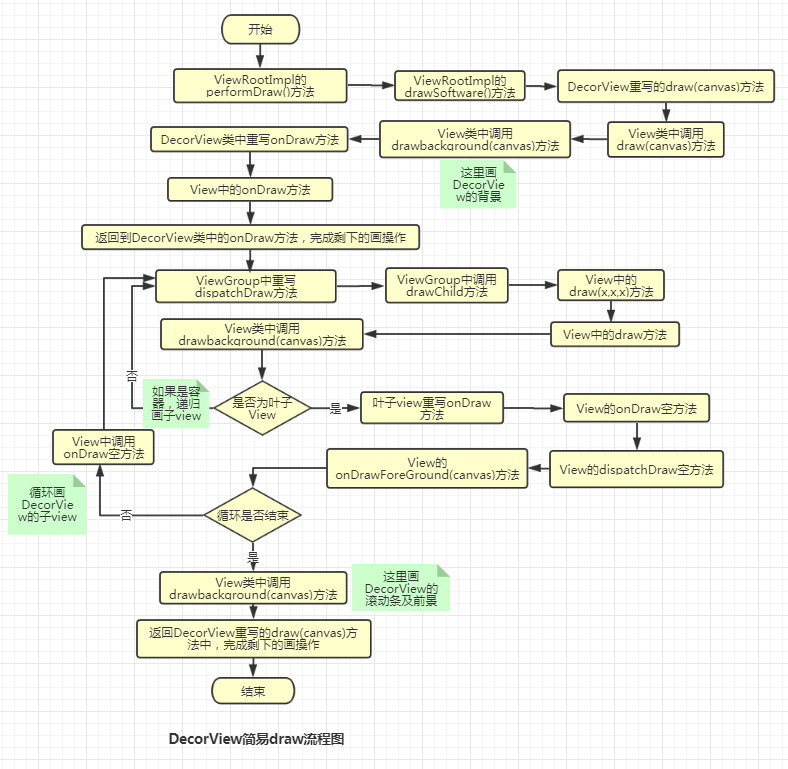
3、DecorView 视图树的简易 draw 流程图
针对上述的代码追踪流程,这里梳理了 DecorView 整个 view 树的 draw 过程的关键流程,其中节点比较多,需要耐心分析。
到目前为止,View 的绘制流程就介绍完了。根节点是 DecorView,整个 View 体系就是一棵以 DecorView 为根的 View 树,依次通过遍历来完成 measure、layout 和 draw 过程。而如果要自定义 view,一般都是通过重写 onMeasure(),onLayout(),onDraw()来完成要自定义的部分,整个绘制流程也基本上是围绕着这几个核心的地方来展开的。


 1万+
1万+


 被折叠的 条评论
为什么被折叠?
被折叠的 条评论
为什么被折叠?
 到【灌水乐园】发言


