


原文链接:https://blog.csdn.net/ldld1717/article/details/80458917
1. 简单实现水平排列效果
我们先自定义一个ViewGroup作为布局容器,实现一个从左往右水平排列(排满换行)的效果:
/**
 * 自定义布局管理器的示例。
 */
public class CustomLayout extends ViewGroup {
      private static final String TAG = "CustomLayout";

    public CustomLayout(Context context) {
        super(context);
    }

    public CustomLayout(Context context, AttributeSet attrs) {
        this(context, attrs, 0);
    }

    public CustomLayout(Context context, AttributeSet attrs, int defStyle) {
        super(context, attrs, defStyle);
    }

    /**
     * 要求所有的孩子测量自己的大小,然后根据这些孩子的大小完成自己的尺寸测量
     */
    @SuppressLint("NewApi") @Override
    protected void onMeasure( int widthMeasureSpec, int heightMeasureSpec) {
        // 计算出所有的childView的宽和高
        measureChildren(widthMeasureSpec, heightMeasureSpec);
        //测量并保存layout的宽高(使用getDefaultSize时,wrap_content和match_perent都是填充屏幕)
        //稍后会重新写这个方法,能达到wrap_content的效果
        setMeasuredDimension( getDefaultSize(getSuggestedMinimumWidth(), widthMeasureSpec),
                getDefaultSize(getSuggestedMinimumHeight(), heightMeasureSpec));
    }

    /**
     * 为所有的子控件摆放位置.
     */
    @Override
    protected void onLayout( boolean changed, int left, int top, int right, int bottom) {
        final int count = getChildCount();
        int childMeasureWidth = 0;
        int childMeasureHeight = 0;
        int layoutWidth = 0;    // 容器已经占据的宽度
        int layoutHeight = 0;   // 容器已经占据的宽度
        int maxChildHeight = 0; //一行中子控件最高的高度,用于决定下一行高度应该在目前基础上累加多少
        for(int i = 0; i<count; i++){
            View child = getChildAt(i);
             //注意此处不能使用getWidth和getHeight,这两个方法必须在onLayout执行完,才能正确获取宽高
            childMeasureWidth = child.getMeasuredWidth();
            childMeasureHeight = child.getMeasuredHeight();
            if(layoutWidth<getWidth()){
                   //如果一行没有排满,继续往右排列
                  left = layoutWidth;
                  right = left+childMeasureWidth;
                  top = layoutHeight;
                  bottom = top+childMeasureHeight;
            } else{
                   //排满后换行
                  layoutWidth = 0;
                  layoutHeight += maxChildHeight;
                  maxChildHeight = 0;

                  left = layoutWidth;
                  right = left+childMeasureWidth;
                  top = layoutHeight;
                  bottom = top+childMeasureHeight;
            }

            layoutWidth += childMeasureWidth;  //宽度累加
             if(childMeasureHeight>maxChildHeight){
                  maxChildHeight = childMeasureHeight;
            }

             //确定子控件的位置,四个参数分别代表(左上右下)点的坐标值
            child.layout(left, top, right, bottom);
        }
    }
}
布局文件:
<?xml version="1.0" encoding= "utf-8"?>
<com.openxu.costomlayout.CustomLayout xmlns:android="http://schemas.android.com/apk/res/android"
    android:layout_width= "wrap_content"
    android:layout_height= "wrap_content" >

    <Button
        android:layout_width= "wrap_content"
        android:layout_height= "wrap_content"
        android:background= "#FF8247"
        android:textColor= "#ffffff"
        android:textSize="20dip"
        android:padding= "20dip"
        android:text="按钮1" />

    <Button
        android:layout_width= "wrap_content"
        android:layout_height= "wrap_content"
        android:background= "#8B0A50"
        android:textColor= "#ffffff"
        android:textSize="20dip"
        android:padding= "10dip"
        android:text="按钮2222222222222" />

    <Button
        android:layout_width= "wrap_content"
        android:layout_height= "wrap_content"
        android:background= "#7CFC00"
        android:textColor= "#ffffff"
        android:textSize="20dip"
        android:padding= "15dip"
        android:text="按钮333333" />

    <Button
        android:layout_width= "wrap_content"
        android:layout_height= "wrap_content"
        android:background= "#1E90FF"
        android:textColor= "#ffffff"
        android:textSize="10dip"
        android:padding= "10dip"
        android:text="按钮4" />

    <Button
        android:layout_width= "wrap_content"
        android:layout_height= "wrap_content"
        android:background= "#191970"
        android:textColor= "#ffffff"
        android:textSize="20dip"
        android:padding= "15dip"
        android:text="按钮5" />

    <Button
        android:layout_width= "wrap_content"
        android:layout_height= "wrap_content"
        android:background= "#7A67EE"
        android:textColor= "#ffffff"
        android:textSize="20dip"
        android:padding= "20dip"
        android:text="按钮6" />

</com.openxu.costomlayout.CustomLayout>
运行效果:
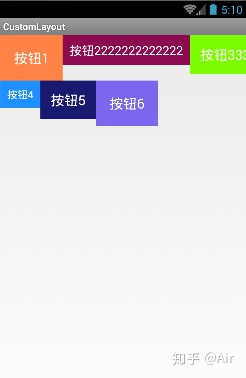
运行成功,是不是略有成就感?这个布局就是简单版的LinearLayout设置android:orientation ="horizontal"的效果,比他还牛X一点,还能自动换行(哈哈)。接下来我们要实现一个功能,只需要在布局文件中指定布局属性,就能控制子控件在什么位置(类似相对布局RelativeLayout)。
免费获取Android进阶资料点击下方链接:
https://shimo.im/docs/tXXKHgdjPYj6WT8d/


 865
865


 被折叠的 条评论
为什么被折叠?
被折叠的 条评论
为什么被折叠?
 到【灌水乐园】发言


