在Spring Boot中使用拦截器,可在以下情况下执行操作 -
- 在将请求发送到控制器之前
- 在将响应发送给客户端之前
例如,使用拦截器在将请求发送到控制器之前添加请求标头,并在将响应发送到客户端之前添加响应标头。
要使用拦截器,需要创建支持它的@Component类,它应该实现HandlerInterceptor接口。
以下是在拦截器上工作时应该了解的三种方法 -
- preHandle()方法 - 用于在将请求发送到控制器之前执行操作。此方法应返回true,以将响应返回给客户端。
- postHandle()方法 - 用于在将响应发送到客户端之前执行操作。
- afterCompletion()方法 - 用于在完成请求和响应后执行操作。
请注意以下代码以便更好地理解 -
@Componentpublic class ProductServiceInterceptor implements HandlerInterceptor { @Override public boolean preHandle( HttpServletRequest request, HttpServletResponse response, Object handler) throws Exception { return true; } @Override public void postHandle( HttpServletRequest request, HttpServletResponse response, Object handler, ModelAndView modelAndView) throws Exception {} @Override public void afterCompletion(HttpServletRequest request, HttpServletResponse response, Object handler, Exception exception) throws Exception {}}必须使用WebMvcConfigurerAdapter向InterceptorRegistry注册此Interceptor,如下所示 -
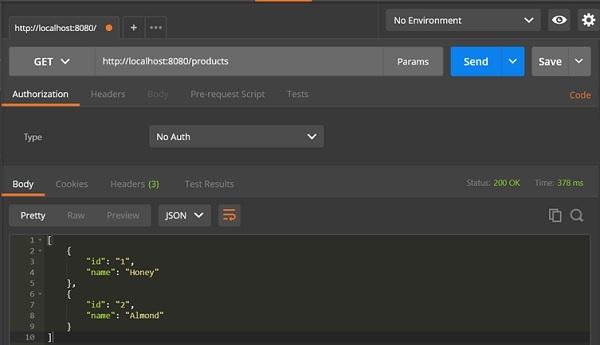
@Componentpublic class ProductServiceInterceptorAppConfig extends WebMvcConfigurerAdapter { @Autowired ProductServiceInterceptor productServiceInterceptor; @Override public void addInterceptors(InterceptorRegistry registry) { registry.addInterceptor(productServiceInterceptor); }}在下面给出的示例中,将使用GET产品API,该API提供的输出如下 -
Interceptor类ProductServiceInterceptor.java的代码如下 -
package com.felix.demo.interceptor;import javax.servlet.http.HttpServletRequest;import javax.servlet.http.HttpServletResponse;import org.springframework.stereotype.Component;import org.springframework.web.servlet.HandlerInterceptor;import org.springframework.web.servlet.ModelAndView;@Componentpublic class ProductServiceInterceptor implements HandlerInterceptor { @Override public boolean preHandle (HttpServletRequest request, HttpServletResponse response, Object handler) throws Exception { System.out.println("Pre Handle method is Calling"); return true; } @Override public void postHandle(HttpServletRequest request, HttpServletResponse response, Object handler, ModelAndView modelAndView) throws Exception { System.out.println("Post Handle method is Calling"); } @Override public void afterCompletion (HttpServletRequest request, HttpServletResponse response, Object handler, Exception exception) throws Exception { System.out.println("Request and Response is completed"); }}应用程序配置类文件的代码将拦截器注册到拦截器注册表,ProductServiceInterceptorAppConfig.java如下 -
package com.felix.demo.interceptor;import org.springframework.beans.factory.annotation.Autowired;import org.springframework.stereotype.Component;import org.springframework.web.servlet.config.annotation.InterceptorRegistry;import org.springframework.web.servlet.config.annotation.WebMvcConfigurerAdapter;@Componentpublic class ProductServiceInterceptorAppConfig extends WebMvcConfigurerAdapter { @Autowired ProductServiceInterceptor productServiceInterceptor; @Override public void addInterceptors(InterceptorRegistry registry) { registry.addInterceptor(productServiceInterceptor); }}控制器类文件ProductServiceController.java的代码如下 -
package com.felix.demo.controller;import java.util.HashMap;import java.util.Map;import org.springframework.http.HttpStatus;import org.springframework.http.ResponseEntity;import org.springframework.web.bind.annotation.PathVariable;import org.springframework.web.bind.annotation.RequestBody;import org.springframework.web.bind.annotation.RequestMapping;import org.springframework.web.bind.annotation.RequestMethod;import org.springframework.web.bind.annotation.RestController;import com.yiibai.demo.exception.ProductNotfoundException;import com.yiibai.demo.model.Product;@RestControllerpublic class ProductServiceController { private static Map productRepo = new HashMap<>(); static { Product honey = new Product(); honey.setId("1"); honey.setName("Honey"); productRepo.put(honey.getId(), honey); Product almond = new Product(); almond.setId("2"); almond.setName("Almond"); productRepo.put(almond.getId(), almond); } @RequestMapping(value = "/products") public ResponseEntity getProduct() { return new ResponseEntity<>(productRepo.values(), HttpStatus.OK); }}POJO类Product.java 代码如下 -
package com.felix.demo.model;public class Product { private String id; private String name; public String getId() { return id; } public void setId(String id) { this.id = id; } public String getName() { return name; } public void setName(String name) { this.name = name; }}Spring Boot应用程序类主要的文件DemoApplication.java 的代码如下 -
package com.felix.demo;import org.springframework.boot.SpringApplication;import org.springframework.boot.autoconfigure.SpringBootApplication;@SpringBootApplicationpublic class DemoApplication { public static void main(String[] args) { SpringApplication.run(DemoApplication.class, args); }}Maven build的代码 - pom.xml 如下所示 -
<?xml version = "1.0" encoding = "UTF-8"?>4.0.0com.felix demo 0.0.1-SNAPSHOTjardemoDemo project for Spring Bootorg.springframework.boot spring-boot-starter-parent 1.5.8.RELEASEUTF-8UTF-81.8org.springframework.boot spring-boot-starter-web org.springframework.boot spring-boot-starter-test testorg.springframework.boot spring-boot-maven-plugin 这里显示了Gradle构建文件:build.gradle 的代码 -
buildscript { ext { springBootVersion = '1.5.8.RELEASE' } repositories { mavenCentral() } dependencies { classpath("org.springframework.boot:spring-boot-gradle-plugin:${springBootVersion}") }}apply plugin: 'java'apply plugin: 'eclipse'apply plugin: 'org.springframework.boot'group = 'com.felix'version = '0.0.1-SNAPSHOT'sourceCompatibility = 1.8repositories { mavenCentral()}dependencies { compile('org.springframework.boot:spring-boot-starter-web') testCompile('org.springframework.boot:spring-boot-starter-test')}创建可执行的JAR文件,并使用以下Maven或Gradle命令运行Spring Boot应用程序。
对于Maven,使用如下所示的命令 -
mvn clean install在控制台上看到"BUILD SUCCESS"输出之后,在target目录下找到JAR文件。对于Gradle,使用如下所示的命令 -
gradle clean build在控制台上看到"BUILD SUCCESSFUL"之后,在build/libs目录下找到JAR文件。使用以下命令运行JAR文件 -
java –jar 现在,应用程序已在Tomcat端口8080上启动,如下所示 -

打开 POSTMAN 应用程序中的URL,并输入:http://localhost:8080/products,看到输出如下 -

在控制台窗口中,看到在拦截器中添加的System.out.println语句,如下面给出的屏幕截图所示 -


 70
70

 被折叠的 条评论
为什么被折叠?


