


等你点关注都等的长毛了
简介SpringBoot由众多的starter组成,这些starter也被称为是场景启动器,在工程中引入特定的starter再进行少量的配置就可以使用其提供的相应的功能了,SpringBoot在不断的维护和扩展不同场景的starter给使用者提供更完善的功能,我们也可以创建自定义的starter制定我们自己的特定场景。
SpringBoot中的starter1. 我们查看SpringBoot提供的starter可以发现所有的starter包下都没有任何代码
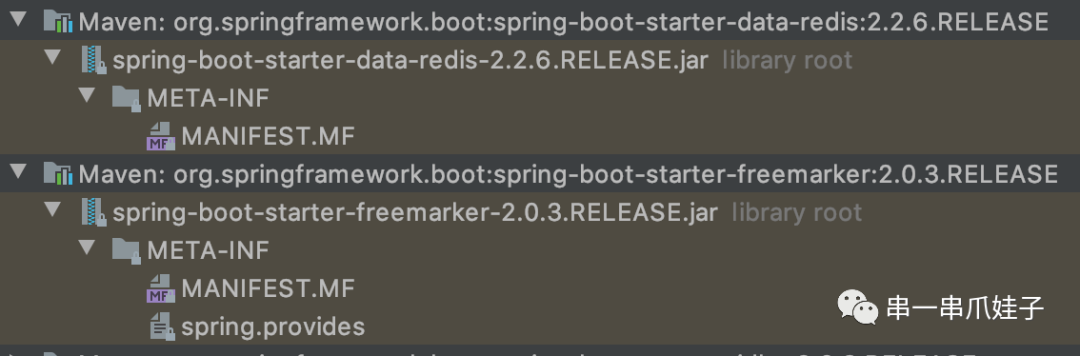
2. 我们找到spring-boot-starter-data-redis.jar包的pom.xml查看一下内容
<?xml version="1.0" encoding="UTF-8"?><project xsi:schemaLocation="http://maven.apache.org/POM/4.0.0 http://maven.apache.org/xsd/maven-4.0.0.xsd" xmlns="http://maven.apache.org/POM/4.0.0" xmlns:xsi="http://www.w3.org/2001/XMLSchema-instance"> <modelVersion>4.0.0modelVersion> <parent> <groupId>org.springframework.bootgroupId> <artifactId>spring-boot-startersartifactId> <version>2.2.6.RELEASEversion> parent> <groupId>org.springframework.bootgroupId> <artifactId>spring-boot-starter-data-redisartifactId> <version>2.2.6.RELEASEversion> <name>Spring Boot Data Redis Startername> <dependencies> <dependency> <groupId>org.springframework.bootgroupId> <artifactId>spring-boot-starterartifactId> <version>2.2.6.RELEASEversion> <scope>compilescope> dependency> <dependency> <groupId>org.springframework.datagroupId> <artifactId>spring-data-redisartifactId> <version>2.2.6.RELEASEversion> <scope>compilescope> <exclusions> <exclusion> <artifactId>jcl-over-slf4jartifactId> <groupId>org.slf4jgroupId> exclusion> exclusions> dependency> <dependency> <groupId>io.lettucegroupId> <artifactId>lettuce-coreartifactId> <version>5.2.2.RELEASEversion> <scope>compilescope> dependency> dependencies>project>我们看到这个starter继承自spring-boot-starters包,并且所有的starter都引入了spring-boot-starter包,包中还可以根据需要选择性的引入其他的jar包。
3. 进入到spring-boot-starter包中,可以找到它引入了spring-boot-autoconfigure包,这是我们完成自动配置的关键
<dependency> <groupId>org.springframework.bootgroupId> <artifactId>spring-boot-autoconfigureartifactId> <version>2.2.6.RELEASEversion> <scope>compilescope>dependency>查看spring-boot-autoconfigure.jar的目录结构发现包含了各种starter的配置信息。
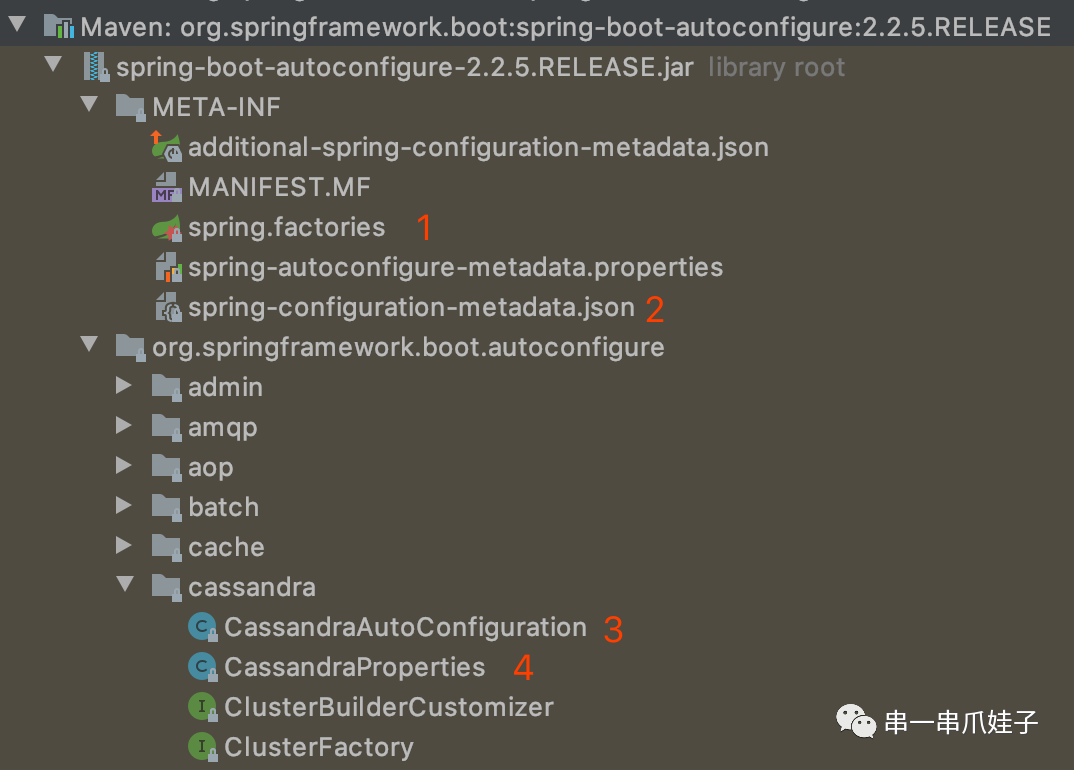
标1:需要自动配置的类声明文件
标2:配置文件中自动提示的元属性数据声明文件
标3:自动配置控制类
标4:场景属性类
以上就是一个starter的关键所在了,总结下来就是:
启动器starter只是用来做依赖管理的,其不应该包含任何代码和配置,需要引入autoconfigure包
自动装配autoconfigure包,需要包含我们需要让SpringBoot自动装配的模块,以及资源配置信息,总的来说包括:spring.factories、spring-configuration-metadata.json、XxxAutoConfiguration、XxxProperties
使用的时候只需要引入启动器starter就可以实现自动配置
官方命名规范
规则:spring-boot-starter-模块名
举例:spring-boot-starter-data-redis、spring-boot-starter-web
自定义命名规范
规则:模块名-spring-boot-starter
举例:cc-spring-boot-starter
根据上面的描述,我们需要创建两个项目:cc-spring-boot-autoconfigure和cc-spring-boot-starter。
1. 创建cc-spring-boot-autoconfigure工程
需要注意的是在工程创建完成之后,要删除启动类、application.properties和test文件夹
pom.xml和控制类
pom.xml
<?xml version="1.0" encoding="UTF-8"?><project xmlns="http://maven.apache.org/POM/4.0.0" xmlns:xsi="http://www.w3.org/2001/XMLSchema-instance" xsi:schemaLocation="http://maven.apache.org/POM/4.0.0 https://maven.apache.org/xsd/maven-4.0.0.xsd"> <modelVersion>4.0.0modelVersion> <parent> <groupId>org.springframework.bootgroupId> <artifactId>spring-boot-startersartifactId> <version>2.2.6.RELEASEversion> parent> <groupId>cc.lugroupId> <artifactId>cc-spring-boot-autoconfigureartifactId> <version>1.0version> <properties> <project.build.sourceEncoding>UTF-8project.build.sourceEncoding> <project.reporting.outputEncoding>UTF-8project.reporting.outputEncoding> <java.version>1.8java.version> properties> <dependencies> <dependency> <groupId>org.springframework.bootgroupId> <artifactId>spring-boot-starterartifactId> dependency> dependencies>project>CcProperties
package cc.lu.autoconfigure.wt;import org.springframework.boot.context.properties.ConfigurationProperties;@ConfigurationProperties(prefix = "cc.config")public class CcProperties { private String name = "cc"; private Integer age = 3; private String birthday; public String getName() { return name; } public void setName(String name) { this.name = name; } public Integer getAge() { return age; } public void setAge(Integer age) { this.age = age; } public String getBirthday() { return birthday; } public void setBirthday(String birthday) { this.birthday = birthday; } @Override public String toString() { return "CcProperties{" + "name='" + name + '\'' + ", age=" + age + ", birthday='" + birthday + '\'' + '}'; }}类的有些属性被设置了值,这些值就是当配置文件未配置属性时使用的默认值,这就是参数配置设置默认值的一种方式。还有一种,继续往下看
CcService
package cc.lu.autoconfigure.wt;public class CcService { private CcProperties ccProperties; public void setCcProperties(CcProperties ccProperties) { this.ccProperties = ccProperties; } public String info() { return ccProperties.toString(); }}CcAutoConfiguration
package cc.lu.autoconfigure.wt;import org.springframework.beans.factory.annotation.Autowired;import org.springframework.boot.autoconfigure.condition.ConditionalOnClass;import org.springframework.boot.autoconfigure.condition.ConditionalOnMissingBean;import org.springframework.boot.context.properties.EnableConfigurationProperties;import org.springframework.context.annotation.Bean;import org.springframework.context.annotation.Configuration;@Configuration(proxyBeanMethods = false)@ConditionalOnClass({ CcService.class })@EnableConfigurationProperties({ CcProperties.class })public class CcAutoConfiguration { @Autowired private CcProperties ccProperties; @Bean @ConditionalOnMissingBean({ CcService.class }) public CcService ccService() { CcService ccService = new CcService(); // 打个日志查看方法是否被调用 System.out.println("------auto register!------"); ccService.setCcProperties(ccProperties); return ccService; }}CcAutoConfiguration的声明上使用了@ConditionalOnClass和@EnableConfigurationProperties做加载控制,然后在类中创建了CcService的实例,并且使用@ConditionalOnMissingBean({ CcService.class })来控制创建条件。
spring.factories和spring-configuration-metadata.json配置
spring.factories
org.springframework.boot.autoconfigure.EnableAutoConfiguration=\ cc.lu.autoconfigurer.wt.CcAutoConfiguration将CcAutoConfiguration放给EnableAutoConfiguration,告知SpringBoot启动的时候进行检测加载。
spring-configuration-metadata.json元属性数据配置
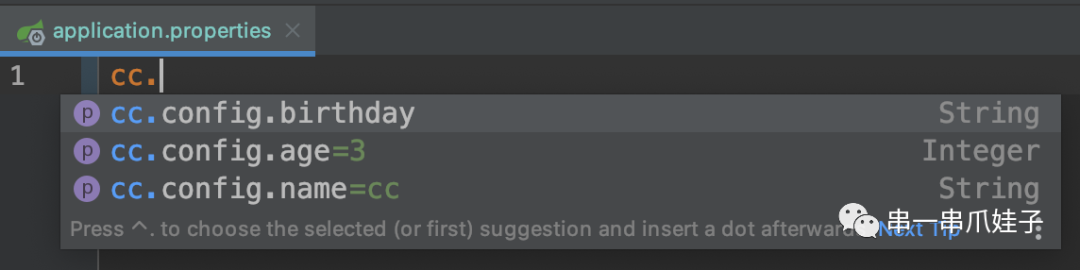
{ "groups": [ { "name": "cc.config", "type": "cc.lu.autoconfigure.wt.CcProperties", "sourceType": "cc.lu.autoconfigure.wt.CcProperties" } ], "properties": [ { "name": "cc.config.age", "type": "java.lang.Integer", "sourceType": "cc.lu.autoconfigure.wt.CcProperties", "defaultValue": 3 }, { "name": "cc.config.birthday", "type": "java.lang.String", "sourceType": "cc.lu.autoconfigure.wt.CcProperties" }, { "name": "cc.config.name", "type": "java.lang.String", "sourceType": "cc.lu.autoconfigure.wt.CcProperties", "defaultValue": "cc" } ], "hints": []}这个文件的目的是在properties或yml文件中配置自定义属性的时候,可以自动提示,例如:
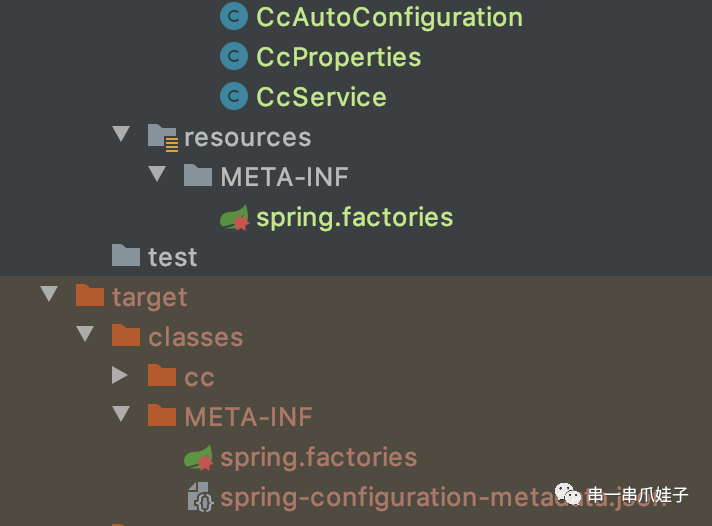
这个文件看上去好像非常复杂,尤其是当我们有几十个自定义配置属性的时候,难道要一个个属性的去写吗?答案是当然不用,可以通过引入一个jar包来在打包的时候自动生成:
<dependency> <groupId>org.springframework.bootgroupId> <artifactId>spring-boot-configuration-processorartifactId> <optional>trueoptional>dependency>引入之后,执行完命令mvn clean package之后,到target/classes/META-INF目录下查看自动生成的文件
至此,我们的cc-spring-boot-autoconfigure就创建完成了,回瞄一眼,是不是和官方的autoconfigure包含的文件一致了。
2. 创建cc-spring-boot-starter工程
一个很普通的maven工程,因为starter中一般不包含任何代码,仅仅作为包的依赖管理工程,所以创建完成之后依然要删除启动类、application.properties和test文件夹,它只有一个pom.xml
<?xml version="1.0" encoding="UTF-8"?><project xmlns="http://maven.apache.org/POM/4.0.0" xmlns:xsi="http://www.w3.org/2001/XMLSchema-instance" xsi:schemaLocation="http://maven.apache.org/POM/4.0.0 https://maven.apache.org/xsd/maven-4.0.0.xsd"> <modelVersion>4.0.0modelVersion> <groupId>cc.lugroupId> <artifactId>cc-spring-boot-starterartifactId> <version>1.0version> <name>cc-spring-boot-startername> <properties> <project.build.sourceEncoding>UTF-8project.build.sourceEncoding> <project.reporting.outputEncoding>UTF-8project.reporting.outputEncoding> <java.version>1.8java.version> properties> <dependencies> <dependency> <groupId>cc.lugroupId> <artifactId>cc-spring-boot-autoconfigureartifactId> <version>1.0version> dependency> dependencies>project>3. 创建cc-starter-demo测试工程
创建一个常规的SpringBoot工程,引入我们自定义的starter,并设置相关的配置信息,就可以使用了。
pom.xml
<dependency> <groupId>cc.lugroupId> <artifactId>cc-spring-boot-starterartifactId> <version>1.0version>dependency>application.properties
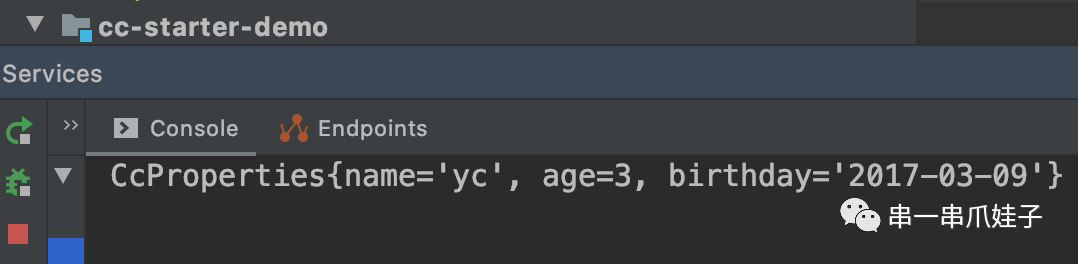
修改birthday和name两个属性,age使用默认值,待会看效果
cc.config.birthday=2017-03-09cc.config.name=yc创建一个Controller
package cc.lu.starter.demo.controller;import org.springframework.beans.factory.annotation.Autowired;import org.springframework.web.bind.annotation.GetMapping;import org.springframework.web.bind.annotation.RestController;import cc.lu.autoconfigurer.wt.CcService;@RestControllerpublic class PersonController { @Autowired private CcService ccService; @GetMapping("/info") public void info() { System.out.println(ccService.info()); }}1. 情况一
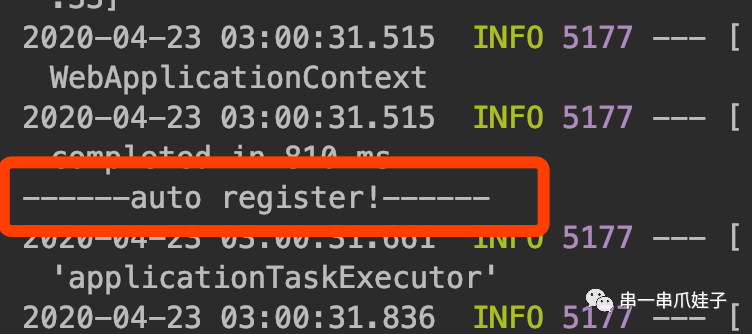
启动cc-starter-demo工程,查看启动日志,会发现我们在CcAutoConfiguration中打印的字符串
------auto register!------出现在了控制台,说明CcService的实例创建是在CcAutoConfiguration中完成的。
访问http://127.0.0.1:8080/info,查看控制台的日志,看到我们在application.properties文件中配置的值生效了,也就是我们的starter写的正常。
2. 情况二
在启动类中重新定义CcService的实例创建方法
@Beanpublic CcService ccService(CcProperties ccProperties) { CcService ccService = new CcService(); // 打个日志查看方法是否被调用 System.out.println("====client register===="); ccService.setCcProperties(ccProperties); return ccService;}启动工程,查看控制台是打印了字符串
====client register====还是------auto register!------
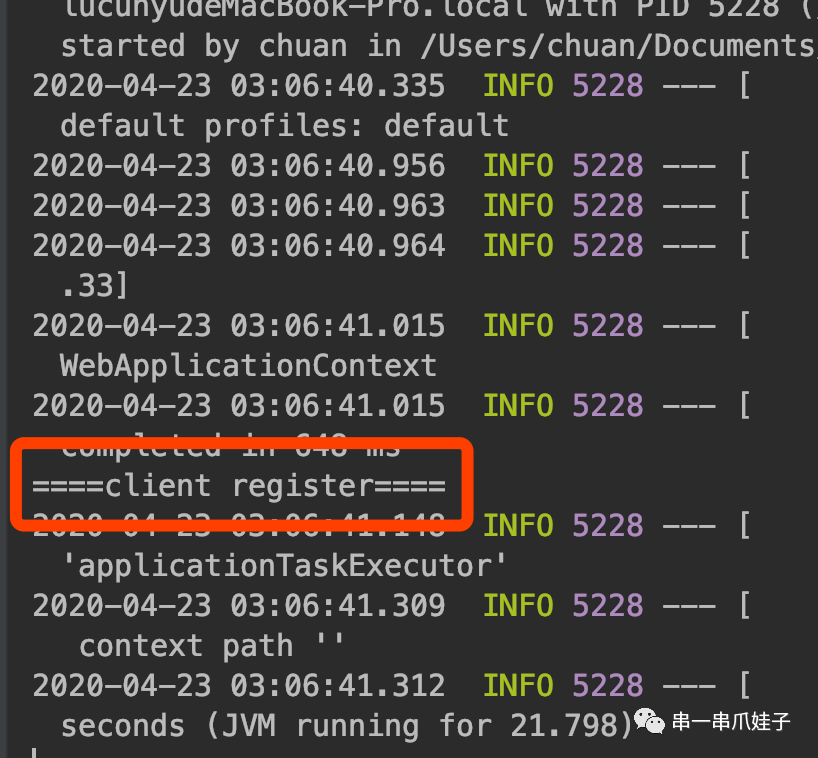
控制台打印的是我们demo工程里创建CcService实例方法内的字符串,而CcAutoConfiguration内的打印语句未执行,这是因为我们在CcAutoConfiguration类中的方法加了@ConditionalOnMissingBean({ CcService.class })来控制实例的创建。(划知识点,约定大于配置)
通过自定义starter分析一下其工作原理:
SpringBoot在启动时扫描项目依赖的全部jar包,并寻找
META-INF/spring.factories文件根据
META-INF/spring.factories加载符合条件的AutoConfigure类根据
@Conditional注解条件进行自动配置,并将Bean注入到Spring Context中。
更多精彩推荐,请关注

点击 “在看” 解锁更多!


 3029
3029


 被折叠的 条评论
为什么被折叠?
被折叠的 条评论
为什么被折叠?
 到【灌水乐园】发言


