


 本文介绍了如何使用Python的python-docx库高效读取和操作Word文档,包括创建、写入、读取内容示例,以及解决乱码问题的方法。重点讲解了通过win32com接口与文档编码设置来实现自动化处理。
这两天在更新Python在办公自动化方面的文章,前面发的是关于办公软件中的Excel部分,有网友私信我说想看看Python在Word方面的应用,今天就给大家从基础的入门操作开始吧!
我们在工作中会遇到需要读取一个有几百页的word文档并从中整理出一些信息的需求,比如产品的API文档一般是word格式的。几百页的文档,如果手工一个个去处理,几乎是不可能的事情。这时就要找一个库写脚本去实现了,而本文要讲的python-docx库就能满足这个需求。

1、举例:简单使用
import win32comfrom win32com.client import Dispatch, constantswordApp = win32com.client.Dispatch('Word.Application')# 后台运行,显示,不警告wordApp.Visible = TruewordApp.DisplayAlerts = 0# 创建新的文档doc = wordApp.Documents.Add() # 插入文字doc.Paragraphs.Last.Range.Text = 'hello!'# 保存文件doc.SaveAs('d://say_hello.docx')因为采用的word的api,所有的调用方法都是一致的。不想去微软官网读文档,最简单的办法就是去搜c#操作word之类的文章,稍微看下就明白了。
如果出现写入word乱码,甚至某些时候写进去没有值,这个时候你需要统一全部的文档格式。我试过用nodepad++转换成utf-8文档,以及utf-8无BOM模式都不能很好的支持中文。最后用visuasl studio全部转换成GB2312。这里我没做更深入研究,不知道是不是word只支持GB2312编码的写入。
仅仅转换不一定能解决所有的问题,我在main.py里引用文件a.py return回的中文时有出现乱码,此时在相关的文件头部加上 #coding:utf-8 写入word就没有问题了。
2、安装
pip install python-docx
3、写docx文件
示例代码:
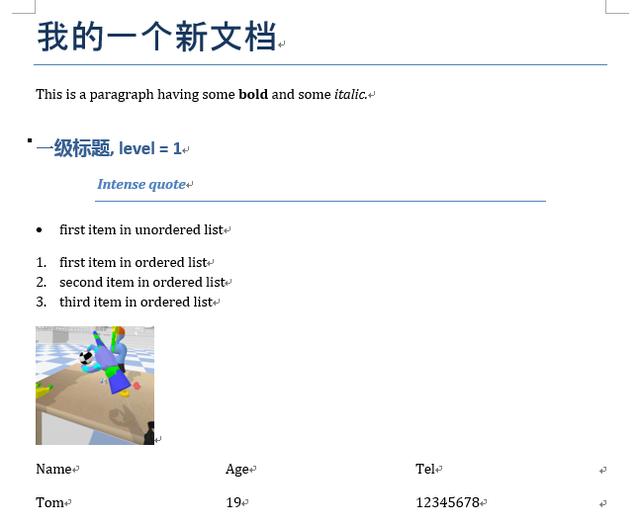
# coding:utf-8# 写word文档文件import sysfrom docx import Documentfrom docx.shared import Inchesdef main(): reload(sys) sys.setdefaultencoding('utf-8') # 创建文档对象 document = Document() # 设置文档标题,中文要用unicode字符串 document.add_heading(u'我的一个新文档',0) # 往文档中添加段落 p = document.add_paragraph('This is a paragraph having some ') p.add_run('bold ').bold = True p.add_run('and some ') p.add_run('italic.').italic = True # 添加一级标题 document.add_heading(u'一级标题, level = 1',level = 1) document.add_paragraph('Intense quote',style = 'IntenseQuote') # 添加无序列表 document.add_paragraph('first item in unordered list',style = 'ListBullet') # 添加有序列表 document.add_paragraph('first item in ordered list',style = 'ListNumber') document.add_paragraph('second item in ordered list',style = 'ListNumber') document.add_paragraph('third item in ordered list',style = 'ListNumber') # 添加图片,并指定宽度 document.add_picture('e:/docs/pic.png',width = Inches(1.25)) # 添加表格: 1行3列 table = document.add_table(rows = 1,cols = 3) # 获取第一行的单元格列表对象 hdr_cells = table.rows[0].cells # 为每一个单元格赋值 # 注:值都要为字符串类型 hdr_cells[0].text = 'Name' hdr_cells[1].text = 'Age' hdr_cells[2].text = 'Tel' # 为表格添加一行 new_cells = table.add_row().cells new_cells[0].text = 'Tom' new_cells[1].text = '19' new_cells[2].text = '12345678' # 添加分页符 document.add_page_break() # 往新的一页中添加段落 p = document.add_paragraph('This is a paragraph in new page.') # 保存文档 document.save('e:/docs/demo1.docx') if __name__ == '__main__': main()执行以上代码会在'e:/docs/'路径下产生一个demo1.docx文件,其内容如下:
4、读docx文件
示例代码:
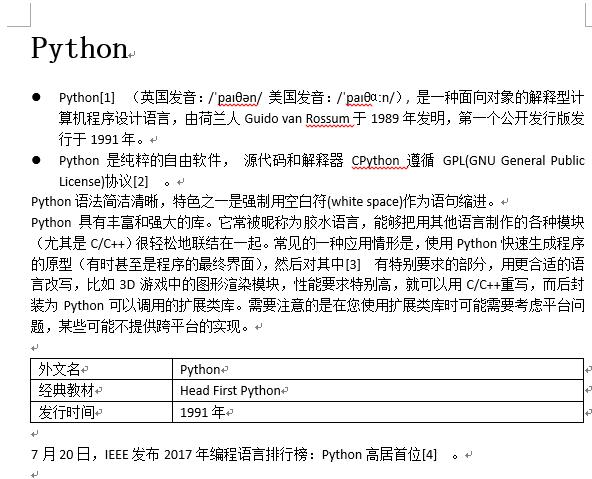
# coding:utf-8# 读取已有的word文档import sysfrom docx import Documentdef main(): reload(sys) sys.setdefaultencoding('utf-8') # 创建文档对象 document = Document('e:/docs/demo2.docx') # 读取文档中所有的段落列表 ps = document.paragraphs # 每个段落有两个属性:style和text ps_detail = [(x.text,x.style.name) for x in ps] with open('out.tmp','w+') as fout: fout.write('') # 读取段落并写入一个文件 with open('out.tmp','a+') as fout: for p in ps_detail: fout.write(p[0] + '' + p[1] + '') # 读取文档中的所有段落的列表 tables = document.tables # 遍历table,并将所有单元格内容写入文件中 with open('out.tmp','a+') as fout: for table in tables: for row in table.rows: for cell in row.cells: fout.write(cell.text + '') fout.write('') if __name__ == '__main__': main()假如在'e:/docs/'路径下有一个demo2.docx文档,其内如如下:
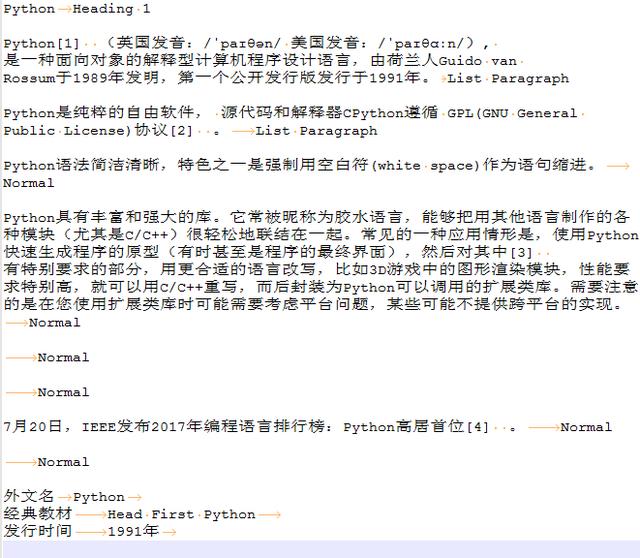
执行上面脚本后,输出的out.tmp文件的内容如下:
5、注意事项
- 如果段落中是有超链接的,那么段落对象是读取不出来超链接的文本的,需要把超链接先转换成普通文本,方法:全选word文档的所有内容,按快捷键Ctrl+Shift+F9即可。
6、遇到的问题
用pyinstaller打包时的一个问题
用pyinstaller工具(用法详见:python打包工具pyinstaller的用法)把使用到python-docx库的脚本打包成exe可执行文件后,双击运行生成的exe文件,报错:
docx.opc.exceptions.PackageNotFoundError: Package not found at 'C:甥敳獲ADMINI~1.PC-AppDataLocalTemp_MEI49~1docxemplatesdefault.docx'经过在stackoverflow上搜索,发现有人遇到过类似的问题(问题链接:cx_freeze and docx - problems when freezing),经过尝试,该问题的第二个回答可以解决这个问题:
I had the same problem and managed to get around it by doing the following. First, I located the default.docx file in the site-packages. Then, I copied it in the same directory as my .py file. I also start the .docx file with Document() which has a docx=... flag, to which I assigned the value: os.path.join(os.getcwd(), 'default.docx') and now it looks like doc = Document(docx=os.path.join(os.getcwd(), 'default.docx')). The final step was to include the file in the freezing process. Et voilà! So far I have no problem.大概的解决步骤是这样的:
- 找到python-docx包安装路径下的一个名为default.docx的文件,我是通过everything这个强大的搜索工具全局搜索找到这个文件的,它在我本地所在的路径是:
E:codeenv.envLibsite-packagesdocxemplates
- 把找到的default.docx文件复制到我的py脚本文件所在的目录下。
- 修改脚本中创建Document对象的方式:
从原来的创建方式:
document = Document()修改为:
import os document = Document(docx=os.path.join(os.getcwd(), 'default.docx'))- 再次用pyinstaller工具打包脚本为exe文件
- 把default.docx文件复制到与生成的exe文件相同的路径下,再次运行exe文件,顺利运行通过,没有再出现之前的报错,问题得到解决。


 被折叠的 条评论
为什么被折叠?
被折叠的 条评论
为什么被折叠?
 到【灌水乐园】发言


