


从0系统学Android--3.7 聊天界面编写

本系列文章目录:更多精品文章分类
本系列持续更新中….
3.7 编写界面的最佳实践
前面学习了那么多 UI 开发的知识,下面来进行实践,做一个美观的聊天界面。
3.7.1 制作 Nine-Patch 图片
实战前先学习一个小知识,如何制作 Nine-Patch 图片。
Nine-Patch 是一种被特殊处理的 .png图片,能够指定那些区域可以被拉伸,那些区域不可以。
来看看 Nine-Patch 图片的实际作用。

首先我们用一张普通的图片作为背景
1<?xml version="1.0" encoding="utf-8"?>
2<LinearLayout xmlns:android="http://schemas.android.com/apk/res/android"
3    android:layout_width="match_parent"
4    android:layout_height="wrap_content"
5    android:background="@mipmap/message_"
6    android:orientation="vertical">
7</LinearLayout>
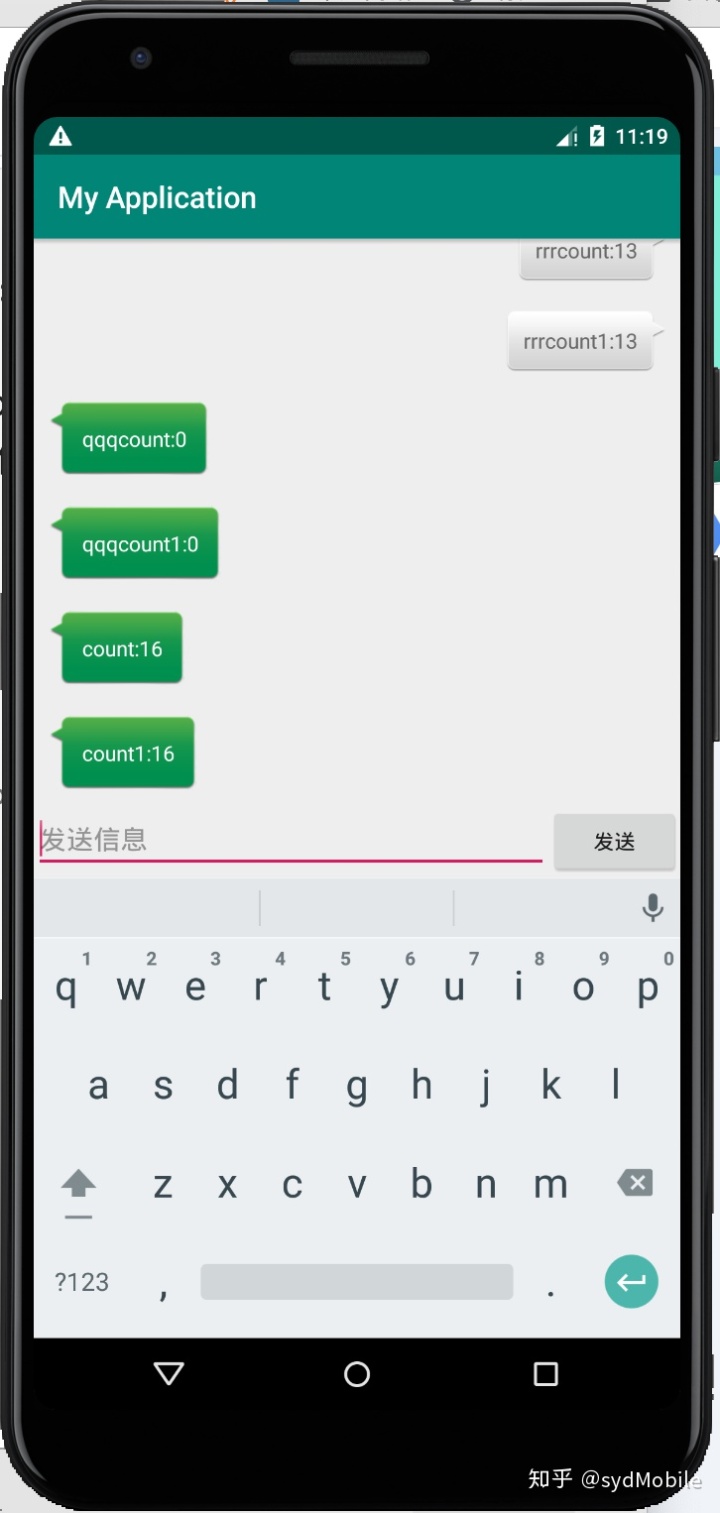
运行结果

可以看到效果非常糟糕,由于图片的宽度不能填满整个屏幕的宽度,整张图片就被均匀的拉伸的,效果很差,这种情况,我们就可以使用 Nine-Patch 图片来进行改善了。
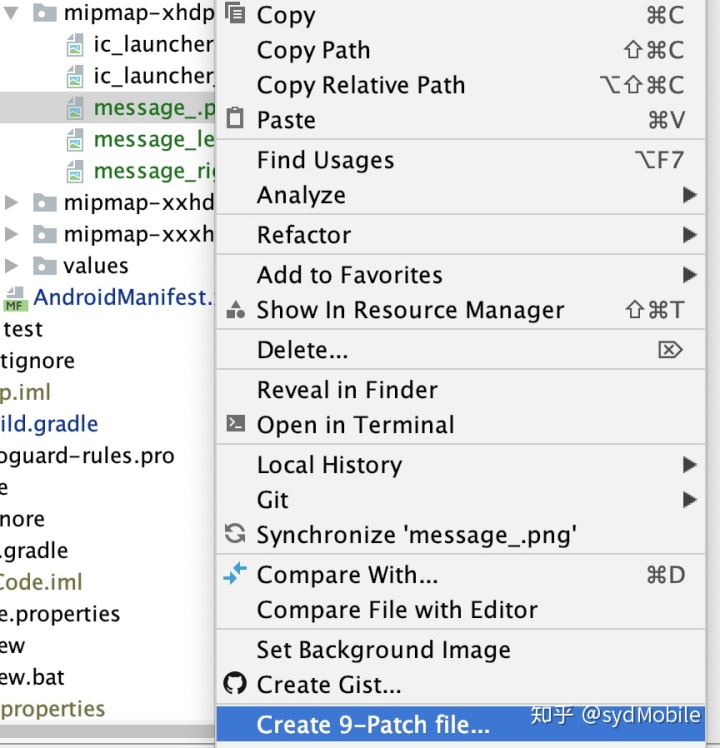
如何创建 nine-patch 图片呢?
首先在 Android Studio 中选中你要变成 nine-patch 的图片,然后右击--->Create 9-Patch file 就可以创建 Nine-Patch 图片了。
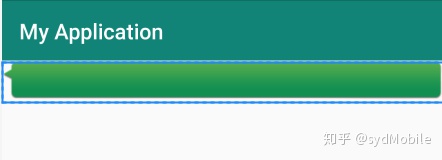
我们可以在图片的四个边框绘制一个个的小黑点。在上边框和左边框的部分表示当前图片需要拉伸的时候就会拉伸黑色点标记的区域,在下边框和右边框的部分表示内容会被放置的区域。用鼠标在图片的边缘拖到就可以进行绘制了。按住 Shift 键拖动可以进行擦除。
再来看看使用 nine-patch 的效果
这样当图片需要拉伸的时候就只拉伸指定区域了。
3.7.2 编写精美的聊天界面
聊天界面肯定有收到的消息和发送的消息,上面我们已经把发送消息的背景图制作好了,再制作一张发送消息的背景图。
图片资源都准备好了,就可以写代码了。
编写主页面布局
 1<?xml version="1.0" encoding="utf-8"?>
 2<LinearLayout xmlns:android="http://schemas.android.com/apk/res/android"
 3    android:layout_width="match_parent"
 4    android:layout_height="match_parent"
 5    android:orientation="vertical">
 6    <androidx.recyclerview.widget.RecyclerView
 7        android:id="@+id/rlv"
 8        android:layout_width="match_parent"
 9        android:layout_height="0dp"
10        android:layout_weight="1"/>
11    <LinearLayout
12        android:orientation="horizontal"
13        android:layout_width="match_parent"
14        android:layout_height="wrap_content">
15        <EditText
16            android:id="@+id/et_info"
17            android:layout_width="0dp"
18            android:layout_height="wrap_content"
19            android:layout_weight="1"
20            android:hint="发送信息"
21            android:maxLines="2"/>
22        <Button
23            android:layout_width="wrap_content"
24            android:layout_height="wrap_content"
25            android:text="发送"
26            android:id="@+id/bt_send"/>
27    </LinearLayout>
28</LinearLayout>
建立聊天的消息对象
 1public class Msg {
 2    public static final  int TYPE_RECEIVE = 0;
 3    public static final int TYPE_SEND = 1;
 4    private String content;
 5
 6    public Msg(String content, int type) {
 7        this.content = content;
 8        this.type = type;
 9    }
10
11    private int type;
12
13    public String getContent() {
14        return content;
15    }
16
17    public void setContent(String content) {
18        this.content = content;
19    }
20
21    public int getType() {
22        return type;
23    }
24
25    public void setType(int type) {
26        this.type = type;
27    }
28}
type 用来指定消息的类型,是发送的消息还接受的消息
然后编写 RecyclerView 的子项布局
 1<?xml version="1.0" encoding="utf-8"?>
 2<LinearLayout xmlns:android="http://schemas.android.com/apk/res/android"
 3    android:layout_width="match_parent"
 4    android:layout_height="wrap_content"
 5    android:padding="10dp"
 6    android:orientation="vertical">
 7    <LinearLayout
 8        android:id="@+id/ll_left"
 9        android:background="@mipmap/message_left"
10        android:layout_width="wrap_content"
11        android:layout_height="wrap_content">
12        <TextView
13            android:layout_width="wrap_content"
14            android:layout_height="wrap_content"
15            android:layout_gravity="center"
16            android:id="@+id/tv_left"
17            android:textColor="#FFF"
18            android:layout_margin="10dp"/>
19
20    </LinearLayout>
21
22    <LinearLayout
23        android:layout_gravity="right"
24        android:id="@+id/ll_right"
25        android:background="@mipmap/message_right"
26        android:layout_width="wrap_content"
27        android:layout_height="wrap_content">
28        <TextView
29            android:layout_width="wrap_content"
30            android:layout_height="wrap_content"
31            android:layout_gravity="center"
32            android:id="@+id/tv_right"
33            android:layout_margin="10dp"/>
34
35    </LinearLayout>
36</LinearLayout>
这里我们把接受消息和发送消息的布局都写进来了,代码中根据消息的类型来调用 visible 方法,显示对应的消息。
建立适配器
 1public class MsgAdapter extends RecyclerView.Adapter<MsgAdapter.MsgViewHolder> {
 2    private List<Msg> list;
 3    public MsgAdapter(List<Msg> list){
 4        this.list = list;
 5    }
 6
 7
 8
 9    class MsgViewHolder extends RecyclerView.ViewHolder{
10        LinearLayout llLeft,llRight;
11        TextView tvLeft,tvRight;
12
13        public MsgViewHolder(@NonNull View itemView) {
14            super(itemView);
15            llLeft =itemView.findViewById(R.id.ll_left);
16            llRight =itemView.findViewById(R.id.ll_right);
17            tvLeft =itemView.findViewById(R.id.tv_left);
18            tvRight =itemView.findViewById(R.id.tv_right);
19        }
20    }
21
22    @NonNull
23    @Override
24    public MsgViewHolder onCreateViewHolder(@NonNull ViewGroup parent, int viewType) {
25        View view = LayoutInflater.from(parent.getContext()).inflate(R.layout.msg_item,parent,false);
26        MsgViewHolder viewHolder = new MsgViewHolder(view);
27
28        return viewHolder;
29    }
30
31    @Override
32    public void onBindViewHolder(@NonNull MsgViewHolder holder, int position) {
33        Msg msg = list.get(position);
34        // 这里根据消息的类型来选择不同的布局
35        if (msg.getType() == Msg.TYPE_RECEIVE){
36            holder.llLeft.setVisibility(View.VISIBLE);
37            holder.llRight.setVisibility(View.GONE);
38            holder.tvLeft.setText(msg.getContent());
39        }else {
40            holder.llRight.setVisibility(View.VISIBLE);
41            holder.llLeft.setVisibility(View.GONE);
42            holder.tvRight.setText(msg.getContent());
43        }
44
45    }
46
47    @Override
48    public int getItemCount() {
49        return list.size();
50    }
51}
然后写 Activity 代码
 1public class MsgActivity extends AppCompatActivity {
 2
 3    List<Msg> list  =new ArrayList<>();
 4    EditText text ;
 5    @Override
 6    protected void onCreate(@Nullable Bundle savedInstanceState) {
 7        super.onCreate(savedInstanceState);
 8        setContentView(R.layout.activity_nine_patch);
 9        initData();
10        final RecyclerView recyclerView  = findViewById(R.id.rlv);
11        final MsgAdapter msgAdapter = new MsgAdapter(list);
12         text = findViewById(R.id.et_info);
13        Button bt = findViewById(R.id.bt_send);
14        LinearLayoutManager layoutManager = new LinearLayoutManager(this);
15        recyclerView.setLayoutManager(layoutManager);
16        recyclerView.setAdapter(msgAdapter);
17        bt.setOnClickListener(new View.OnClickListener() {
18            @Override
19            public void onClick(View v) {
20                Random random = new Random();
21                // 这里还是利用随机数来生成消息的类型
22                int count = random.nextInt(20);
23                Msg msg = new Msg(text.getText()+"count:"+count,count%2);
24                list.add(msg);
25                // 表示在消息的末尾插入内容
26                msgAdapter.notifyItemInserted(list.size()-1);
27                // 让 RecyclerView 自动滚动到最底部
28                recyclerView.scrollToPosition(list.size()-1);
29                // 清空内容
30                text.setText("");
31            }
32        });
33    }
34
35    public void initData(){
36        Random random = new Random();
37        for (int i=0;i<40;i++){
38            int count = random.nextInt(20);
39            Msg msg = new Msg("消息嗯哼"+i+"count:"+count,count%2);
40            list.add(msg);
41        }
42
43
44    }
45}
notifyItemInserted() 方法,用于通知列表有新的数据插入了,这样新增加的一条消息才能显示出来。
scrolltoPosition() 方法将数据定位到最后一行,保证我们可以看到最后发送的内容。


 344
344


 被折叠的 条评论
为什么被折叠?
被折叠的 条评论
为什么被折叠?
 到【灌水乐园】发言


