本人大学生,搞了三年的 PHP,感觉 PHP 的生态还是不行,但是 PHP 仍然是全世界最好的语言!!!上手简单,能快速搭建起一个项目。由于快要找工作了想花一年的时间来搞搞 Java,搞了一段时间后发现 Java 整套是真是完善,可扩展性很强,Java 牛逼不是没有道理的。
搭建 Springboot 项目
springboot 是建立在的 spring 生态的基础上的,以前看 spring 的时候,有两大概念是纠结了很久的,IOC(控制反转)以及 AOP(面向切面的编程)。其实控制反转就是依赖注入,spring 提供了一个 IOC 容器来初始化对象,解决对象间依赖管理和对象的使用,如@Bean、@Autowired等可以实现依赖注入,AOP 目前理解是在一些日志框架场景中用到。
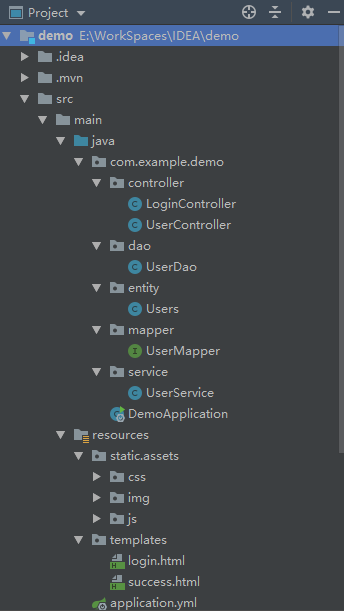
平时我们常见的 web 项目开发,使用的 mvc 框架、maven 管理在 springboot 依然使用到,springboot 最明显的好处是简化了新建一个项目时的各种配置过程,就连 tomcat 都不用配置了。可以看到我新建一个 maven 项目大目录结构是这样的

Maven 依赖:1
2
3
4
5
6
7
8
9
10
11
12
13
14
15
16
17
18
19
20
21
22
23
24
25
26
27
org.springframework.boot
spring-boot-starter-jdbc
org.springframework.boot
spring-boot-starter-thymeleaf
org.springframework.boot
spring-boot-starter-web
org.mybatis.spring.boot
mybatis-spring-boot-starter
2.0.1
mysql
mysql-connector-java
runtime
org.springframework.boot
spring-boot-starter-test
test
application.yml1
2
3
4
5
6
7
8
9
10
11
12
server:
port: 8080
spring:
datasource:
url: jdbc:mysql://localhost:3306/test?useSSL=false&useUnicode=true&characterEncoding=UTF-8&serverTimezone=UTC
username: root
password: root
driver-class-name: com.mysql.jdbc.Driver
type: com.zaxxer.hikari.HikariDataSource
thymeleaf:
cache: false
login.html1
2
3
4
5
6
7
8
9
10
11
12
13
14
15
16
17
18
19
20
21
22
23
24
25
26
27
28
29
30
31
32
33
34
35
36
37
38
39
40
41
42
43
44
45
46
47
48
用户登录用户登录
提交
function login() {
var username = document.getElementById("username").value;
var password = document.getElementById("password").value;
$.ajax({
type: "POST",
url: "/login_ht",
data: {
username: username,
password: password
},
dataType: "json",
success: function(data){
var msg = data.msg;
alert(msg);
}
})
}
实体类(entity 里的 Users 类)1
2
3
4
5
6
7
8
9
10
11
12
13
14
15
16
17
18
19
20
21
22
23
24
25
26
27
28
29
30
31
package com.example.demo.entity;
public class{
private Integer id;
private String username;
private String password;
public Integer getId(){
return id;
}
public void setId(Integer id){
this.id = id;
}
public String getUsername(){
return username;
}
public void setUsername(String username){
this.username = username;
}
public String getPassword(){
return password;
}
public void setPassword(String password){
this.password = password;
}
}
定义基本的几个属性后,可以通过键盘上的 “alt+insert” 键,来进行自动添加该类自带的 get 和 set 方法,以及 toString 方法
mapper(mapper 里的 UserMapper 类):1
2
3
4
5
6
7
8
9
10
11
12
13
14
15
16
17
18
19
20
21
22
23
24
25
26
package com.example.demo.mapper;
import com.example.demo.entity.Users;
import org.apache.ibatis.annotations.*;
@Mapper
public interface UserMapper{
@Select("select * from user where id=#{id}")
public Users getUserById(Integer id);
@Select("select username from user where username=#{username} and password=#{password}")
public String login(@Param("username") String username,@Param("password") String password);
@Delete("delete from user where id=#{id}")
public int deleteUserById(Integer id);
@Options(useGeneratedKeys = true,keyProperty = "id")
@Insert("insert into user(username,password) values(#{username},#{password})")
public int insertUser(Users users);
@Update("update user set password=#{password} where id=#{id}")
public int updateUser(Users users);
}
这里我使用的是 mybatis 的注解的形式实现增删改查的,mybatis 还提供了一个 xml 配置的方式,但是我觉得小 demo 还是使用注解的方式比较简单。当然这里的登录功能只需要用到查询。
注意一定要加上@Mapper注解,不然容器扫描不到。
UserService:
书写 service,业务层,控制业务,主要负责业务逻辑模块的逻辑应用设计1
2
3
4
5
6
7
8
9
10
11
12
13
14
15
16
17
package com.example.demo.service;
import com.example.demo.mapper.UserMapper;
import org.springframework.beans.factory.annotation.Autowired;
import org.springframework.stereotype.Service;
@Service
public class UserService{
@Autowired
UserMapper userMapper;
public String login(String username,String password){
return userMapper.login(username,password);
}
}
LoginController:
controller 控制层,负责具体的业务模块流程的控制,即页面访问控制,调用 service 层里面的接口控制具体的业务流程1
2
3
4
5
6
7
8
9
10
11
12
13
14
15
16
17
18
19
20
21
22
23
24
25
26
27
28
29
30
31
32
33
34
35
36
37
38
39
40
41
42
43
44
45
46
47
48
package com.example.demo.controller;
import com.example.demo.service.UserService;
import org.springframework.beans.factory.annotation.Autowired;
import org.springframework.stereotype.Controller;
import org.springframework.web.bind.annotation.RequestMapping;
import org.springframework.web.bind.annotation.RequestMethod;
import org.springframework.web.bind.annotation.ResponseBody;
import org.springframework.web.bind.annotation.RestController;
import javax.servlet.http.HttpServletRequest;
import javax.servlet.http.HttpSession;
import javax.swing.*;
import java.util.HashMap;
import java.util.Map;
@Controller
public class LoginController{
@Autowired
UserService userService;
@RequestMapping("/login")
public String login(){
return "login";
}
@ResponseBody
@RequestMapping(value = "/login_ht", method = {RequestMethod.POST, RequestMethod.GET})
public Map login(HttpServletRequest request, HttpSession session){
Map map = new HashMap();
String username = request.getParameter("username");
String password = request.getParameter("password");
String name = userService.login(username,password);
System.out.println(username+password);
System.out.println(name);
session.setAttribute("name", name);
if (name == null) {
map.put("msg","用户名或密码错误");
}
return map;
}
@RequestMapping("/success")
public String success(){
return "success";
}
}
@RequestMapping(value = “/login_ht”, method ={RequestMethod.POST,RequestMethod.GET})
HttpServletRequest request
该 value 的值/login_ht 要与 ajax 中 url 值一样,
注意这里一定要加上@ResponseBody注解!!这样才能将数据以 Json 格式返回到前台!


 789
789


 被折叠的 条评论
为什么被折叠?


