


前言
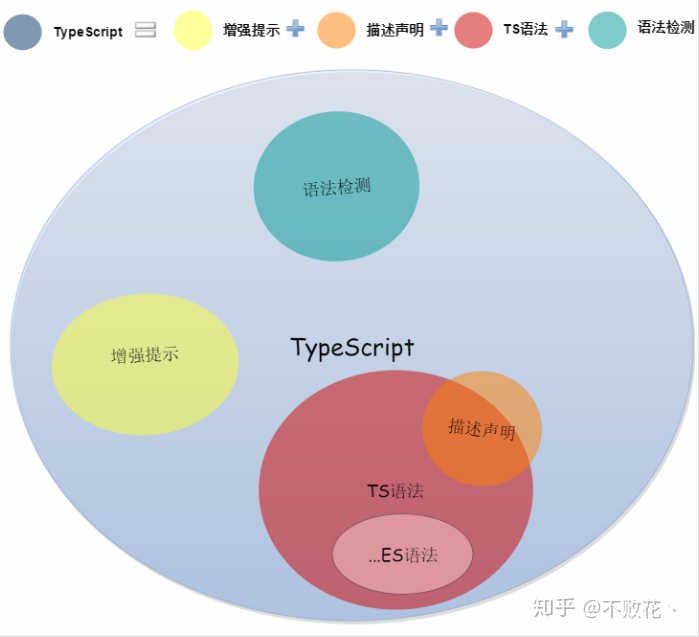
TypeScript 作为 JavaScript 的超集,强类型、类型推断等优点简直棒棒哒。对项目来说,typescript 可以让你的 app 更稳定、易阅读、好管理。当你在你的项目中引入 TypeScript ,你将能节省大量的时间以及精力,来开发维护你的项目。照目前趋势来看,前端各大框架或库都慢慢趋于倒向 TypeScript 。希望你也可以考虑一下。
这里本文主要做了对 TypeScript + React + Redux 的集成总结,并输出了一个 TodoList Demo 避免纸上谈兵,其中遇到的问题也是蛮多的,在仓库中都有说明,欢迎大家 code review 。有任何建议可以提出。
Create React App
首先,我们运行如下指令,创建一个新的基于 TypeScript 的 React App,当然你也可以参照官方文档把旧项目迁移到 TypeScript 上来。
$ npx create-react-app app_name --typescript
完成之后,你会看到一个基本的 React with TypeScript 项目结构,其中包含了以下几点变化(对比 JavaScript ):
- 根目录下出现了 tsconfig.json 文件
接触过 TypeScript 的应该很熟悉,这是作为你项目的 TypeScript 编译选项配置。
2. 文件扩展名变化:.js变成了.ts、.jsx变成了.tsx
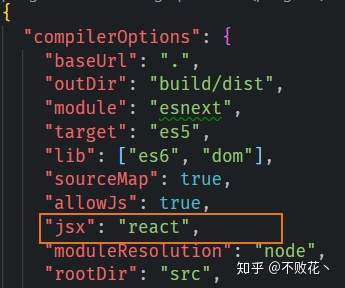
这扩展名变化相信大家都懂,这里要说明的是,为了使 TypeScript 支持 JSX ,除了 tsx 作为文件扩展名外,还需要配置 JSX 工作模式:preserve 模式和 react 模式以及 react-native 模式。这三个模式只影响编译策略。preserve 模式会生成代码中会保留 JSX ,以供后续的转换操作使用(比如:Babel),输出的文件是 .jsx 格式的;而 react模式则会直接编译成 React.createElement,在使用前就不需要再进行 JSX 转换了,输出的文件是 .js 格式的;react-native模式相当于preserve,它也保留了所有的JSX,但是输出文件的扩展名是.js。

你可以在命令行中使用 --jsx 参数或者在 tsconfig.json 中指定其工作模式(使用 Create-React-App 构建默认配置的是 react 模式)。
更多详情可以参考:https://www.tslang.cn/docs/handbook/jsx.html
3. 每个组件变成了优雅的 class 写法
// srcApp.tsx

import * as React from 'react';

class TodosApp extends React.Component {

  public render() {
    return (
      <main className="todo-app">
		... ...
      </main>
    );
  }
}

export default TodosApp;
4. 出现大量的 @types 开头的相关依赖包
包括 @types/jest 、@types/node、@types/react、@types/react-dom 等等。这里每个 @types/xxx 叫声明文件,表示为指定模块 xxx 提供其包含的声明,它们会放在 node_modules/@types 文件夹下,TypeScript 会自动从这里来获取模块内相关的类型定义,当我们开发时就可以获得对应的代码补全、接口提示等功能啦。一般需要独立安装这些声明文件。当一个第三方库没有提供声明文件时,我们就需要自己书写其声明文件了(形如 xxx.d.ts 文件),这里不扯太多。
需要注意的有@types 支持全局和模块类型定义。
- 全局
@types
默认情况下,TypeScript 会自动包含支持全局使用的任何定义。例如,对于 jQuery,你应该能够在项目中开始全局使用 $。
- 模块
@types
安装完之后,不需要特别的配置,你就可以像使用模块一样使用它:
import * as $ from 'jquery';
这里推荐一个网站:TypeSearch: https://microsoft.github.io/TypeSearch/,专门搜索第三方包的声明文件。
另外,对于 TypeScript 里面类型这个东西,你需要关注interface和type的区别、以及什么时候使用any比较合适。
推荐:typescript interface 与 type 声明类型的区别
推荐:Typescript 中的 interface 和 type 到底有什么区别
类型的定义以及使用
这里我们拿 TodoList 作为案例,分析它哪些地方需要用到类型以及如何好地定义它们。
- 一个独立的实体定义一个类型
// srcstorestypesindex.ts

export interface ITodo {
  public id: number;
  public title: string;
  public isCompleted: boolean;
}

// 这里建议class,不仅仅可以做类型,还可以做构建函数
export class Todo {
  public id: number;
  public title: string;
  public isCompleted = false;

  constructor(id: number, title: string) {
    this.id = id;
    this.title = title;
  }
}
2. 为每个组件的 props 和 state 规定类型
将interface应用于组件的 props ,这将迫使我们在将 props 传递到某组件时始终保持统一的数据结构,确保组件在开发时,这些 props 类型为开发者提供提示,让开发者考虑每个 props 的使用,同时也能避免无意义的的 props 被传递下去。
// srccomponentsTodosItemindex.tsx

// 可以根据需要抽离到一个单独的文件然后引入使用
interface TodosItemProps {
	todo: ITodo;
    toggleTodo: (id :number) => void;
    deleteTodo: (id :number) => void;
    editTodo: (id: number, text: string) => void;
}
interface TodosItemState {
	// 可选
    isEditing?: boolean;
}

// 类组件
export class TodosItem extends React.Component<TodosItemProps, TodosItemState> {
   ...
}

// 无状态函数组件
function MyForm(props: FormProps) {
  ...
}
3. 枚举作为类型使用
FiltersEnum 枚举了 TodoList 中三个过滤条件:ALL、COMPLETED、ACTIVE,我们使用其枚举值,同时也可以把它当作类型使用。
export const enum FiltersEnum {
  ALL= 'ALL',
  COMPLETED = 'COMPLETED',
  ACTIVE = 'ACTIVE'
}

// 作为类型
public getFilterTodos = (currentFilter: FiltersEnum) => {

  switch (currentFilter) {
    // 获取值
    case FiltersEnum.ACTIVE:
      return this.filterTodos(item => !item.isCompleted);
    case FiltersEnum.COMPLETED:
      return this.filterTodos(item => item.isCompleted);
    default:
      return this.filterTodos();
  }
}
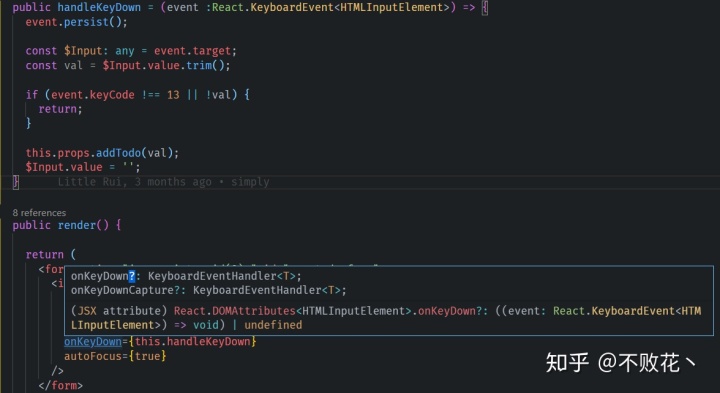
4. 事件对象类型
在vscode上,我们可以将鼠标光标悬停在事件上,可以自动获取触发某事件后的事件对象类型。这个是非常棒的。如下实例,我们可以清晰地看到绑定 onKeyDown 事件传递回调函数的事件对象参数 event 类型为React.KeyboardEvent<HTMLInputElement>。当然这些类型的声明都是在@types/react依赖里定义好的,我们写 handleKeyDown 时就可以直接拿来使用。这里也再次体现了类型声明后代码提示的强大之处。
请教:这里语法工具提示 event.target 类型是 EventTarget 。本应该有 value 属性的,但是提示其上没有 value 属性。所以转成了 any 。算是临时解决,大佬看到有更好的方式欢迎评论指出,感谢~

集成 Redux
Redux作为一个状态管理工具,相信大家并不陌生。Redux github:https://github.com/reduxjs/redux
安装 Redux
首先安装redux、react-redux,还有它们的@types包,使用如下命令:
npm install -S redux react-redux @types/react-redux细心的大伙应该发现,我们这里并没有安装@types/redux,因为 Redux 就自己提供了自己的声明文件( redux/index.d.ts ),并没有单独抽离出来。
确定 store.state 类型
引用Redux后,我们创建 src/types/index.ts 的文件,用来统一定义 store.state 类型,以及我们可能在应用开发中用到的类型,它们将很好地帮助我们管理和维护应用程序的状态。
// srcstorestypesindex.ts

export interface IStoreState {
  todos: Todo[];
  currentFilter: FiltersEnum;
}
定义 action
通常我们在 src/constants/index.ts 文件中定义 action.type 及其类型。
// srcstoresconstantsindex.ts

export const ADD_TODO = "ADD_TODO";
export type ADD_TODO = typeof ADD_TODO;

export const TOGGLE_TODO = "TOGGLE_TODO";
export type TOGGLE_TODO = typeof TOGGLE_TODO;

export const EDIT_TODO = "EDIT_TODO";
export type EDIT_TODO = typeof EDIT_TODO;

export const DELETE_TODO = "DELETE_TODO";
export type DELETE_TODO = typeof DELETE_TODO;

export const TOGGLE_ALL_TODOS = "TOGGLE_ALL_TODOS";
export type TOGGLE_ALL_TODOS = typeof TOGGLE_ALL_TODOS;

export const SET_CURRENT_FILTER = "SET_CURRENT_FILTER";
export type SET_CURRENT_FILTER = typeof SET_CURRENT_FILTER;
这里可以看到,我们使用 Const&type 模式定义 action.type ,这样我们可以很容易访问和使用相关的 action,有点一语双关的作用,这主要得益与 TypeScript 的声明合并(Declaration Merging)。
比如之前所说的创建实体类型时,推荐 class,就是因为 class既可作类型也可以当做 JavaScript 中可见的值来使用。更多详见文档 Declaration Merging。
我们将在srcstoresactionsindex.ts中引入它们,在这个文件中,我们定义了每个 action的 interface 以及 ActionCreator 函数的实现。
// srcstoresactionsindex.ts

import { ADD_TODO, ......, SET_CURRENT_FILTER } from '../constants';
import { FiltersEnum } from '../types';

// Actions
export interface IAddTodoAction {
  text: string;
  type: ADD_TODO;
}
......
export interface ISetCurrentFilterAction {
  filter: FiltersEnum;
  type: SET_CURRENT_FILTER;
}

// 归一
export type TodoAction = IAddTodoAction | IToggleTodoAction | IEditTodoAction | IDeleteTodoAction | IToggleAllTodoAction;

// Action Creators
export const addTodo = (text: string): IAddTodoAction => ({
  text,
  type: ADD_TODO
});
......
export const setCurrentFilter = (filter: FiltersEnum): ISetCurrentFilterAction => ({
  filter,
  type: SET_CURRENT_FILTER
});
这里 setCurrentFilter(filter) 的 action 我们使用 FiltersEnum 约束了它的参数传入,只有预先定义好的三个值( 'ALL', 'COMPLETED', 'ACTIVE'),在开发使用该 action 时可以很好地提醒开发者,避免不必要的错误。
定义 reducer
在上一步中,我们使用归一大法,即union types,将每个 action 类型归一为 TodoAction ,在 todos reducer 中我们来直接使用它。
// srcstoresreducerstodos.ts

import { TodoAction } from '../actions';
import { ADD_TODO, TOGGLE_TODO, EDIT_TODO, DELETE_TODO, TOGGLE_ALL_TODOS } from '../constants';
import { ITodo } from '../types';


const todos = (state: ITodo[] = [], action: TodoAction): ITodo[] => {
  switch (action.type) {
    case ADD_TODO:
      return [
        ...state,
        {
          isCompleted: false,
          title: action.text
        }
      ];
    case TOGGLE_TODO:
      return state.map((todo: ITodo, idx: number): ITodo =>
        (idx === action.index)
          ? {...todo, isCompleted: !todo.isCompleted}
          : todo
      );
    ... ...
    default:
      return state;
  }
};

export default todos;
这里简单展示了 TodoList 中todos reducer 的实现,另外还有currentFilter reducer 。
初始化 state
使用 combineReducer 合并我们刚刚写的所有 reducers ,并导出 rootReducr。
// srcstoresreducersindex.ts

import { combineReducers } from 'redux';

import todos from './todos';
import currentFilter from './filters';

export default combineReducers({
  // states
  todos,
  currentFilter
});

另外在入口文件 index.tsx ,我们生成有初始状态的 store 对象,对 rootReducer 调用 creatStore ,并使用 Provider 包裹根组件 TodoApp ,传入 state 对象。
// srcindex.tsx

import { localStore } from './utils/localStorage';
import rootReducer from './stores/reducers';
import { throttle } from './utils/throttle';

// 从localstorage加载state,并初始化
const persistedState = JSON.parse( localStore.get('redux-todos-state') || '{}' );
const store = createStore(rootReducer, persistedState);

// 监听state改变,并持久化
store.subscribe(
  throttle(() => localStore.set('redux-todos-state', store.getState()),
  1000)
);

ReactDOM.render(
  <Provider store={ store }>
    <TodosApp />
  </Provider>,
  document.getElementById('root') as HTMLElement
);
registerServiceWorker();
这里我们初始化 store 对象,会提前去本地取 persistedState 作为 initialState ,同时 state 每次改动也会本地存储,做到 store 持久化。同时为了避免频繁调用 localstorage ,加入了 throttle 作为节流优化。
Redux 到组件
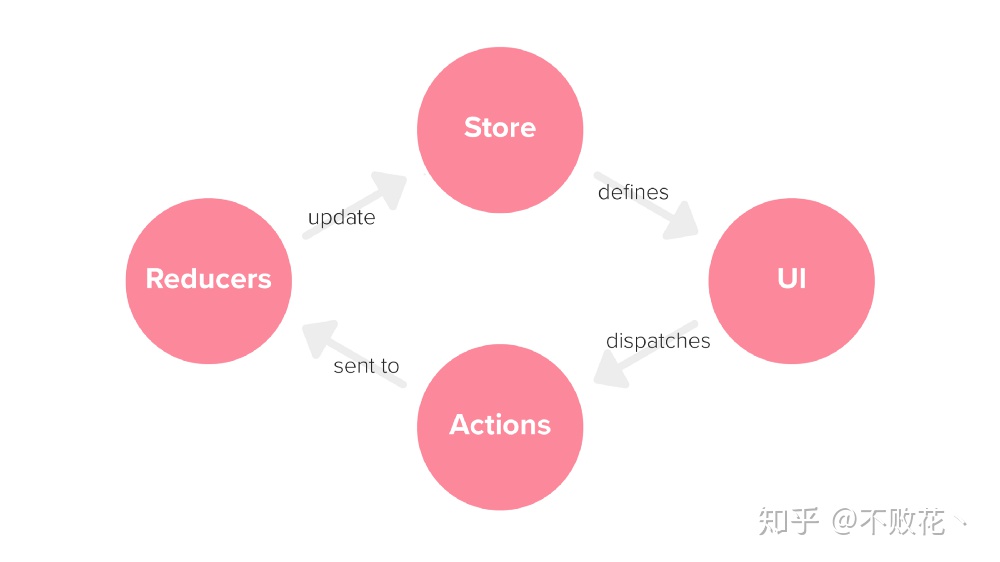
首先我们要明确引入 Redux 之后数据的流向。如下图所示,我们要把 store.state 以及改变 store 的唯一途径 store.dispatch(action) 方法传递给组件。这里以TodoItem组件为例,我们使用mapStateToProps 和mapDispatchToProps来做这项工作,建立redux和组件的映射关系。
mapStateToProps (state: IStoreState, ownProps: IStateProps)
mapStateToProps是一个函数,用于建立组件跟 store 的 state 的映射关系。第一个参数 state 为订阅 store.state 改变后的 state ,类型为 IStoreState 没有任何问题;第二个参数 ownProps 为从父组件传入的 props 。通过这种方式,容器组件可以监听 store 以及父组件传入 props 的变化,然后重新被计算 mapStateToProps ,从而影响组件,更新UI。
mapDispatchToProps (dispatch: Dispatch, ownProps: IStateProps)
mapDispatchToProps :用于建立组件跟 store 的dispatch的映射关系。可以是一个对象,也可以是一个函数,传入dispatch 和 ownProps ,定义该组件如何发出 action ,即调用 dispatch 方法。
// srccomponentsTodosItemindex.tsx

import { Dispatch } from 'redux';
import { IStoreState } from '../../stores/types/index';
import * as actions from '../../stores/actions';

interface IStateProps {
  id: number;
  isCompleted: boolean;
  title: string;
}
interface IDispatcherProps {
  deleteTodo: () => void;
  toggleTodo: () => void;
  editTodo: (text: string) => void;
}

// 将 reducer 中的状态插入到组件的 props 中
const mapStateToProps = (state: IStoreState, ownProps: IStateProps): IStateProps => ({
  id: ownProps.id,
  isCompleted: ownProps.isCompleted,
  title: ownProps.title
});

// 将 对应action 插入到组件的 props 中
const mapDispatcherToProps = (dispatch: Dispatch, ownProps: IStateProps): IDispatcherProps => ({
    deleteTodo: () => dispatch(actions.deleteTodo(ownProps.id)),
    toggleTodo: () => dispatch(actions.toggleTodo(ownProps.id)),
    editTodo: (text: string) => dispatch(actions.editTodo(ownProps.id, text))
});
在组件中,我们可以通过 this.props.xxx 获取这些映射过来的 store 数据来渲染组件,以及 mapDispatcher 方法来改变 store 。

接下来,我们使用 connect() 方法将 store 中的数据作为 props 绑定到组件上:
// srccomponentsTodosItemindex.tsx

import { connect } from 'react-redux';

export type ReduxType = ReturnType<typeof mapStateToProps> & ReturnType<typeof mapDispatcherToProps>;

export class TodosItem extends React.Component<ReduxType> {
  ... ...
}

export default connect(mapStateToProps, mapDispatcherToProps)(TodosItem);
项目核心的文件结构

总结
写这篇文章,主要是为了对之前使用 TypeScript - React - Redux 三者结合的开发总结,主要讨论了和普通 JavaScript 开发的不同点,以及如何使用 TypeScript 的一些特性提高我们的开发效率、提高我们的项目质量,包括如何使用 interface ,如何为组件的 props 和 state 定义类型,以及如何集成 Redux 等等。如果大家有任何疑问或发现任何错误,欢迎指出~~ 另外附上 TodoList 源码 ,欢迎大家参考阅读。
参考:Adding state management
参考:how-to-use-typescript-with-react-and-redux
React + Redux + TypeScript — into the better frontend (tutorial)
参考:How to use Redux in typescript
使用 TypeScript + React + Redux 进行项目开发(入门篇,附源码)


 1896
1896

 被折叠的 条评论
为什么被折叠?
被折叠的 条评论
为什么被折叠?
 到【灌水乐园】发言


