


Spring Boot最好的学习方法就是实战训练,今天我们用很短的时间启动我们第一个Spring Boot应用,并且制作一个文件上传系统, 用户可以将本地文件上传到服务器上。我将假设读者为几乎零基础,在实战讲解中会渗透Spring框架中的一些知识点,并提供相关官方文档链接, 让我们一起在实战中高效学习。
该文章来自于我的Github项目

, 该项目里有详细的实战Spring Boot小应用工程源代码和配套详解, 在每个小应用中的README.md就是该小项目的讲解, 本篇文章来自gs-niudai-uploading-files项目中的README.md文件,文体两开花,多多关注。
看完这篇教程, 你将做出这样一个应用:
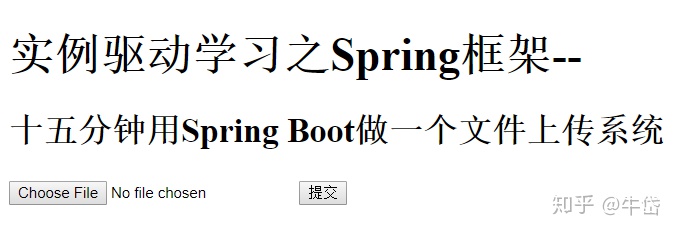
用户点击Choose File按钮, 会打开用户本地的文件系统, 点击提交会将用户选中的文件上传到我们的服务器中。
在这篇文章中,你将学到:
@ConfigurationProperties注解的使用方法。CommandLineRunner的使用方法。- 与文件相关的API, 比如
File,Path,Resource,MultipartFile等的用法。 - 在Spring中, 如何接受并处理用户传入的
MultipartFile。
创建我们的Spring Boot应用
首先在你的IDE中创建我们的Spring Boot应用,选择Web模块和Thymeleaf模块,答主用的是Visual Studio Code,关于具体如何在其中创建应用,请参考本人之前的文章:
十五分钟用Spring Boot+MySQL做一个登陆系统
StoreService 接口及其实现
StoreService的接口, 我们通过调用这个接口来实现对用户传入文件的储存, 删除, 初始化等操作:
package org.springframework.gsniudaiuploadingfiles;

import java.nio.file.Path;
import java.util.stream.Stream;

import org.springframework.core.io.Resource;
import org.springframework.stereotype.Service;
import org.springframework.web.multipart.MultipartFile;

/**
 * 存储服务的接口, 用来存储, 删除, 调用用户传入
 * 的文件。
 */
@Service
public interface StoreService {

    /**
     * 储存用户传入的文件。
     * @param file
     */
    void store(MultipartFile file);

    /**
     * 初始化用户储存用户文件的文件夹。
     */
    void init();

    /**
     * 根据文件名返回用户存储的文件。
     * @param filename 文件名
     * @return 文件路径
     */
    Resource retrieve(String filename);

    /**
     * 根据用户名返回用户存储的文件的路径。
     * @param filename 文件名
     * @return 文件路径
     */
    Path retrievePath(String filename);

    /**
     * 返回用户传入所有文件的文件名,以Stream的形式。
     * @return
     */
    Stream<Path> retrieveAllPath();

    /**
     * 删除所有用户传入的文件。
     */
    void deleteAll();

}先写一个这样的接口,它作为抽象层,本身没有什么东西,我们可以在方法注释中看到这些接口的功能。
然后我们写一个具体的实现,StoreFileService.java:
@Service
public class StoreFileService implements StoreService {
    private final Logger logger = LoggerFactory.getLogger(StoreFileService.class); // 用Logger打印日志
    private final Path rootDirectory; // 存储用户名的文件夹位置

    /**
     * 传入了一个参数:storeProperties,故名思意就是“存储属性”,一切关于存储
     * 有关的属性,比如用户文件存储在哪里,一个文件夹里最多储存多少文件等,这些
     * 属性都存储在storeProperties中。
     * 使用@Autowired让IoC容器自动注入你的StoreProperties依赖。
     * @param storeProperties
     */
    @Autowired
    public StoreFileService(StoreProperties storeProperties) {
        rootDirectory = Paths.get(storeProperties.getLocation());
    }

    /**
     * 先使用File API中的 .getInputStream() 获得传入文件的输入流(InputStream),
     * 再调用Files API 中的 .copy(InputStream, target, copyType) 来将传入的文件
     * 写进目标路径中, target就是我们的目标路径, 详情可查阅相关文档。
     */
    @Override
    public void store(MultipartFile file) {
        String filename = file.getOriginalFilename();
        logger.info("filename");
        try {
            InputStream inputStream = file.getInputStream();
            Files.copy(inputStream, this.rootDirectory.resolve(filename), StandardCopyOption.REPLACE_EXISTING);
        } catch (IOException e) {
            throw new StorageException("Failed to store file ");
        }
    }

    /**
     * 使用File API中的.mkdir()创建一个目录, 目录是由rootDirectory指定的。
     */
    @Override
    public void init() {
        File file = new File(rootDirectory.toString());
        file.mkdir();
    }

    /**
     * 使用Spring Mvc推荐的UrlResource API来获取我们的储存
     * 文件,先把Path路径转换成URI,再传入到UrlResource中,获得
     * 我们的指定文件。
     */
    @Override
    public Resource retrieve(String filename) {
        Path path = retrievePath(filename);
        Resource resource;
        try {
            resource = new UrlResource(path.toUri());
            return resource;
        } catch (MalformedURLException e) {
            throw new StorageException("Failed to store file ");
        }
    }

    /**
     * 使用了Path API中的 .resolve 方法, 让文件名附着在存储文件夹的路径后, 构成
     * 文件的完整路径。
     */
    @Override
    public Path retrievePath(String filename) {
        return rootDirectory.resolve(filename);
    }

    /**
     * 使用Files API 中的 .walk 方法, 对根目录中所有直接子
     * 文件进行扫描,该方法返回一个Stream对象,关于Java Stream
     * API的内容大家可以去查阅相关内容。
     */
    @Override
    public Stream<Path> retrieveAllPath() {
        try {
            return Files.walk(rootDirectory, 1).
                filter(path -> !path.equals(this.rootDirectory))
                .map(rootDirectory::relativize);
        }
        catch(IOException e) {
            throw new StorageException("Failed to read stored files", e);
        }
    }

    /**
     * 使用 FileSystemUtils API 中的 .deleteRecursively()方法将文件夹中
     * 的所有文件全部删除, 用于文件夹的清零。
     */
    @Override
    public void deleteAll() {
        FileSystemUtils.deleteRecursively(rootDirectory.toFile());
    }

}在上面的类中出现了我们自定义的一个类:StoreProperties,我们来看它的代码:
/**
 * 知识点讲解:
 * 1. @ConfigurationProperties 注解
 *    注有该注解的类, 类中的变量可以通过外接的.properties文件进行配置, 比如下面这个例子, 由于我在application.properties文件中声明了"storage.location=upload", 在Spring运行过程中, location的值会被配置为"upload", 这也是一种依赖注入的方式.
 */
@ConfigurationProperties("store")
public class StoreProperties {
    private String location;

    public String getLocation() {
        return this.location;
    }

    public void setLocation(String location) {
        this.location = location;
    }

}我们再写一个StorageException,当文件储存出现错误时,抛出这个Exception:
public class StorageException extends RuntimeException {
    private static final long serialVersionUID = 1L;

    public StorageException(String message) {
        super(message);
    }
    public StorageException(String message, Throwable cause) {
        super(message, cause);
    }
}
小贴士: 由于我们经常使用这种自定义的Exception,我们可以在Visual Studio Code中自定义一个代码碎片(Code Snnipet), 当我们再需要写这段代码的时候,直接打出它的前缀,编辑器会为我们自动补全这段代码。
在编辑器中选择File -> Preferences -> User Snnipet, 然后在弹出的页面中选择Java语言,说明我们现在的代码随便只对Java语言有效。

然后代开我们的代码碎片编辑页面,发现这个编辑文件是json格式的,这不奇怪,我们只需按照注释中的提示将我们的代码碎片写进去:
"Exception Extension": {
        "prefix": "exception",
        "body": [
            "public class $1 extends RuntimeException {",
            "tprivate static final long serialVersionUID = 1L;",
            "tpublic $1(String message) {",
            "ttsuper(message);",
            "t }",
            "tpublic $1(String message, Throwable cause) {",
            "ttsuper(message, cause);",
            "t}",
            "}"
        ],
        "description": "Exception extends RuntimeException"
}我们在body中写上我们的代码碎片,缩进用t替代,每行代码分别用引号括住,就是常规的json格式,然后在prefix中写上exception,这样我们在java文件中就可以打出exception, 智能补全会弹出我们的代码碎片,选择了我们的代码碎片后,就可以直接调出我们的这块代码,description则是对我们代码碎块的描述,类似于文档。
更详细的教程,请参考Visual Studio Code官方教程:
怎样使用代码碎片功能
前端静态HTML页面
在src/main/resources/templates中创建一个html文件,命名为index.html,它就是我们的入口页面,而支持它工作的正是我们的ThymeLeaf模板引擎。
简单的写个表单(Form):
<!DOCTYPE html>
<html lang="en">
<head>
    <meta charset="UTF-8">
    <meta name="viewport" content="width=device-width, initial-scale=1.0">
    <meta http-equiv="X-UA-Compatible" content="ie=edge">
    <title>文件上传实例</title>
</head>
<body>
    <h1>实例驱动学习之Spring框架--</h1>
    <h2>十五分钟用Spring Boot做一个文件上传系统</h2>
    <form action="/" method="POST" enctype="multipart/form-data">
        <input name="file" value="上传文件" type="file">
        <input type="submit" value="提交">
    </form>


</body>
</html>注意到我们的第一个input标签,它的类型是file, 也就是文件, 因为我们要传入的不是普通的文本text或是密码password, 而是文件本身, 而且在form的属性中, enctype的值为multipart/form-data, 一般而言如果用户上传的是文件, 我们就要使用multipart/form-data。
Spring MVC中的Controller
写完了我们的StoreService, 我们可以开始Controller的开发, 创建一个UploadController.java作为我们的控制器。
@Controller
public class UploadController {

    private final StoreService storeService;

    /**
     * 构造函数,传入一个StoreService,IoC容器会自动注入该实例,
     * 也就是我们的StoreFileService的实例。
     * @param storeService
     */
    @Autowired
    public UploadController(StoreService storeService) {
        this.storeService = storeService;
    }

    /**
     * 将“/”对应的Post请求映射到这个方法,然后存储文件,返回一个跳转页面,并且将成功上传页面的信息
     * 传给下一个页面。
     * 知识点:FlashAttribute 详情请参见本人文章:
     * 《Spring MVC 之 Flash Attribute详解》https://zhuanlan.zhihu.com/p/55983646
     * @param file 用户上传的文件
     * @param redirectAttributes 跳转属性
     * @return 跳转页面名
     */
    @PostMapping("/")
    public String uploadHandler(@RequestParam("file") MultipartFile file,
                RedirectAttributes redirectAttributes) {
        // we need an interface for storing the file, and an implementation of the store interface.
        storeService.store(file);
        redirectAttributes.addFlashAttribute("message", "you successfully uploaded");
        // store the file
        return "redirect:/";
    }

    /**
     * 映射到入口页面。
     */
    @GetMapping("/")
    public String index() {
        return "index";
    }

}
CommandLineRunner和@ConfigurationProperties
这是最后的工作了, 打开我们含有main方法的DemoApplication.java, 做如下更改:
- 在类名上方增加注解
@EnableConfigurationProperties, 加上它后, 我们的StoreProperties才能生效。 - 增加一个返回
CommandLineRunner的方法init,在该方法上方增加注解@Bean。
注有@Bean的方法,它们返回的对象会被装进IoC容器中,而返回CommandLineRunner的方法会在Spring Boot应用运行开始是运行, 所以我们将它用作初始化服务端储存空间的init函数的返回值。
init方法为:
@Bean
CommandLineRunner init(StoreService storagService) {
    return (args) -> {
        storagService.deleteAll();
        storagService.init();
    }
}可以看到我们先进行了deleteAll(), 再进行init(), 也就是说每次Spring Boot应用重新运行的时候, 原有的储存信息都会被清空, 适合开发状态的应用。


 3549
3549


 被折叠的 条评论
为什么被折叠?
被折叠的 条评论
为什么被折叠?
 到【灌水乐园】发言


