


上文中,我们已经顺利的完成了Nginx的安装,从本文开始我们真正的进入到Nginx的配置和使用。
我们通过rpm命令可以查看Nginx安装之后文件都放在了哪里(rpm 是linux的rpm包管理工具),命令如下:
rpm -ql nginx
我们可以看到,Nginx的主要配置都在/etc/nginx这个目录下,usr/share是我们的服务目录,前面的文章提到,Nginx是模块化的设计,在配置这块这个特点有所体现,那么哪些配置文件是经常需要维护的或者需要我们了解的呢?
nginx.conf配置文件:
nginx.conf文件是Nginx总配置文件,也是我们经常需要维护的文件,文件路径如下
/etc/nginx/我们使用vim进入该配置文件,终端命令如下:
vim /etc/nginx/nginx.conf我们看到nginx.conf内容如下:
user  nginx;
worker_processes  1;

error_log  /var/log/nginx/error.log warn;
pid        /var/run/nginx.pid;

events {
    worker_connections  1024;
}

http {
    include       /etc/nginx/mime.types;
    default_type  application/octet-stream;

    log_format  main  '$remote_addr - $remote_user [$time_local] "$request" '
                      '$status $body_bytes_sent "$http_referer" '
                      '"$http_user_agent" "$http_x_forwarded_for"';

    access_log  /var/log/nginx/access.log  main;

    sendfile        on;
    #tcp_nopush     on;

    keepalive_timeout  65;

    #gzip  on;

    include /etc/nginx/conf.d/*.conf;
}                                                                                                           1,0-1        全部
配置项很多,我们分别解释:
#我们看到nginx.conf中通过include加载了子配置项,我们去看一下这里边配置了什么内容,
终端中输入命令如下:
vim /etc/nginx/conf.d/default.conf打开之后内容如下:
server {
    listen       80;
    server_name  localhost;

    #charset koi8-r;
    #access_log  /var/log/nginx/host.access.log  main;

    location / {
        root   /usr/share/nginx/html;
        index  index.html index.htm;
    }

    #error_page  404              /404.html;

    # redirect server error pages to the static page /50x.html
    #
    error_page   500 502 503 504  /50x.html;
    location = /50x.html {
        root   /usr/share/nginx/html;
    }

    # proxy the PHP scripts to Apache listening on 127.0.0.1:80
    #
    #location ~ .php$ {
    #    proxy_pass   http://127.0.0.1;
    #}

    # pass the PHP scripts to FastCGI server listening on 127.0.0.1:9000
    #
    #location ~ .php$ {
                                                                                                                      1,1          顶端
    #}

    # pass the PHP scripts to FastCGI server listening on 127.0.0.1:9000
    #
    #location ~ .php$ {
    #    root           html;
    #    fastcgi_pass   127.0.0.1:9000;
    #    fastcgi_index  index.php;
    #    fastcgi_param  SCRIPT_FILENAME  /scripts$fastcgi_script_name;
    #    include        fastcgi_params;
    #}

    # deny access to .htaccess files, if Apache's document root
    # concurs with nginx's one
    #
    #location ~ /.ht {
    #    deny  all;
    #}
}
我们看到主要的配置是在server这个下边的,原来这里是配置Nginx跟服务器相关的一些内容,具体解释如下(默认是没有开启部分内容的注释的):
#设定虚拟主机配置
server {
        #侦听80端口
        listen    80;
        #定义使用 localhost访问, 转发到哪个地址
        server_name  localhost;

        #定义服务器的默认网站根目录位置
        root html;

        #设定本虚拟主机的访问日志
        access_log  logs/nginx.access.log  main;

        #默认请求
        location / {

            #定义首页索引文件的名称
            index index.php index.html index.htm;

        }

        # 定义错误提示页面
        error_page   500 502 503 504 /50x.html;
        location = /50x.html {
        }

        #静态文件,nginx自己处理
        location ~ ^/(images|javascript|js|css|flash|media|static)/ {

            #过期30天,静态文件不怎么更新,过期可以设大一点,
            #如果频繁更新,则可以设置得小一点。
            expires 30d;
        }

        #PHP 脚本请求全部转发到 FastCGI处理. 使用FastCGI默认配置.
        location ~ .php$ {
            fastcgi_pass 127.0.0.1:9000;
            fastcgi_index index.php;
            fastcgi_param  SCRIPT_FILENAME  $document_root$fastcgi_script_name;
            include fastcgi_params;
        }

        #禁止访问 .htxxx 文件
            location ~ /.ht {
            deny all;
        }

    }
我们从配置中看到,我们的服务目录是放在/usr/share/nginx/html下的,我们进去看看
命令如下:
cd /usr/share/nginx/html我们看到,默认该目录下只有50x.html index.html两个文件,而index.html就是你的Nginx默认的服务映射地址了,也就是通过你的服务器的公网ip访问会默认到index.html,我们看一下index.html的网页内容,然后验证一下:
命令如下:
vim index.html我们看到index.html的内容如下:
<!DOCTYPE html>
<html>
<head>
<title>Welcome to Nginx!</title>
<style>
body {
width: 35em;
margin: 0 auto;
font-family: Tahoma, Verdana, Arial, sans-serif;
}
</style>
</head>
<body>
<h1>Welcome to nginx!</h1>
<p>If you see this page, the nginx web server is successfully installed and
working. Further configuration is required.</p>
<p>For online documentation and support please refer to
<a href="http://nginx.org/">nginx.org</a>.<br/>
Commercial support is available at
<a href="http://nginx.com/">nginx.com</a>.</p>
<p><em>Thank you for using nginx.</em></p>
</body>
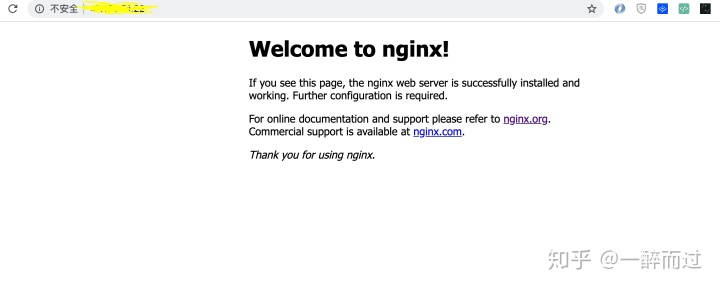
</html>我们通过浏览器访问你的服务器的公网ip内容呈现如下:
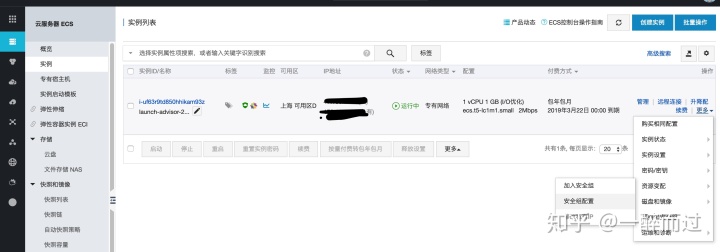
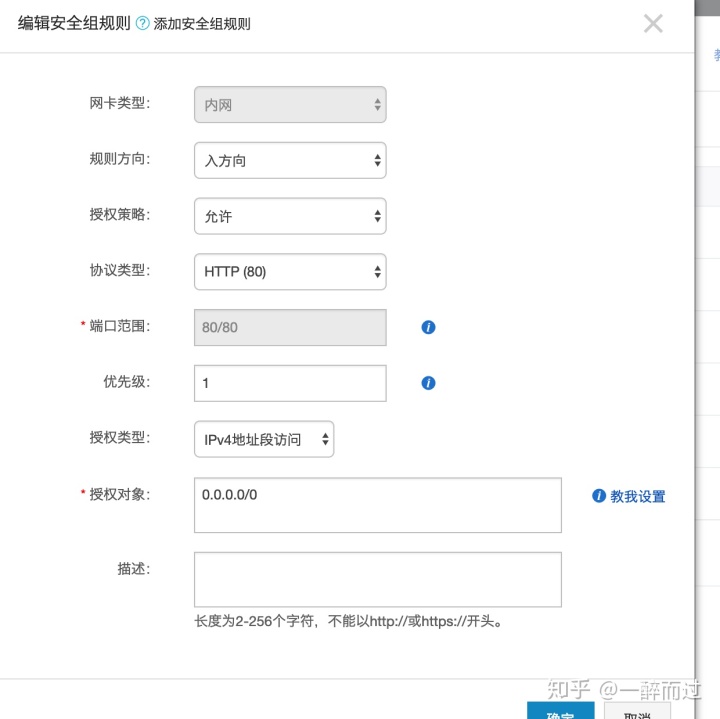
如果不能出现上述画面,可能需要配置一下对应的服务器安全配置,阿里云ECS路径如下:
配置规则如下:
腾讯云的配置因为我过年期间服务器到期,所以暂时没有截图请大家自行百度吧,顺便祝大家新年快乐!


 2769
2769


 被折叠的 条评论
为什么被折叠?
被折叠的 条评论
为什么被折叠?
 到【灌水乐园】发言


