


在自动化测试中,我们一般需要将python脚本进行参数化,才可以实现命令行的自动化调用。
简单来说,就是将代码变成一个独立的程序,从而可以在terminal中随意改变其中调用的文件、特异性数据等,而不用进入原单代码界面进行操作,也可以在此基础上对命令行的输入进行自动化处理,从而最大限度将软件测试工作自动化。以下为三种最常用的python模块。使用时调参即可。
#注意:
1.Windows命令行调用时需要在前面加python,而且最好先使用以下命令来进入当前文件夹位置,符号全为英文!!!
cd .Desktop#我的脚本文件.py在桌面2.如果函数外的变量想用于函数内,则需要将其全局化(global)
xxx = 23
def PrintFileName(strFileName):
    global xxx #此位置需要记牢 在主函数下方第一行 如果去掉,print将不可运行
    if xxx == 23:
        print (strFileName )
        xxx = 24 #这里的xxx是函数内的 外面的xxx仍然是23

print(PrintFileName("file") )
1、第一个方法:使用sys模块
import sys
def test_for_sys(year, name, body):
    print('the year is', year)#写实现功能
    print('the name is', name)
    print('the body is', body)
  #注意,此处的三个变量为局部变量 如果有其他功能 一定要写到此函数内才能调用这些变量


if __name__ == '__main__': #检测是否调用到这个文件.py
    try:
        year, name, body = sys.argv[1:4]#将三个变量传入列表
        test_for_sys(year, name, body)#调用上面的函数来执行操作
    except Exception as e:
        print(sys.argv)
        print(e)#这是报错指示功能
效果如下:值得注意的是 不同变量之间用空格 比较方便 但通常测试时的格式是“-variable”
G:Allcodestestscripts>python test_cmd.py 2018 Leijun "are you ok?"
the year is 2018
the name is Leijun
the body is are you ok?
如果运行失败:形成列表 提示你变量不够
G:Allcodestestscripts>python test_cmd.py 2018 Leijun
['test_cmd.py', '2018', 'Leijun']
not enough values to unpack (expected 3, got 2)
###如果你输入的参数比函数需要的多,那么无所谓,
多的参数因为不会被提取使用,所以不影响脚本运行。小结:sys.argv 形式传入参数的方式比较简单,但是也很死板,因为传入的参数是一个有序的列表,所以在命令行中必须按照脚本规定的顺序去输入参数,这种方法比较适合脚本中需要的参数个数很少且参数固定的脚本。
2、argparse 模块argparse 模块也是 Python 自带的一个命令行参数模块,这个模块才是真的为了命令行参数而生的模块 ,使用空格和“-”符号实现不同变量之间的分割
import argparse


def test_for_sys(year, name, body):
    print('the year is', year)
    print('the name is', name)
    print('the body is', body)#同上 定义函数功能


parser = argparse.ArgumentParser(description='Test for argparse')
parser.add_argument('--name', '-n', help='name 属性,非必要参数')
parser.add_argument('--year', '-y', help='year 属性,非必要参数,但是有默认值', default=2017)#此处定义每个参数的必要性
parser.add_argument('--body', '-b', help='body 属性,必要参数', required=True)#"-b"是"--body"的简写
args = parser.parse_args()


if __name__ == '__main__':
    try:
        test_for_sys(args.year, args.name, args.body)#此处调参即可
    except Exception as e:
        print(
在添加命令行参数的属性的时候,还可以有更多的设置,如下:
- name or flags:也就是在使用参数的时候使用的符号,
--foo或者-f - action:根据我的理解,这个属性可以选择参数在只提供符号而不输入实际的值的时候给予一个默认的值
- nargs:这个属性规定了参数可以输入的个数
- const:这属性跟 action 属性一起使用
- default:这属性就是给参数设置一个默认值
- type:这个属性规定了参数的数据类型
- choices:这个属性给参数限定了一个选择的迭代,参数只能在这个范围内选择参数的值,否则报错
- required:参数的值为必填
更多的参数介绍和使用可以查看官方文档:Python 官方文档:argparse
3、click 库 这是一个第三方库,专门为了命令行而生的非常有名的 Python 命令行模块。
import click#单独安装  pip install click


@click.command()
@click.option('--name',default='Leijun',help='name 参数,非必须,有默认值')
@click.option('--year',help='year 参数',type=int)
@click.option('--body',help='body 参数')
def test_for_sys(year, name, body):
    print('the year is', year)
    print('the name is', name)
    print('the body is', body)


if __name__ == '__main__':
    test_for_sys()
#click 库也是一个非常人性化的命令行参数模块,它其实非常强大,强大到把所有的命令行参数可能涉及的情况都考虑到了,需要自己去探索
4、总结:以上就是三种最流行的python参数化模块
sys模块比较基础,使用sys的列表化,方便传入大量参数,但是用起来不够方便(copy以后调参就很方便了),也不是一个真正意义上的参数化测试模块;argparse模块是 Python 自带的一个命令行参数模块,这个模块才是真的为了命令行参数而生的模块,使用起来功能强大,具有官方气息,就像matplotlib;最后一个click 模块是一个第三方模块,使用起来及其方便,功能也很强大,就像seaborn。
整体来说,逻辑都很简单:
首先,用def来定义功能,然后,确定参数导入的方法和格式要求,最后,用try except功能来实现调用执行或者报错。
以上是三种最基础的参数化工具,同时我们也可以在此基础上编写非常复杂的测试脚本,值得注意的是全局变量和局部变量很容易混淆,因此测试脚本最好编写在def框架内。
以下是我今天做的一个小项目,输入参数后会实现自动导入不同的文档,并实现自动绘图功能
import seaborn as sns
import numpy as np
import matplotlib.pyplot as plt
import pandas as pd
import matplotlib.dates as mdates
import time
import argparse
def test_for_sys(test,reference, output):
    def draw(a,b,c):
        font1 = {
        'weight' : 'normal',
        'size'   : 8
        }
        font2 = {
        'weight':'normal',
        'size': 8}
        plt.rcParams['figure.figsize'] = (10.24, 7.68)
        plt.rcParams['image.cmap'] = 'Red'
        plt.rcParams.update({"font.size":8,'font.weight' : 'normal'})
        sns.set_style("whitegrid")
        names=["Date","Case1","Case2","Case3","Case4","Case5"]
        Ref=pd.read_csv("%s"%(b),names=names,dtype={"Date":object})
        Exp=pd.read_csv("%s"%(a),names=names,dtype={"Date":object})
        plt.subplots_adjust(hspace=0.2,wspace=0.4)
        plt.subplot(2,1,1)
        dates = list(Exp["Date"])
        #dates = [ str(x) for x in dates ]
        #date =list((datetime.strptime(a, '%Y%m%d').strftime('%m/%d/%Y') for a in dates))
        #转化成'06/16/2020‘这种格式
        plt.plot(dates,list(Exp['Case1']),marker= '+',label='Case1',linestyle='-',linewidth=1.5,ms=4)
        labels=dates
        plt.xticks(dates, labels)
        plt.plot(dates,Exp['Case1'],marker= '<',label='Case2',linestyle='-',linewidth=1.5,ms=4)
        plt.plot(dates,Exp['Case3'],marker= 'D',label='Case3',linestyle='-',linewidth=1.5,ms=4)
        plt.plot(dates,Exp['Case4'],marker= '*',label='Case4',linestyle='-',linewidth=1.5,ms=4)
        plt.plot(dates,Exp['Case5'],marker= 'd',label='Case5',linestyle='-',linewidth=1.5,ms=4)
        plt.legend(loc='best')
        plt.xlabel('Date',font1)
        plt.ylabel('value',font1)
        Bar_Compare=Ref.append(Exp.iloc[-1])
        plt.subplot(2,5,6)
        sns.barplot(x="Date",y="Case1",data=Bar_Compare,hue=["before","after"])
        plt.xlabel('Case1',font2)
        plt.ylabel('value',font2)
        plt.subplot(2,5,7)
        sns.barplot(x="Date",y="Case2",data=Bar_Compare,hue=["before","after"])
        plt.xlabel('Case2',font2)
        plt.ylabel('value',font2)
        plt.subplot(2,5,8)
        sns.barplot(x="Date",y="Case3",data=Bar_Compare,hue=["before","after"])
        plt.xlabel('Case3',font2)
        plt.ylabel('value',font2)
        plt.subplot(2,5,9)
        sns.barplot(x="Date",y="Case4",data=Bar_Compare,hue=["before","after"])
        plt.xlabel('Case4',font2)
        plt.ylabel('value',font2)
        plt.subplot(2,5,10)
        sns.barplot(x="Date",y="Case5",data=Bar_Compare,hue=["before","after"])#hue:legend
        plt.xlabel('Case5',font2)
        plt.ylabel('value',font2)
        plt.savefig("%s"%(c))#自动保存图片
        plt.show()
    draw(test,reference, output)
parser = argparse.ArgumentParser(description='Test for argparse')
parser.add_argument('--test', '-s', help='name 属性 必要参数 实验文件')
parser.add_argument('--reference', '-r', help='year 属性,必要参数 参照文件')
parser.add_argument('--output', '-o', help='body 属性,非必要参数 导出图片')
args = parser.parse_args()
if __name__ == '__main__':
    try:
        test_for_sys(args.test, args.reference, args.output)
    except Exception as e:
        print(e)
#示例:在terminal里输入
python 11.py -s test.csv -r ref.csv -o fsfs.png     #输入两个csv文件 生成一个图表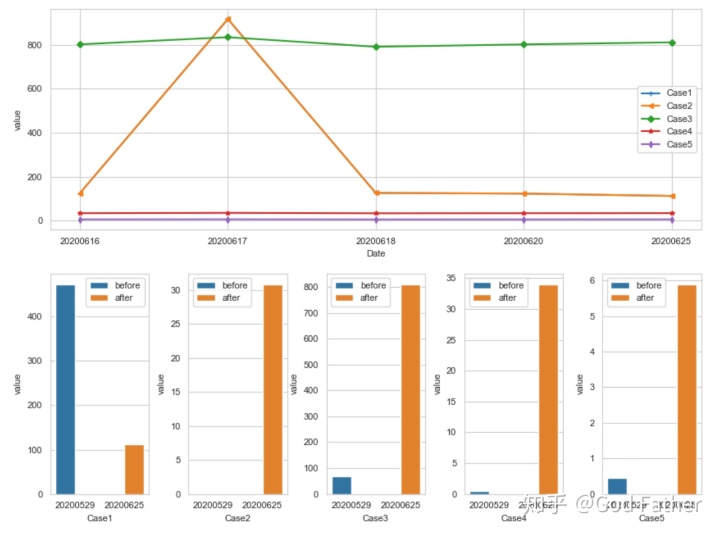


 8339
8339

 被折叠的 条评论
为什么被折叠?
被折叠的 条评论
为什么被折叠?
 到【灌水乐园】发言


