


光有理论,没有实践是不行的,本篇文章就是介绍JDBC如何使用。
本文知识点分布如下:
- 下载数据库驱动
- 创建项目添加驱动
- 通过 Statement 向表中插入数据
- 通过 Statement 对象修改表中的数据
- 封装 JDBC 工具类
- 通过 Statement
- ResultSet 讲解
- 通过 ResultSet 实现逻辑分页
- 什么是 SQL 注入?
- PreparedStatement 对象的使用(重点)
- PreparedStatement 的预编译能力
- 通过 PreparedStatement
- 通过 PreparedStatement 对象完成数据的查询
- PreparedStatement
- JDBC 中的事务
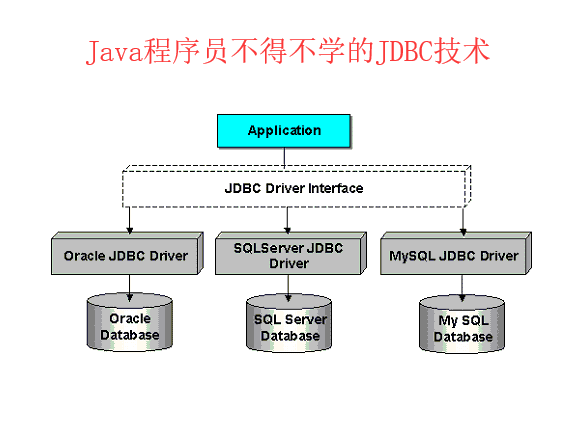
三、 JDBC 的使用
加载数据库驱动程序 → 建立数据库连接 Connection → 创建执行 SQL 的语句
Statement → 处理执行结果 ResultSet → 释放资源。
1 下载数据库驱动
1.1 MySQL 驱动
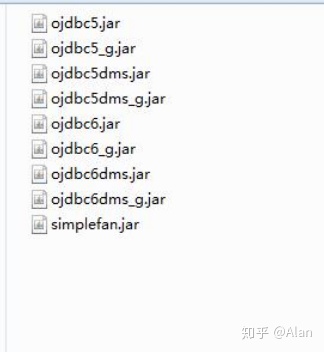
Download Connector/Jdev.mysql.com1.2 Oracle 驱动
数据库安装目录oracleproduct11.2.0dbhome_1jdbclib
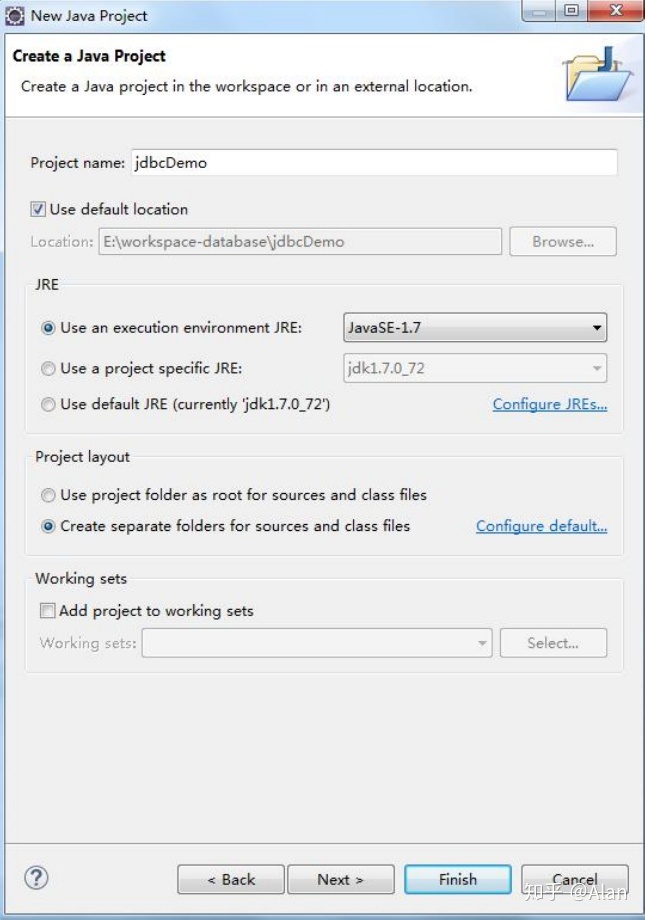
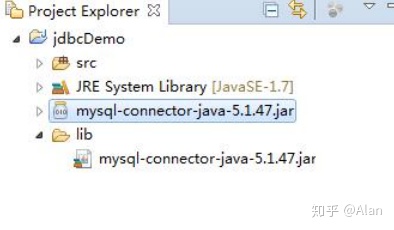
2 创建项目添加驱动
3 通过 Statement 向表中插入数据
3.1 注册驱动
Class.forName("com.mysql.jdbc.Driver");3.2 获取链接
Connection conn=DriverManager.getConnection("jdbc:mysql://localhost:3306/bjsxt?useUnicode=true&characterEncoding=utf-8","root", "root");3.3 执行 SQL
String sql="insert into departments values(default,'"+department_name+"'"+location_id+")";
Statement state = conn.createStatement();
3.4 释放资源
if(state != null){
try {
state.close();
} catch (SQLException e) {
// TODO Auto-generated catch block
e.printStackTrace();
}
}
if(conn != null){
try {
conn.close();
} catch (SQLException e) {
// TODO Auto-generated catch block
e.printStackTrace();
}
}
4 通过 Statement 对象修改表中的数据
4.1 代码:
//更新 departments 表中的 department_id 为 6 的数据,将部门名称修改为教学部,location_id 修改为 6。
5 封装 JDBC 工具类
5.1 普通版
5.1.1 工具类代码.
/**
* jdbc 工具类
* @author Alan
*
*/
public class JdbcUtil {
private static String driver = "com.mysql.jdbc.Driver";
private static String jdbcUrl="jdbc:mysql://localhost:3306/bjsxt?useUnicode =true&characterEncoding=utf-8";
private static String username ="root";
private static String userpassword="root";
static{
try {
Class.forName(driver);
} catch (ClassNotFoundException e) {
e.printStackTrace();
}
}
//获取 Connection 对象
public static Connection getConnection(){
Connection conn = null;
try {
conn = DriverManager.getConnection(jdbcUrl,username, userpassword);
} catch (SQLException e) {
// TODO Auto-generated catch block
e.printStackTrace();
}
return conn;
}
//关闭 Statement
public static void closeStatement(Statementstate){
try {
if(state != null){
state.close();
}
} catch (SQLException e) {
e.printStackTrace();
}
}
//关闭 Connection
public static void closeConnection(Connection
conn){
try {
if(conn != null){
conn.close();
}
} catch (SQLException e) {
e.printStackTrace();
}
}
//關閉資源
public static void closeResource(Statement
state,Connection conn){
closeStatement(state);
closeConnection(conn);
}
}
5.2 升级版
5.2.1 工模具类代码
/**
* jdbc 工具类
* @author Administrator
*
*/
public class JdbcUtil {
private static String driver;
private static String jdbcUrl;
private static String username;
private static String userpassword;
static{
//读取 Properties 文件
ResourceBundle bundle =
ResourceBundle.getBundle("jdbc");
driver = bundle.getString("driver");
jdbcUrl= bundle.getString("jdbcUrl");
username = bundle.getString("username");
userpassword =bundle.getString("userpassword");
try {
Class.forName(driver);
} catch (ClassNotFoundException e) {
e.printStackTrace();
}
}
//获取 Connection 对象
public static Connection getConnection(){
Connection conn = null;
try {
conn = DriverManager.getConnection(jdbcUrl,
username, userpassword);
} catch (SQLException e) {
// TODO Auto-generated catch block
e.printStackTrace();
}
return conn;
}
//关闭 Statement
public static void closeStatement(Statement
state){
try {
if(state != null){
state.close();
}
} catch (SQLException e) {
e.printStackTrace();
}
}
//关闭 Connection
public static void closeConnection(Connection
conn){
try {
if(conn != null){
conn.close();
}
} catch (SQLException e) {
e.printStackTrace();
}
}
//關閉資源
public static void closeResource(Statement
state,Connection conn){
closeStatement(state);
closeConnection(conn);
}
}
6 通过 Statement 对象查询数据
6.1 代码
//查询 Departmetns 表中部门 ID 为 6 的部门信息
public void selectDepartmentsById(int
departmentId){
Connection conn = null;
Statement state = null;
ResultSet rs = null;
try{
conn= JdbcUtil.getConnection();
state = conn.createStatement();
String sql = "select * from departments d where
d.department_id = "+departmentId;
//执行查询返回结果
rs=state.executeQuery(sql);
while(rs.next()){
System.out.println(rs.getInt("department_id")+"
"+rs.getString("department_name")+" "+rs.getInt(3));
}
}catch(Exception e){
e.printStackTrace();
}finally{
JdbcUtil.closeResource(state, conn,rs);
}
}
7 ResultSet 讲解
注意 ResultSet 中封装的并不是我们查询到的所有的结果集,而是返回了查询到的结果
集的数据库游标。通过 ResultSet 中的 next()方法操作游标的位置获取结果集。
8 通过 ResultSet 实现逻辑分页
8.1 代码
//查询 departments 表中的所有的数据,并且通过 ResultSet 实现逻辑分
页
public void selectDeptPage(int currentPage,int pageRows){
Connection conn = null;
Statement state = null;
ResultSet rs = null;
try{
conn = JdbcUtil.getConnection();
state = conn.createStatement();
String sql = "select * from departments";
rs = state.executeQuery(sql);
//开始位置与结束位置
int begin = (currentPage -1)*pageRows;
int end = currentPage * pageRows;
//当前位置的计数器
int currentNum = 0;
while(rs.next()){
//什么情况下获取结果集中的数据
if(currentNum >= begin && currentNum < end){
System.out.println(rs.getInt("department_id")+"
"+rs.getString("department_name"));
//结束操作 ResultSet 的边界条件
if(currentNum == end -1){
break;
}
}
currentNum++;
}
}catch(Exception e){
e.printStackTrace();
}finally{
JdbcUtil.closeResource(state, conn, rs);
}
}
9 SQL 注入问题
9.1 什么是 SQL 注入
所谓 SQL 注入,就是通过把含有 SQL 语句片段的参数插入到需要执行的 SQL 语句中,最终达到欺骗数据库服务器执行恶意操作的 SQL 命令。
9.2 SQL 注入案例
//sql 注入
public void sqlInject(String departmentName,int
locationId){
Connection conn = null;
Statement state = null;
ResultSet rs = null;
try{
conn = JdbcUtil.getConnection();
state = conn.createStatement();
String sql = "select * from departments where
department_name ='"+departmentName+"' and location_id =
"+locationId;
System.out.println(sql);
rs = state.executeQuery(sql);
while(rs.next()){
System.out.println(rs.getInt("department_id")+"
"+rs.getString("department_name")+"
"+rs.getInt("location_id"));
}
}catch(Exception e){
e.printStackTrace();
}finally{
JdbcUtil.closeResource(state, conn, rs);
}
}
10 PreparedStatement 对象的使用( 重点)
10.1 PreparedStatement 特点:
• PreparedStatement 接口继承 Statement 接口
• PreparedStatement 效率高于 Statement
• PreparedStatement 支持动态绑定参数
• PreparedStatement 具备 SQL 语句预编译能力
• 使用 PreparedStatement 可防止出现 SQL 注入问题
10.2 通过 PreparedStatement 对象向表中插入数据
10.2.1
//向 Departments 表中插入一条数据
public void insertDempartments(String departmentName,int
locationId){
Connection conn = null;
PreparedStatement ps = null;
try{
conn = JdbcUtil.getConnection();
ps = conn.prepareStatement("insert into departments
values(default,?,?)");
ps.setString(1, departmentName);
ps.setInt(2, locationId);
ps.execute();
}catch(Exception e){
e.printStackTrace();
}finally{
JdbcUtil.closeResource(ps, conn, null);
}
}
11 PreparedStatement 的预编译能力
11.1 什么是预编译
11.1.1 SQL
• 语法和语义解析
• 优化 sql 语句,制定执行计划
• 执行并返回结果
但是很多情况,我们的一条 sql 语句可能会反复执行,或者每次执行的时候只有个别的
值不同(比如 select 的 where 子句值不同,update 的 set 子句值不同,insert 的 values 值不同)。
如果每次都需要经过上面的词法语义解析、语句优化、制定执行计划等,则效率就明显不行
了。
所谓预编译语句就是将这类语句中的值用占位符替代,可以视为将 sql 语句模板化或者
说参数化
预编译语句的优势在于:一次编译、多次运行,省去了解析优化等过程;此外预编译语
句能防止 sql 注入。
11.1.2 解析过程
11.1.2.1 硬解析
在不开启缓存执行计划的情况下,每次 SQL 的处理都要经过:语法和语义的解析,优
化器处理 SQL,生成执行计划。整个过程我们称之为硬解析。
11.1.2.2 软解析
如果开启了缓存执行计划,数据库在处理 sql 时会先查询缓存中是否含有与当前 SQL
语句相同的执行计划,如果有则直接执行该计划。
11.2 预编译方式
开始数据库的日志
show VARIABLES like '%general_log%'
set GLOBAL general_log = on
set GLOBAL log_output='table'
11.2.1 依赖数据库驱动完成预编译
如果我们没有开启数据库服务端编译,那么默认的是使用数据库驱动完成 SQL 的预编译处理。
11.2.2 依赖数据库服务器完成预编译
我们可以通过修改连接数据库的 URL 信息,添加 useServerPrepStmts=true 信息开启服务端预编译。
12 通过 PreparedStatement 对象完成数据的更新
12.1 代码示例:
//更新数据
public void updateDepartment(int departmentId,String
departmentName,int localhostId){
Connection conn= null;
PreparedStatement ps = null;
try{
conn = JdbcUtil.getConnection();
ps = conn.prepareStatement("update departments set
department_name = ?,location_id = ? where department_id = ?");
ps.setString(1, departmentName);
ps.setInt(2, localhostId);
ps.setInt(3, departmentId);
ps.execute();
}catch(Exception e){
e.printStackTrace();
}finally{
JdbcUtil.closeResource(ps, conn, null);
}
}
13 通过 PreparedStatement 对象完成数据的查询
13.1 查询返回单条结果集
13.1.1 代码示例:
//完成数据查询
public Departments selectDepartmentsById(int departmentId){
Connection conn = null;
PreparedStatement ps = null;
ResultSet rs = null;
Departments dept = null;
try{
conn = JdbcUtil.getConnection();
ps = conn.prepareStatement("select * from
departments where department_id = ?");
ps.setInt(1, departmentId);
rs = ps.executeQuery();
while(rs.next()){
dept=new Departments();
dept.setDepartmentId(rs.getInt("department_id"));
dept.setDepartmentName(rs.getString("department_name"));
dept.setLocationId(rs.getInt("location_id"));
}
}catch(Exception e){
e.printStackTrace();
}finally{
JdbcUtil.closeResource(ps, conn, rs);
}
return dept;
}
13.2 查询返回多条结果集
13.2.1 代码示例:
//查询部门表中的部门名称,找到那些包含“人力”的部门信息
public List<Departments>
selectDepartmentByLikeName(String departmentName){
Connection conn = null;
PreparedStatement ps = null;
ResultSet rs = null;
List<Departments> list = new ArrayList<>();
try{
conn = JdbcUtil.getConnection();
ps = conn.prepareStatement("select * from
departments where department_name like ?");
ps.setString(1, "%"+departmentName+"%");
rs = ps.executeQuery();
while(rs.next()){
Departments dept = new Departments();
dept.setDepartmentId(rs.getInt("department_id"));
dept.setDepartmentName(rs.getString("department_name"));
dept.setLocationId(rs.getInt("location_id"));
list.add(dept);
}
}catch(Exception e){
e.printStackTrace();
}finally{
JdbcUtil.closeResource(ps, conn, rs);
}
return list;
}
14 PreparedStatement 批处理操作
批处理:在与数据库的一次连接中,批量的执行条 SQL 语句。
14.1 代码示例:
//批量添加
public void addBatch(List<Departments> list){
Connection conn = null;
PreparedStatement ps = null;
try{
conn = JdbcUtil.getConnection();
ps = conn.prepareStatement("insert into departments
values(default,?,?)");
for(int i=0;i<list.size();i++){
ps.setString(1,
list.get(i).getDepartmentName());
ps.setInt(2, list.get(i).getLocationId());
//添加批处理
ps.addBatch();
}
int[] arr =ps.executeBatch();
for(int i=0;i<arr.length;i++){
System.out.println(i);
}
}catch(Exception e){
e.printStackTrace();
}finally{
JdbcUtil.closeResource(ps, conn, null);
}
}
15 JDBC 中的事务处理
在 JDBC 操作中数据库事务默认为自动提交。如果事务需要修改为手动提交,那么我们
需要使用 Connection 对象中的 setAutoCommit 方法来关闭事务自动提交。然后通过
Connection 对象中的 commit 方法与 rollback 方法进行事务的提交与回滚。
15.1 代码
//事务处理
public void deleteDempartments(String depratmentName){
Connection conn = null;
PreparedStatement ps = null;
try{
conn = JdbcUtil.getConnection();
//关闭事务的自动提交
conn.setAutoCommit(false);
ps = conn.prepareStatement("delete from departments
where department_name like ?");
ps.setString(1, "%"+depratmentName+"%");
ps.executeUpdate();
ps = conn.prepareStatement("insert into departments
values(default,'开发部',2)");
ps.executeUpdate();
String str = null;
str.length();
conn.commit();
}catch(Exception e){
e.printStackTrace();
JdbcUtil.rollback(conn);
}finally{
JdbcUtil.closeResource(ps, conn, null);
}
}
感谢~,欢迎点赞转发,以及指正。


 236
236


 被折叠的 条评论
为什么被折叠?
被折叠的 条评论
为什么被折叠?
 到【灌水乐园】发言


