


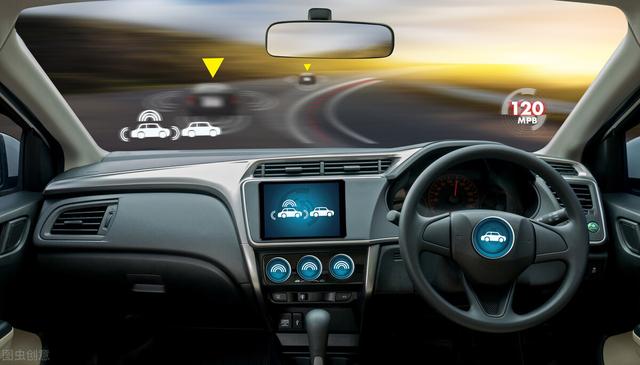
最近,百度Apollo无人驾驶公交车在一些城市开始试运行,这让我对无人驾驶技术有点好奇,于是小编我花了点时间研究了一下,无人驾驶涉及的技术还是很多的,今天我们主要将如何利用python对前方道路和交通情况进行识别,然后给汽车发送指令,为了简化步骤,我打开电脑中的一款驾考科目三的驾驶训练游戏,然后通过截屏获取前方的道路影像信息,通过一系列的分析处理来向游戏中的车子发出相关操作指令,本篇只是简单地实现了自动控制游戏中的前进、左右拐、停止、主动刹车、行人检测等场景的操作,与现实中的无人驾驶技术还是有差距了,旨在抛砖引玉。
环境要求
win10 64位操作系统,安装了python3
sudo apt-get install python3sudo apt-get install python3-pip具体的识别控制过程如下:
1、通过win32gui获取截屏并通过opencv将汽车前方影像图片转成灰度模式 cv2.COLOR_BGR2GRAY
import cv2import numpy as npimport win32gui, win32ui, win32con, win32apidef grab_screen(region=None): hwin = win32gui.GetDesktopWindow() if region: left,top,x2,y2 = region width = x2 - left + 1 height = y2 - top + 1 else: width = win32api.GetSystemMetrics(win32con.SM_CXVIRTUALSCREEN) height = win32api.GetSystemMetrics(win32con.SM_CYVIRTUALSCREEN) left = win32api.GetSystemMetrics(win32con.SM_XVIRTUALSCREEN) top = win32api.GetSystemMetrics(win32con.SM_YVIRTUALSCREEN) hwindc = win32gui.GetWindowDC(hwin) srcdc = win32ui.CreateDCFromHandle(hwindc) memdc = srcdc.CreateCompatibleDC() bmp = win32ui.CreateBitmap() bmp.CreateCompatibleBitmap(srcdc, width, height) memdc.SelectObject(bmp) memdc.BitBlt((0, 0), (width, height), srcdc, (left, top), win32con.SRCCOPY) signedIntsArray = bmp.GetBitmapBits(True) img = np.fromstring(signedIntsArray, dtype='uint8') img.shape = (height,width,4) srcdc.DeleteDC() memdc.DeleteDC() win32gui.ReleaseDC(hwin, hwindc) win32gui.DeleteObject(bmp.GetHandle()) return cv2.cvtColor(img, cv2.COLOR_BGRA2RGB)2、使用 Canny边缘检测算法计算出道路的轮廓线
edge = cv2.Canny(image, threshold1, threshold2[, edges[, apertureSize[, L2gradient ]]])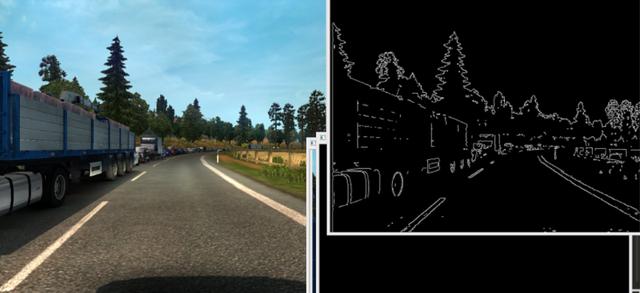
3、使用cv2.HoughLinesP()来分析道路的实线和虚线
lines = cv2.HoughLinesP(processed_img, 1, np.pi/180, 180, 50, 35) m1=0 m2=0 try: l1, l2, m1, m2 = draw_lanes(original_image,lines) cv2.line(original_image, (l1[0], l1[1]), (l1[2], l1[3]), [0,255,0], 30) cv2.line(original_image, (l2[0], l2[1]), (l2[2], l2[3]), [0,255,0], 30) except Exception as e: print(str(e)) pass
4、通过object_detection来识别前方物体,如行人、车辆、红绿灯等
import numpy as npimport osimport six.moves.urllib as urllibimport sysimport tarfileimport tensorflow as tfimport zipfilefrom collections import defaultdictfrom io import StringIOfrom matplotlib import pyplot as pltfrom PIL import Imagefrom grabscreen import grab_screenimport cv2sys.path.append("..")from utils import label_map_utilfrom utils import visualization_utils as vis_util# # Model preparation # What model to download.MODEL_NAME = 'ssd_mobilenet_v1_coco_11_06_2017'MODEL_FILE = MODEL_NAME + '.tar.gz'DOWNLOAD_BASE = 'http://download.tensorflow.org/models/object_detection/'# Path to frozen detection graph. This is the actual model that is used for the object detection.PATH_TO_CKPT = MODEL_NAME + '/frozen_inference_graph.pb'# List of the strings that is used to add correct label for each box.PATH_TO_LABELS = os.path.join('data', 'mscoco_label_map.pbtxt')NUM_CLASSES = 90# ## Download Modelopener = urllib.request.URLopener()opener.retrieve(DOWNLOAD_BASE + MODEL_FILE, MODEL_FILE)tar_file = tarfile.open(MODEL_FILE)for file in tar_file.getmembers(): file_name = os.path.basename(file.name) if 'frozen_inference_graph.pb' in file_name: tar_file.extract(file, os.getcwd())# ## Load a (frozen) Tensorflow model into memory.detection_graph = tf.Graph()with detection_graph.as_default(): od_graph_def = tf.GraphDef() with tf.gfile.GFile(PATH_TO_CKPT, 'rb') as fid: serialized_graph = fid.read() od_graph_def.ParseFromString(serialized_graph) tf.import_graph_def(od_graph_def, name='')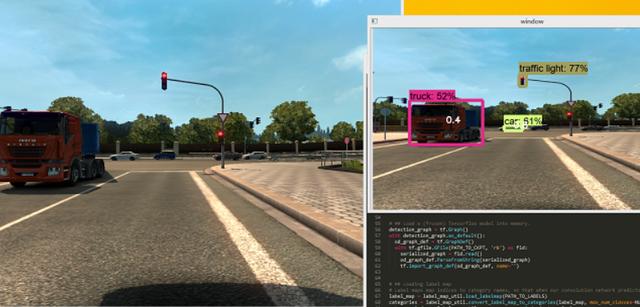
5、基于以上的数据分析使用tensorflow进行学习训练生成模型,最后使用模型分析获得指令通过win32 api发送键盘消息控制游戏中的车辆转向和启停
import ctypesimport timeSendInput = ctypes.windll.user32.SendInputW=0x11A=0x1ES=0x1FD=0x20Q=0x10# C struct redefinitions PUL = ctypes.POINTER(ctypes.c_ulong)class KeyBdInput(ctypes.Structure): _fields_ = [("wVk", ctypes.c_ushort), ("wScan", ctypes.c_ushort), ("dwFlags", ctypes.c_ulong), ("time", ctypes.c_ulong), ("dwExtraInfo", PUL)]class HardwareInput(ctypes.Structure): _fields_ = [("uMsg", ctypes.c_ulong), ("wParamL", ctypes.c_short), ("wParamH", ctypes.c_ushort)]class MouseInput(ctypes.Structure): _fields_ = [("dx", ctypes.c_long), ("dy", ctypes.c_long), ("mouseData", ctypes.c_ulong), ("dwFlags", ctypes.c_ulong), ("time",ctypes.c_ulong), ("dwExtraInfo", PUL)]class Input_I(ctypes.Union): _fields_ = [("ki", KeyBdInput), ("mi", MouseInput), ("hi", HardwareInput)]class Input(ctypes.Structure): _fields_ = [("type", ctypes.c_ulong), ("ii", Input_I)]# Actuals Functionsdef PressKey(hexKeyCode): extra = ctypes.c_ulong(0) ii_ = Input_I() ii_.ki = KeyBdInput( 0, hexKeyCode, 0x0008, 0, ctypes.pointer(extra) ) x = Input( ctypes.c_ulong(1), ii_ ) ctypes.windll.user32.SendInput(1, ctypes.pointer(x), ctypes.sizeof(x))def ReleaseKey(hexKeyCode): extra = ctypes.c_ulong(0) ii_ = Input_I() ii_.ki = KeyBdInput( 0, hexKeyCode, 0x0008 | 0x0002, 0, ctypes.pointer(extra) ) x = Input( ctypes.c_ulong(1), ii_ ) ctypes.windll.user32.SendInput(1, ctypes.pointer(x), ctypes.sizeof(x))if __name__== '__main__': while (True): #PressKey(0x11) time.sleep(1) ReleaseKey(0x11) time.sleep(1)好了,想要源码的朋友可以关注我,私信发送“自动驾驶”,即可获得完整源码。


 被折叠的 条评论
为什么被折叠?
被折叠的 条评论
为什么被折叠?
 到【灌水乐园】发言


