


通过Linux服务器端生成密钥对来提供认证1,执行命令生成 生成公私钥ssh-keygen -t rsa -b 4096
确认生成文件的所在目录(默认为~/.ssh)及密码(可以为空,建议输入密码)
ssh-keygen参数解释:-t rsa 类型rsa/dsa -b 4096 长度
2,将公钥改名并放入/root/.ssh/目录cp ~/.ssh/id_rsa.pub ~/.ssh/authorized_keys # 服务器端的公钥
如果想更改为其它名字的文件,则要修改文件/etc/ssh/sshd_config中的参数为你要的名字#AuthorizedKeysFile .ssh/authorized_keys
另外还需要开启密钥登陆选项,以及RSA算法进行安全验证选项,修改/etc/ssh/sshd_config参数为RSAAuthentication yes
PubkeyAuthentication yes
3,用下载软件,例如winscp flashfxp等将 id_rsa 和 id_rsa.pub 这两个文件下载到自己电脑里,保证这两个文件是在同一个目录里,
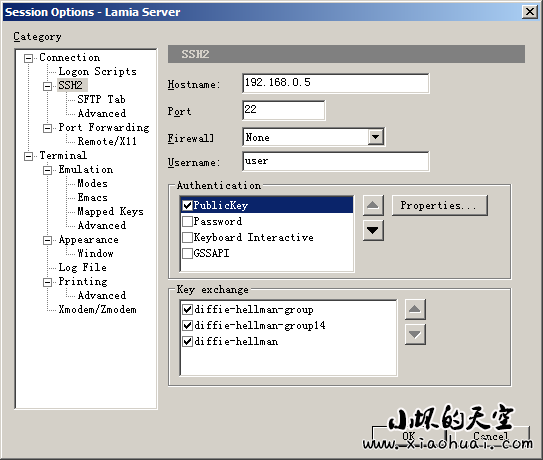
在 SecureCRT 里创建新的或者修改以前的链接,注意图里所示,Authentication 里只选“PublicKey”这一种方式:
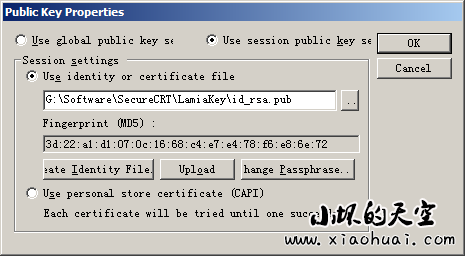
然后点击“Properties…”,出现如下所示窗口
建议先测试一下用密钥登陆是否成功,如果成功则进行下一步,不成功千万不要进行下一步,会导致你登陆不进服务器。
4,取消服务器端ssh默认支持Password认证,修改完成后服务器将不支持用密码登陆:#vi /etc/ssh/sshd_config
PasswordAuthentication no #默认为yes
如果出先如下错误
Public-key authentication with the server for user root failed. Please verify username and public/private key pair.
如果是批量执行的话可以用shell脚本来修改服务器登陆为密钥登陆#开启密钥登陆
sed -i 's/#RSAAuthentication yes/RSAAuthentication yes/g' /etc/ssh/sshd_config
sed -i 's/#PubkeyAuthentication yes/PubkeyAuthentication yes/g' /etc/ssh/sshd_config
sed -i 's/#AuthorizedKeysFile/AuthorizedKeysFile/g' /etc/ssh/sshd_config
#禁止密码登陆
sed -i 's/PasswordAuthentication yes/PasswordAuthentication no/g' /etc/ssh/sshd_config


 被折叠的 条评论
为什么被折叠?
被折叠的 条评论
为什么被折叠?
 到【灌水乐园】发言


