


说起手风琴的制作,大家肯定首选就是使用jQuery来制作,我在《如何使用jQuery制作手风琴效果》也简单的介绍了使用jQuery制作手风琴效果。但今天我在Saud Khan的《Cross Browser Pure CSS3 Vertical Accordion》中学习了一种使用纯CSS制作手风琴效果,稍加整理了一下,贴上来与大家一起分享。
使用纯CSS制作手风琴效果,我们主要使用的是伪类“:hover”来实现,不过使用“:hover”只能在现代浏览器运行,因为大家都知道,在IE6下是只能支持“a:hover”,而别的元素将无法支持。因此我们不在考虑IE6下的运行,不过你要是想在项目中使用,还是有必要考虑是否要支持IE6。虽然在IE6下无法正常运行,但并不会阻碍我们的学习。
我们在这个实例中将添加CSS3的transition来增加过渡效果,当然你也可以添加更多的CSS3属性来修饰你的手风琴效果。不过CSS3的效果在IE6-8下是不支持的,所以大家在使用时需要考虑清楚。下面我们一起来看看使用纯CSS是如何制作出类似jQuery制作出来的手风琴效果。
HTML Markup
Heading 1
Content for Panel 1.Heading 2
Content for panel 2.Headgin 3
Content for panel 3.Heading 4
Content for panel 4.
div.verticalAccordion:我们将整个手风琴每个面板都放在一个div的容器内;
li:每下li放置一个面板,包含了一个标题和标题所对应的主内容;
h3:每个h3就是一个面板的标题;
div:与h3相邻的div就是每个面板的主内容。
CSS Code
随着手风琴的HTML结构完成,我们先来制作其折叠效果,请看下面的代码:
.verticalAccordion {
width: 500px;
margin: 0 auto;
}
.verticalAccordion ul {
width: 100%;
margin: 0;
padding: 0;
}
.verticalAccordion li {
list-style: none outside none;
display: block;
margin: 0;
padding: 0;
height: 40px;
width: 100%;
overflow: hidden;
background: #f0f0f0;
}
.verticalAccordion h3 {
margin: 0;
padding: 10px;
height: 19px;
border-top: 1px solid #f0f0f0;
text-transform: uppercase;
color: #000;
background: #ccc;
cusor: pointer;
position:relative;
}
.verticalAccordion h3:before {
content:"";
border: 5px solid #000;
border-color: #000 transparent transparent;
position: absolute;
right: 10px;
top: 15px;
width: 0;
height: 0;
}
.verticalAccordion div {
margin: 0;
voerflow: auto;
padding: 10px;
height: 220px;
}
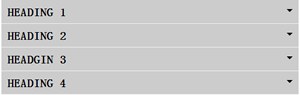
默认状态效果:因为我们没有使用“:target”伪类,我们无法指定手风琴的默认状态,所以在页面载入就设置了所有面板为折叠状态。我们此处设置了“li”的高度和“h3”的高度相等,并在“li”上设置其“overflow:hidden”,以防止内容溢出;
默认panel标题:上一条说“h3”的高度和“li”高度相同,此例中我们的“h3”高度是通过“padding+border+height”之合计算而来,并且刚好等于“li”的高度;
面板主内容:需要在面主内容上设置一个“overflow:auto”,以防止内容溢出能正常阅读,因为我们在“li”设置了一个固定高度,用来控制面板展开时的高度。
三角形:使用“h3:before”配合border制作一个向下的三角标志。
效果如下
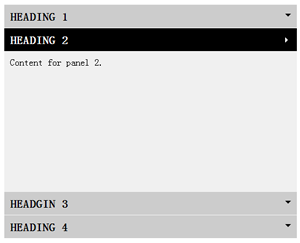
制作手风琴效果
正如前面所述,我们使用的是鼠标悬停事个件(“li:hover”)来响应手风琴展开的效果。
.verticalAccordion li:hover {
height: 280px;
}
.verticalAccordion li:hover h3 {
color: #fff;
background: #000;
}
.verticalAccordion li:hover h3:before {
border-color: transparent transparent transparent #fff;
}
展开面板:通过在“li”元素的鼠标悬停事件(“:hover”)来改变“li”的高度,从而达到面板展开的效果;
高亮显示当前标题:当“li:hover”下时,改变当前下的“h3”属性,让其处于高亮状态。这里关键的一点我们使用在“li:hover h3”而并不是直接应用在“h3:hover”
改变三角形状态:同前面的方法一样,我们并展开状态下的三角形改变颜色和形状,表示面板处于展开状态。
效果如下:
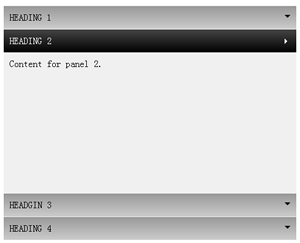
添加CSS3效果
通过上面的代码,我们已经实现了除IE6下的垂直手风琴效果。为了让你的手风琴效果更具有视觉冲击力,我们在这里给他使用一些CSS3效果。其中最重要的是在“li”上添加CSS3 transition效果,增加手风琴展开时达到一种平滑过渡的效果。
.verticalAccordion li {
-moz-transition: height 0.3s ease-in-out;
-webkit-transition: height 0.3s ease-in-out;
-o-transition: height 0.3s ease-in-out;
transition: height 0.3s ease-in-out;
}
.verticalAccordion h3 {
background: -moz-linear-gradient( top, #999999, #cccccc);
background: -webkit-gradient(linear, left top, left bottom, from(#999999), to(#cccccc));
background: -webkit-linear-gradient( top, #999999, #cccccc);
background: -o-linear-gradient( top, #999999, #cccccc);
filter: progid:DXImageTransform.Microsoft.gradient(startColorstr=#ff999999, endColorstr=#ffcccccc);
-ms-filter: "progid:DXImageTransform.Microsoft.gradient(startColorstr=#ff999999, endColorstr=#ffcccccc)";
}
.verticalAccordion li:hover h3 {
background: -moz-linear-gradient( top, #454545, #000000);
background: -webkit-gradient(linear, left top, left bottom, from(#454545), to(#000000));
background: -webkit-linear-gradient( top, #454545, #000000);
background: -o-linear-gradient( top, #454545, #000000);
filter: progid:DXImageTransform.Microsoft.gradient(startColorstr=#ff454545, endColorstr=#ff000000);
-ms-filter: "progid:DXImageTransform.Microsoft.gradient(startColorstr=#ff454545, endColorstr=#ff000000)";
}
完整的CSS CODE
这就是我们通过CSS制作的垂直手风琴的所有代码:
.verticalAccordion {
width: 500px;
margin: 0 auto;
}
.verticalAccordion ul {
width: 100%;
margin: 0;
padding: 0;
}
.verticalAccordion li {
list-style: none outside none;
display: block;
margin: 0;
padding: 0;
height: 40px;
width: 100%;
overflow: hidden;
background: #f0f0f0;
-moz-transition: height 0.3s ease-in-out;
-webkit-transition: height 0.3s ease-in-out;
-o-transition: height 0.3s ease-in-out;
transition: height 0.3s ease-in-out;
}
.verticalAccordion h3 {
margin: 0;
padding: 10px;
height: 19px;
border-top: 1px solid #f0f0f0;
text-transform: uppercase;
color: #000;
background: #ccc;
cusor: pointer;
position: relative;
background: -moz-linear-gradient( top, #999999, #cccccc);
background: -webkit-gradient(linear, left top, left bottom, from(#999999), to(#cccccc));
background: -webkit-linear-gradient( top, #999999, #cccccc);
background: -o-linear-gradient( top, #999999, #cccccc);
filter: progid:DXImageTransform.Microsoft.gradient(startColorstr=#ff999999, endColorstr=#ffcccccc);
-ms-filter: "progid:DXImageTransform.Microsoft.gradient(startColorstr=#ff999999, endColorstr=#ffcccccc)";
}
.verticalAccordion h3:before {
content:"";
border: 5px solid #000;
border-color: #000 transparent transparent;
position: absolute;
right: 10px;
top: 15px;
width: 0;
height: 0;
}
.verticalAccordion div {
margin: 0;
voerflow: auto;
padding: 10px;
height: 220px;
}
.verticalAccordion li:hover {
height: 280px;
}
.verticalAccordion li:hover h3 {
color: #fff;
background: #000;
background: -moz-linear-gradient( top, #454545, #000000);
background: -webkit-gradient(linear, left top, left bottom, from(#454545), to(#000000));
background: -webkit-linear-gradient( top, #454545, #000000);
background: -o-linear-gradient( top, #454545, #000000);
filter: progid:DXImageTransform.Microsoft.gradient(startColorstr=#ff454545, endColorstr=#ff000000);
-ms-filter: "progid:DXImageTransform.Microsoft.gradient(startColorstr=#ff454545, endColorstr=#ff000000)";
}
.verticalAccordion li:hover h3:before {
border-color: transparent transparent transparent #fff;
}
这样一来,我们就完成了CSS制作的垂直手风琴效果,具体效果大家可以点击下面的DEMO:
那么下面大家最好通过自己去实践,从而加强理解。最后我在说一点“使用CSS制作手风琴效果,最关键的是其结构,需要将标题和其对应的主内容放在同一个块中,然后通过设置这个元素块当前状态下的高度实现折叠效果,另外在这个元素块设置其鼠标悬停事件时改变其默认高度,从而达到展开效果。”
大家要是对这个效果感兴趣可以自己亲手体验一下,也可以和《如何使用jQuery制作手风琴效果》介绍的方法对比一下学习,看看使用纯CSS制作的手风琴和jQuery制作的手风琴,两种方法有何不同之处,并且哪种方法更具有优势。那么今天这个短暂的教程就算介绍完了,最后再次感谢Saud Khan给我们带来的《Cross Browser Pure CSS3 Vertical Accordion》。
如需转载烦请注明出处:


 5998
5998


 被折叠的 条评论
为什么被折叠?
被折叠的 条评论
为什么被折叠?
 到【灌水乐园】发言


