


1.使用yum安装基础依赖包
[root@localhost ~]# yum -y install gcc openssl-devel pcre-devel
2.下载Nginx和Mysql安装包
Nginx下载
Mysql下载
[root@localhost ~]# wget http://nginx.org/download/nginx-1.16.1.tar.gz
[root@localhost ~]# ls
nginx-1.16.1.tar.gz
mysql57-community-release-el7-11.noarch.rpm
3.源码安装Nginx
[root@localhost ~]# useradd -s /sbin/nologin nginx
[root@localhost ~]# tar -xf nginx-1.16.1.tar.gz
[root@localhost ~]# cd nginx-1.16.1
[root@localhost nginx-1.16.1]# ./configure --prefix=/usr/local/nginx --user=nginx --group=nginx --with-http_ssl_module
[root@localhost nginx-1.16.1]# make && make install
4.安装Mysql
[root@localhost ~]# rpm -ivh mysql57-community-release-el7-11.noarch.rpm
[root@localhost ~]# yum -y install mysql-server
5.安装PHP
[root@localhost ~]# yum -y install php php-fpm php-mysql
6.启动服务并开机自启
1.启动Nginx服务
[root@localhost nginx-1.16.1]# /usr/local/nginx/sbin/nginx
[root@localhost nginx-1.16.1]# ss -antulp | grep :80
tcp    LISTEN     0      128       *:80                    *:*                   users:(("nginx",pid=15686,fd=6),("nginx",pid=15685,fd=6))
tcp    LISTEN     0      50       :::8080                 :::*                   users:(("java",pid=3207,fd=161))
2.启动Mysql服务
[root@localhost ~]# systemctl start mysqld
[root@localhost ~]# systemctl enable mysqld
[root@localhost ~]# ss -antulp | grep :3306
tcp    LISTEN     0      80     [::]:3306               [::]:*                   users:(("mysqld",pid=54086,fd=21))
3.启动PHP服务
[root@localhost ~]# systemctl start php-fpm
[root@localhost ~]# systemctl enable php-fpm
[root@localhost ~]# ss -antulp | grep php-fpm
tcp    LISTEN     0      128    127.0.0.1:9000                  *:*                   users:(("php-fpm",pid=54190,fd=0),("php-fpm",pid=54189,fd=0),("php-fpm",pid=54188,fd=0),("php-fpm",pid=54187,fd=0),("php-fpm",pid=54186,fd=0),("php-fpm",pid=54185,fd=6))
7.Mysql 初始化
[root@localhost ~]# mysql --version
mysql  Ver 14.14 Distrib 5.7.29, for Linux (x86_64) using  EditLine wrapper

[root@localhost ~]# grep "temporary password" /var/log/mysqld.log     //查看初始密码
2020-03-10T03:23:43.256226Z 1 [Note] A temporary password is generated for root@localhost: 9s3aBfelT5).

[root@localhost ~]# mysql -hlocalhost -uroot -p'9s3aBfelT5).'
...
Server version: 5.7.29
mysql> alter user root@"localhost"identified by "123qqq...A";   //修改mysql密码
mysql> exit
LNMP平台案例
步骤一:修改php-fpm配置文件
[root@localhost ~]# vim /etc/php-fpm.d/www.conf
[www]
listen = 127.0.0.1:9000           //PHP端口号
pm.max_children = 50              //最大进程数量
pm.start_servers = 5              //最小进程数量
pm.min_spare_servers = 5          //最少需要几个空闲着的进程
pm.max_spare_servers = 35         //最多允许几个进程处于空闲状态
步骤二:修改nginx配置文件
[root@localhost ~]# vim /usr/local/nginx/conf/nginx.conf
...
 location / {
            root   html;
            index  index.php index.html index.htm;
        }
...
        location ~ \.php$ {
            root           html;
            fastcgi_pass   127.0.0.1:9000;
            fastcgi_index  index.php;
            #fastcgi_param  SCRIPT_FILENAME  /scripts$fastcgi_script_name;
            include        fastcgi.conf;
        }
[root@localhost ~]# /usr/local/nginx/sbin/nginx -s reload
步骤三:创建PHP页面
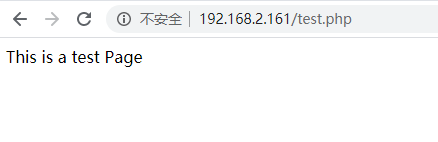
测试页面1, 测试LNMP架构能否解析PHP页面(动态)
[root@localhost ~]# vim /usr/local/nginx/html/test.php
<?php
$i="This is a test Page";
echo $i;
?>
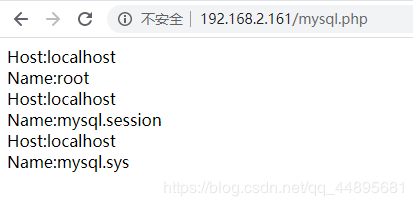
测试页面2,测试连接并查询Mysql数据库
[root@localhost ~]# vim /usr/local/nginx/html/mysql.php
<?php
    $mysqli = new mysqli('localhost','root','123qqq...A','mysql');
    if (mysqli_connect_errno()){
        die('Unable to connect!'). mysqli_connect_error();
    }
    $sql = "select * from user";
    $result = $mysqli->query($sql);
    while($row = $result->fetch_array()){
        printf("Host:%s",$row[0]);
        printf("");
        printf("Name:%s",$row[1]);
        printf("");
}
?>
步骤四:访问测试
测试解析PHP页面:
如果你觉得这篇文章还不错,就请动动你的发财手为本文留个言,点个在看,或者转发一下吧,因为这将是我持续输出更多优质文章的最强动力!


 907
907


 被折叠的 条评论
为什么被折叠?
被折叠的 条评论
为什么被折叠?
 到【灌水乐园】发言


