


阅读此文章需要掌握Angular组件的知识。本文所有的例子都可以在kingfolk/Angular-Playground找到。
简单的ng-content使用
ng-content可以创建类似于div span等内部可以插入元素的组件,比如下面的app-ng-content-simple他的作用和span一样
@Component({
  selector: 'app-ng-content-simple',
  template: '<ng-content></ng-content>',
  styleUrls: ['./ng-content-simple.component.sass']
})
export class NgContentSimpleComponent implements OnInit {

  constructor() { }

  ngOnInit() {
  }

}

// usage
<app-ng-content-simple>
  I am a simple ng content
</app-ng-content-simple>
利用select插入不同种类的内容
ng-content指令有一个select输入,使用方式如同css selector, 可以对包含的内容进行过滤展示。以下例子展示了标签,属性,css类选择性地展示内容。
@Component({
  selector: 'app-ng-content-select',
  template: `
    <ng-content></ng-content>
    <ng-content select="span"></ng-content>
    <ng-content select="[attribute]"></ng-content>
    <ng-content select=".class"></ng-content>
  `,
  styleUrls: ['./ng-content-select.component.sass']
})
export class NgContentSelectComponent implements OnInit {

  constructor() { }

  ngOnInit() {
  }

}


// usage
<app-ng-content-select>
  <div>simple content</div>
  <span style="display:block">span content</span>
  <div attribute>content with attribute</div>
  <div class="class">content with css class</div>
</app-ng-content-select>
嵌入的内容获取上下文context
某些特定的实现<parent><child></child></parent> 作为一个整体组件使用,child可以是定制化的不同组件。parent拥有不同的状态比如 parent.active表示该组件是否是选中状态,此时child组件要如何获取这个状态,这就涉及到组件间通信,有非常多的处理方式。
Angular提供了ngTemplateOutlet指令,用于渲染TemplateRef模板实例,结合ngTemplateOutletContext提供context,TemplateRef可以获取context进行操作渲染。
以下例子定义了一个具有timer状态的parent组件,并能想嵌入内部在child模板内容提供context={timer}的上下文用于子内容的渲染。注意到模板组件的定义TemplateRef<{$implicit: number; timer: number}>泛型的类型申明为{$implicit: number; timer: number}为提供的context的类型,$implicit为context默认提供的对象,这里的let-timer="timer"也可以写成let-timer,效果一致。
<ng-container *ngTemplateOutlet="template; context: context"></ng-container>。这里ngTemplateOutlet用作结构指令,绑定结构指令的属性ngTemplateOutletContext写在ngTemplateOutlet表达式内部context: context(Angular黑科技,传承了AngularJS)。其他博客有<ng-template [ngTemplateOutlet]="template"></ng-template>的用法,但貌似官方文档并没有提倡这么用Angular Docs。而且逻辑上这边是往DOM里插入节点,更接近结构指令的用法。
@Component({
  selector: 'app-ng-content-context',
  template: '<ng-container *ngTemplateOutlet="template; context: context"></ng-container>',
  styleUrls: ['./ng-content-context.component.sass']
})
export class NgContentContextComponent implements OnInit, OnDestroy {
  @ContentChild(TemplateRef, {read: TemplateRef}) template: TemplateRef<{$implicit: number; timer: number}>;

  timer = 0;

  intervalSub: Subscription;

  get context() {
    const {timer} = this;
    return {
      $implicit: timer,
      timer,
    };
  }

  constructor() { }

  ngOnInit() {
    this.intervalSub = interval(1000).subscribe(() => {
      this.timer ++;
    });
  }

  ngOnDestroy() {
    this.intervalSub.unsubscribe();
  }

}

// usage
<app-ng-content-context>
  <ng-template let-timer="timer">{{timer}}</ng-template>
</app-ng-content-context>
用注入获取上下文
接上个例子,除了用ngTemplateOutlet来提供context,可以通过注入来获得parent的成员。在复杂组件的开发中,也是常用的方法。
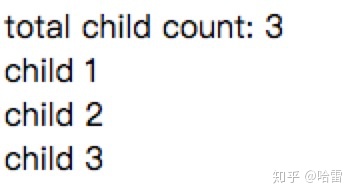
如下面这个例子parent组件用作统计child组件的数量,给定child组件id的功能,作为一个master节点与child交流。而child通过在constructor注入parent实例,注册自己、获取id。
Angular在应用运行时在内存中会有一个依赖注入的树,每个组件实例化之后也会在这个依赖注入树上注册一个相应的节点,可注入下游组件。每个组件实例去请求某个依赖的时候,都会在树的某一个对应的位置向上寻找。这边child组件通过Host装饰器,会只在局部寻找parent组件(官方局部解释:host element of the current component. 可理解为寻找到usage所在的组件为止)。
// child
@Component({
  selector: 'app-ng-content-inject-child',
  template: '<div>child {{id}}</div>',
  styleUrls: ['./ng-content-inject-child.component.sass']
})
export class NgContentInjectChildComponent implements OnInit {
  id: number;

  constructor(@Host() private parent: NgContentInjectComponent) { }

  ngOnInit() {
    this.parent.register();
    this.id = this.parent.childCount;
  }

}


// parent
@Component({
  selector: 'app-ng-content-inject',
  template: `
    <div>total child count: {{childCount}}</div>
    <ng-content></ng-content>
  `,
  styleUrls: ['./ng-content-inject.component.sass']
})
export class NgContentInjectComponent implements OnInit {

  name = 'parent';

  childCount = 0;

  constructor() { }

  ngOnInit() {
  }

  register() {
    this.childCount ++;
  }

}


// usage
<app-ng-content-inject>
  <app-ng-content-inject-child></app-ng-content-inject-child>
  <app-ng-content-inject-child></app-ng-content-inject-child>
  <app-ng-content-inject-child></app-ng-content-inject-child>
</app-ng-content-inject>


 被折叠的 条评论
为什么被折叠?
被折叠的 条评论
为什么被折叠?
 到【灌水乐园】发言


