


请自行安装安装CentOS7.8-2003版本
如果不会,请自行学习
1.基础环境配置:
[root@localhost ~]# systemctl disable firewalld #禁止防火墙服务启动
[root@localhost ~]# systemctl stop firewalld #关闭防火墙服务
[root@localhost ~]# setenforce = 0 #临时关闭SELinux
[root@localhost ~]# vi /etc/sysconfig/selinux #修改将"SELINUX=enforcing"更改为"SELINUX=disabled",永久关闭SELINUX
...
SELINUX=disabled
...
重启电脑
[root@localhost ~]# getenforce #查看状态
Disabled
[root@localhost ~]# yum install -y tree net-tools net-snmp vim ntpdate wget httpd #安装部分基础软件包
[root@localhost ~]# cd /etc/yum.repos.d/ #修改yum源 更改为阿里云
[root@localhost ~]# mv CentOS-Base.repo CentOS-Base.repo.bak #备份文件
[root@localhost ~]# wget -O CentOS-Base.repo #下载阿里云镜像仓库
[root@localhost ~]# wget -O /etc/yum.repos.d/epel.repo #下载epel仓库
[root@localhost ~]# yum clean all #清理缓存
[root@localhost ~]# yum makecache #重新生成缓存
2.安装Mysql数据库
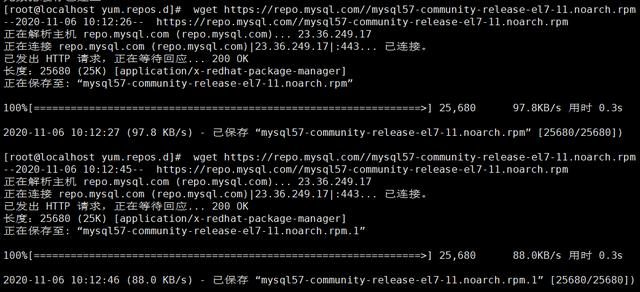
[root@localhost ~]# wget https://repo.mysql.com//mysql57-community-release-el7-11.noarch.rpm #下载Mysql 5.7 Yum源
[root@localhost ~]# ls mysql57-community-release-el7-11.noarch.rpm

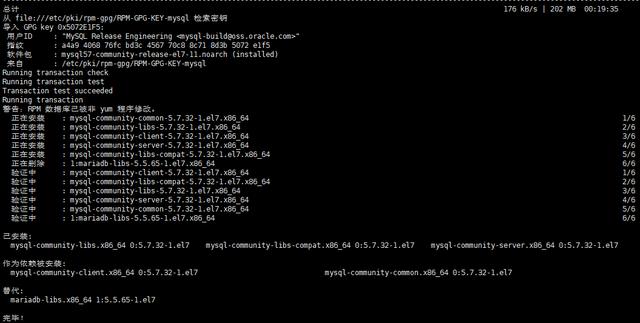
[root@localhost ~]# rpm -ivh mysql57-community-release-el7-11.noarch.rpm #安装Mysql Yum源

[root@localhost ~]# yum -y install mysql-server #安装mysql
[root@localhost ~]# systemctl start mysqld #启动Mysqld服务
[root@localhost ~]# systemctl enable mysqld #开机自启mysql
[root@localhost ~]# ss -antulp | grep :3306

[root@localhost ~]# grep 'root@localhost:' /var/log/mysqld.log #查看初始密码

2020-11-06T02:28:56.436322Z 1 [Note] A temporary password is generated for root@localhost: ON_Byhz0S6*9
红字部分为初始密码
[root@localhost ~]# mysql -h localhost -uroot -p'ON_Byhz0S6*9' #使用初始密码登陆
注意:-p和密码之间不能有空格。单引号必须要有
mysql: [Warning] Using a password on the command line interface can be insecure.
...
Server version: 5.7.29
...
mysql>
mysql> alter user root@"localhost" identified by "1qaz2wsx@JSGQ"; 修改登陆密码

如果提示
ERROR 1819 (HY000): Your password does not satisfy the current policy requirements
表示密码安全复杂度不够。要大小写加数字加字符
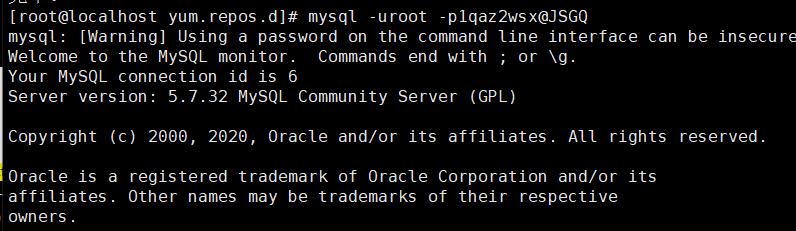
[root@localhost ~]# mysql -uroot -p1qaz2wsx@JSGQ //使用新密码登陆

注意:-p和密码之前是连一起的,不能有空格
3.安装Zabbix 5.0监控平台
安装Zabbix Yum源仓库
[root@localhost ~]# rpm -Uvh https://repo.zabbix.com/zabbix/5.0/rhel/7/x86_64/zabbix-release-5.0-1.el7.noarch.rpm
*****也可以使用国内清华大学的YUM安装源
[root@localhost ~]# rpm -Uvh https://mirrors.tuna.tsinghua.edu.cn/zabbix/zabbix/5.0/rhel/7/x86_64/zabbix-release-5.0-1.el7.noarch.rpm

[root@localhost ~]# yum clean all

安装Zabbix Server 与 Zabbix agent
[root@localhost ~]# yum -y install zabbix-server-mysql zabbix-agent

注意
1、安装报错
zabbix-server-mysql-5.0.5-1.el7.x86_64: [Errno 256] No more mirrors to try.

解决方案:
修改为清华大学的YUM源即可
[root@localhost ~]# vi /etc/yum.repos.d/zabbix.repo
配置文件如下
[zabbix]
name=Zabbix Official Repository - $basearch
#baseurl=http://repo.zabbix.com/zabbix/5.0/rhel/7/$basearch/
baseurl=https://mirror.tuna.tsinghua.edu.cn/zabbix/zabbix/5.0/rhel/7/$basearch/
enabled=1
gpgcheck=1
gpgkey=file:///etc/pki/rpm-gpg/RPM-GPG-KEY-ZABBIX-A14FE591
[zabbix-frontend]
name=Zabbix Official Repository frontend - $basearch
baseurl=https://mirror.tuna.tsinghua.edu.cn/zabbix/zabbix/5.0/rhel/7/$basearch/frontend
enabled=1
gpgcheck=1
gpgkey=file:///etc/pki/rpm-gpg/RPM-GPG-KEY-ZABBIX-A14FE591
[zabbix-debuginfo]
name=Zabbix Official Repository debuginfo - $basearch
#baseurl=http://repo.zabbix.com/zabbix/5.0/rhel/7/$basearch/debuginfo/
baseurl=https://mirror.tuna.tsinghua.edu.cn/zabbix/zabbix/5.0/rhel/7/$basearch/debuginfo/
enabled=0
gpgkey=file:///etc/pki/rpm-gpg/RPM-GPG-KEY-ZABBIX-A14FE591
gpgcheck=1
[zabbix-non-supported]
name=Zabbix Official Repository non-supported - $basearch
#baseurl=http://repo.zabbix.com/non-supported/rhel/7/$basearch/
baseurl=https://mirror.tuna.tsinghua.edu.cn/zabbix/non-supported/rhel/7/$basearch/
enabled=1
gpgkey=file:///etc/pki/rpm-gpg/RPM-GPG-KEY-ZABBIX
gpgcheck=1
2、
如果安装中报错:Delta RPMs disabled because /usr/bin/applydeltarpm not installed,则安装 deltarpm软件。
yum -y install deltarpm
安装Zabbix frontend
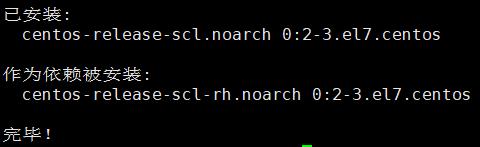
[root@localhost ~]# yum -y install centos-release-scl
[root@localhost ~]# vim /etc/yum.repos.d/zabbix.repo
...
[zabbix-frontend]
name=Zabbix Official Repository frontend - $basearch
baseurl=http://repo.zabbix.com/zabbix/5.0/rhel/7/$basearch/frontend
enabled=1 //将0修改为1
...
安装Zabbix前端包(注意本教程是用Nginx不是Apache)
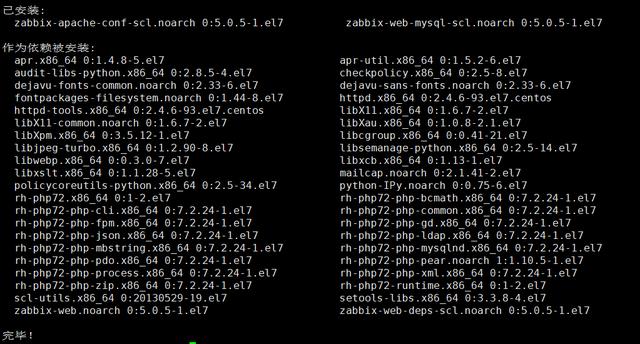
[root@localhost ~]# yum -y install zabbix-web-mysql-scl zabbix-nginx-conf-scl zabbix-apache-conf-scl
如果是Apache请使用以下命令
[root@localhost ~]# yum -y install zabbix-web-mysql-scl zabbix-apache-conf-scl
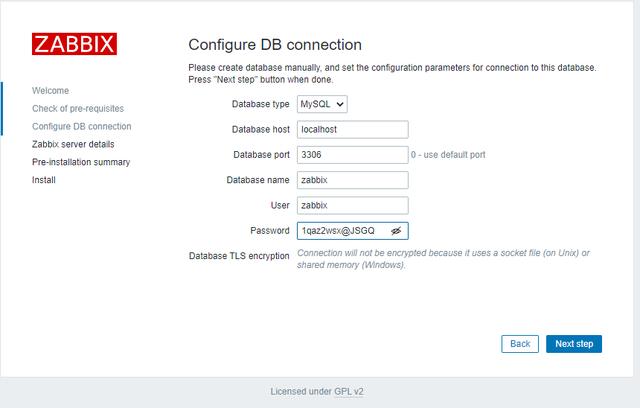
创建和初始化数据库
[root@localhost ~]# mysql -uroot -p1qaz2wsx@JSGQ
mysql> create database zabbix character set utf8 collate utf8_bin;

mysql> create user zabbix@localhost identified by '1qaz2wsx@JSGQ';

mysql> grant all privileges on zabbix.* to zabbix@localhost;

mysql> exit
导入Zabbix数据库结构和数据
[root@localhost ~]# zcat /usr/share/doc/zabbix-server-mysql*/create.sql.gz | mysql -uzabbix -p1qaz2wsx@JSGQ zabbix

其中-uzabbix是前面在数据库中创建的用户,-p1qaz2wsx@JSGQ是前面数据库中创建的用户的密码,后面的zabbix是前面创建的数据库。
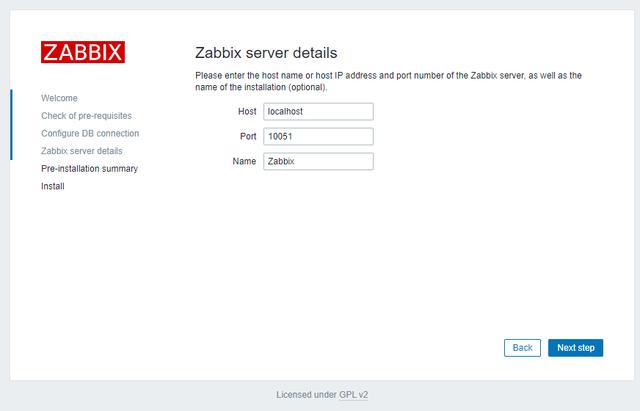
4.配置Zabbix server
[root@localhost ~]# vim /etc/opt/rh/rh-nginx116/nginx/conf.d/zabbix.conf
server {
# listen 80;
# server_name example.com;
取消以上两行注释修改后为以下:
server {
listen 80;
server_name example.com;
...
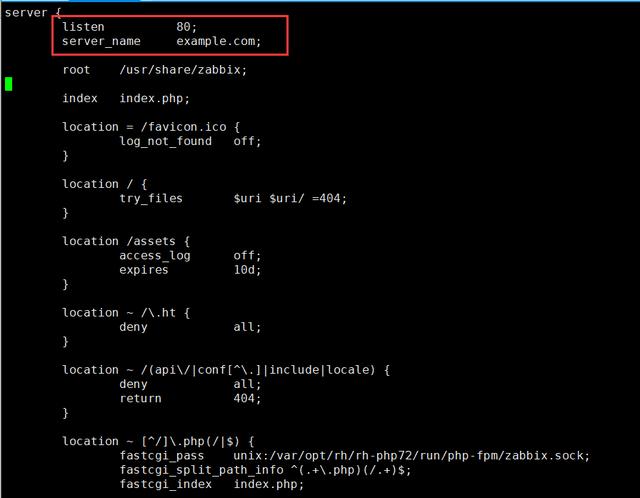
[root@localhost ~]# cat /etc/opt/rh/rh-nginx116/nginx/conf.d/zabbix.conf
server {
listen 80;
server_name example.com;
root /usr/share/zabbix;
index index.php;
location = /favicon.ico {
log_not_found off;
}
location / {
try_files $uri $uri/ =404;
}
location /assets {
access_log off;
expires 10d;
}
location ~ /.ht {
deny all;
}
location ~ /(api/|conf[^.]|include|locale) {
deny all;
return 404;
}
location ~ [^/].php(/|$) {
fastcgi_pass unix:/var/opt/rh/rh-php72/run/php-fpm/zabbix.sock;
fastcgi_split_path_info ^(.+.php)(/.+)$;
fastcgi_index index.php;
fastcgi_param DOCUMENT_ROOT /usr/share/zabbix;
fastcgi_param SCRIPT_FILENAME /usr/share/zabbix$fastcgi_script_name;
fastcgi_param PATH_TRANSLATED /usr/share/zabbix$fastcgi_script_name;
include fastcgi_params;
fastcgi_param QUERY_STRING $query_string;
fastcgi_param REQUEST_METHOD $request_method;
fastcgi_param CONTENT_TYPE $content_type;
fastcgi_param CONTENT_LENGTH $content_length;
fastcgi_intercept_errors on;
fastcgi_ignore_client_abort off;
fastcgi_connect_timeout 60;
fastcgi_send_timeout 180;
fastcgi_read_timeout 180;
fastcgi_buffer_size 128k;
fastcgi_buffers 4 256k;
fastcgi_busy_buffers_size 256k;
fastcgi_temp_file_write_size 256k;
}
}
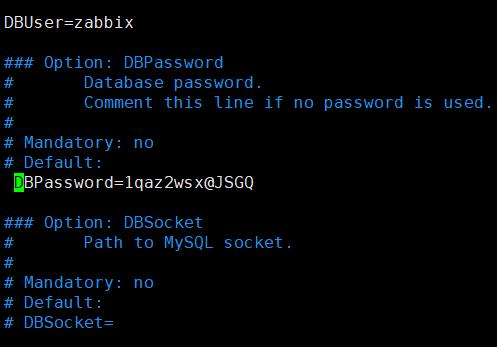
[root@localhost ~]# vim /etc/zabbix/zabbix_server.conf
...
116 DBUser=zabbix //用户名要与数据库中创建的供zabbix访问的用户名一致
...
124 DBPassword=1qaz2wsx@JSGQ //去掉注释,添加创建的zabbix用户的数据库密码
为Zabbix前端配置PHP
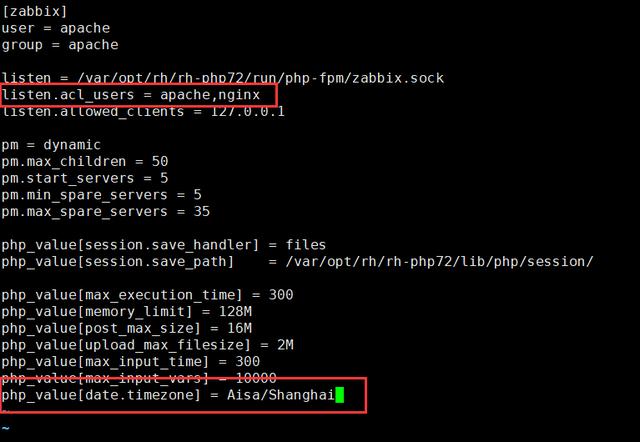
[root@localhost ~]# vim /etc/opt/rh/rh-php72/php-fpm.d/zabbix.conf
[zabbix]
user = apache
group = apache
listen = /var/opt/rh/rh-php72/run/php-fpm/zabbix.sock
listen.acl_users = apache,nginx //添加一个nginx
listen.allowed_clients = 127.0.0.1
pm = dynamic
pm.max_children = 50
pm.start_servers = 5
pm.min_spare_servers = 5
pm.max_spare_servers = 35
php_value[session.save_handler] = files
php_value[session.save_path] = /var/opt/rh/rh-php72/lib/php/session/
php_value[max_execution_time] = 300
php_value[memory_limit] = 128M
php_value[post_max_size] = 16M
php_value[upload_max_filesize] = 2M
php_value[max_input_time] = 300
php_value[max_input_vars] = 10000
; php_value[date.timezone] = Europe/Riga
--》取消注释将Europe/Riga时区修改为以下:
php_value[date.timezone] = Asia/Shanghai
6.开启服务
[root@localhost ~]# systemctl restart zabbix-server zabbix-agent httpd rh-php72-php-fpm
[root@localhost ~]# systemctl enable zabbix-server zabbix-agent httpd rh-php72-php-fpm
[root@localhost ~]# ss -antulp | grep :80
tcp LISTEN 0 128 :::80 :::* users:(("httpd",pid=5619,fd=4),("httpd",pid=5618,fd=4),("httpd",pid=5617,fd=4),("httpd",pid=5616,fd=4),("httpd",pid=5614,fd=4),("httpd",pid=5585,fd=4))

[root@localhost ~]# ps -aux | grep zabbix
......
apache 5677 0.0 0.3 336672 7316 ? S 16:36 0:00 php-fpm: pool zabbix
root 5809 0.0 0.0 112736 976 pts/0 S+ 16:47 0:00 grep --color=auto zabbix
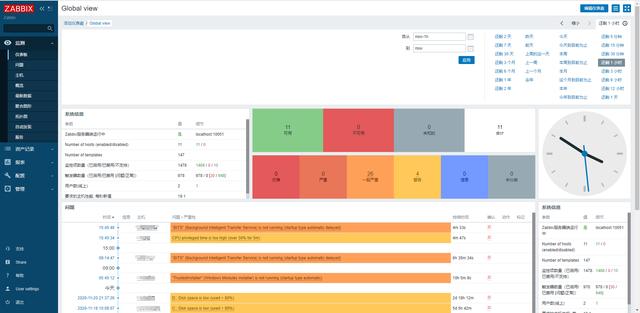
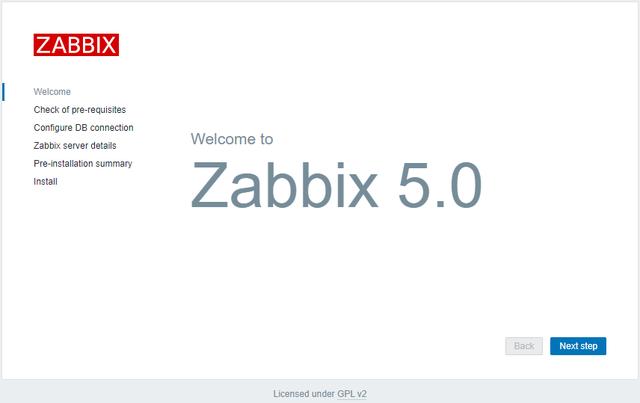
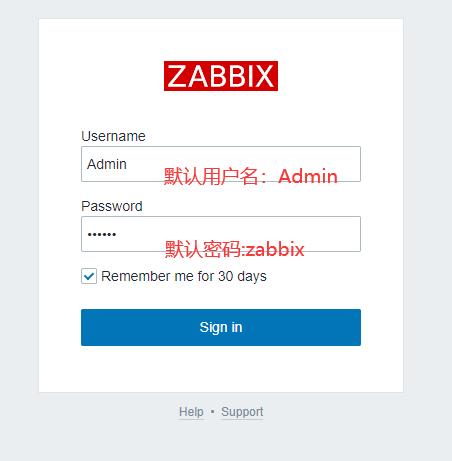
7.访问客户端并安装
在IE中打开

错误:时区不对
DateTime::__construct(): Invalid date.timezone value 'Aisa/Shanghai', we selected the timezone 'UTC' for now.

vim /etc/opt/rh/rh-php72/php-fpm.d/zabbix.conf
修改为
php_value[date.timezone] = Asia/Shanghai
注意拼写
第一次写成了Aisa/Shanghai
导致出错
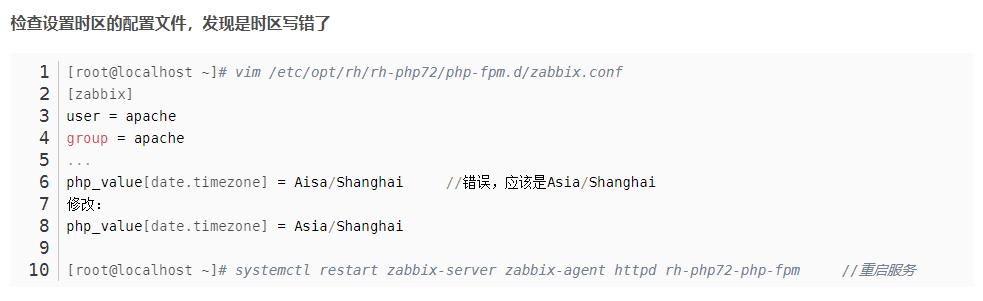
错误:时区错误
如下图
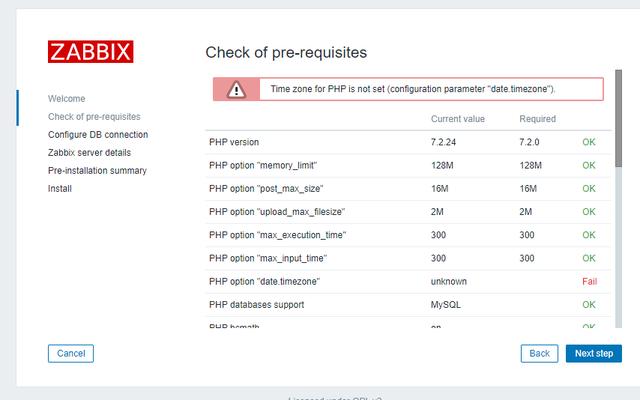
主要原因也是没有配置时区


 832
832


 被折叠的 条评论
为什么被折叠?
被折叠的 条评论
为什么被折叠?
 到【灌水乐园】发言


